# authing-wxapp-sdk
**Repository Path**: Authi_ng/authing-wxapp-sdk
## Basic Information
- **Project Name**: authing-wxapp-sdk
- **Description**: Authing SDK for 微信小程序(wxapp)
- **Primary Language**: Unknown
- **License**: Not specified
- **Default Branch**: master
- **Homepage**: None
- **GVP Project**: No
## Statistics
- **Stars**: 14
- **Forks**: 0
- **Created**: 2019-08-07
- **Last Updated**: 2025-08-21
## Categories & Tags
**Categories**: weixin-lapp
**Tags**: None
## README
# SDK for 微信小程序
> GitHub 源码地址:[https://github.com/authing/authing-wxapp-sdk](https://github.com/authing/authing-wxapp-sdk)
Authing 小程序 SDK (`authing-wxapp-sdk`) 适用于在微信小程序环境下使用,以 [authing-js-sdk](https://github.com/authing/authing.js) 为基础,对微信小程序环境做了适配。你可以使用 `authing-js-sdk` [AuthenticationClient](https://docs.authing.cn/v2/reference/sdk-for-node/authentication/AuthenticationClient.html) 中的所有方法,如获取、修改用户资料,添加用户自定义字段等。同时专门在小程序环境下使用的 **通过微信授权获取用户手机号**、 **使用微信授权登录**、**使用微信授权的手机号登录** 等方法。
## 在 Authing 中配置小程序登录
为了在小程序中使用 Authing 小程序 SDK,你需要先在[微信开放平台](https://mp.weixin.qq.com/)申请一个小程序,同时在 [Authing 控制台](https://console.authing.cn/console/userpool)内填入该小程序的配置。
配置小程序登录
1. 前先前往[微信开放平台](https://mp.weixin.qq.com/)注册一个微信小程序开发账号
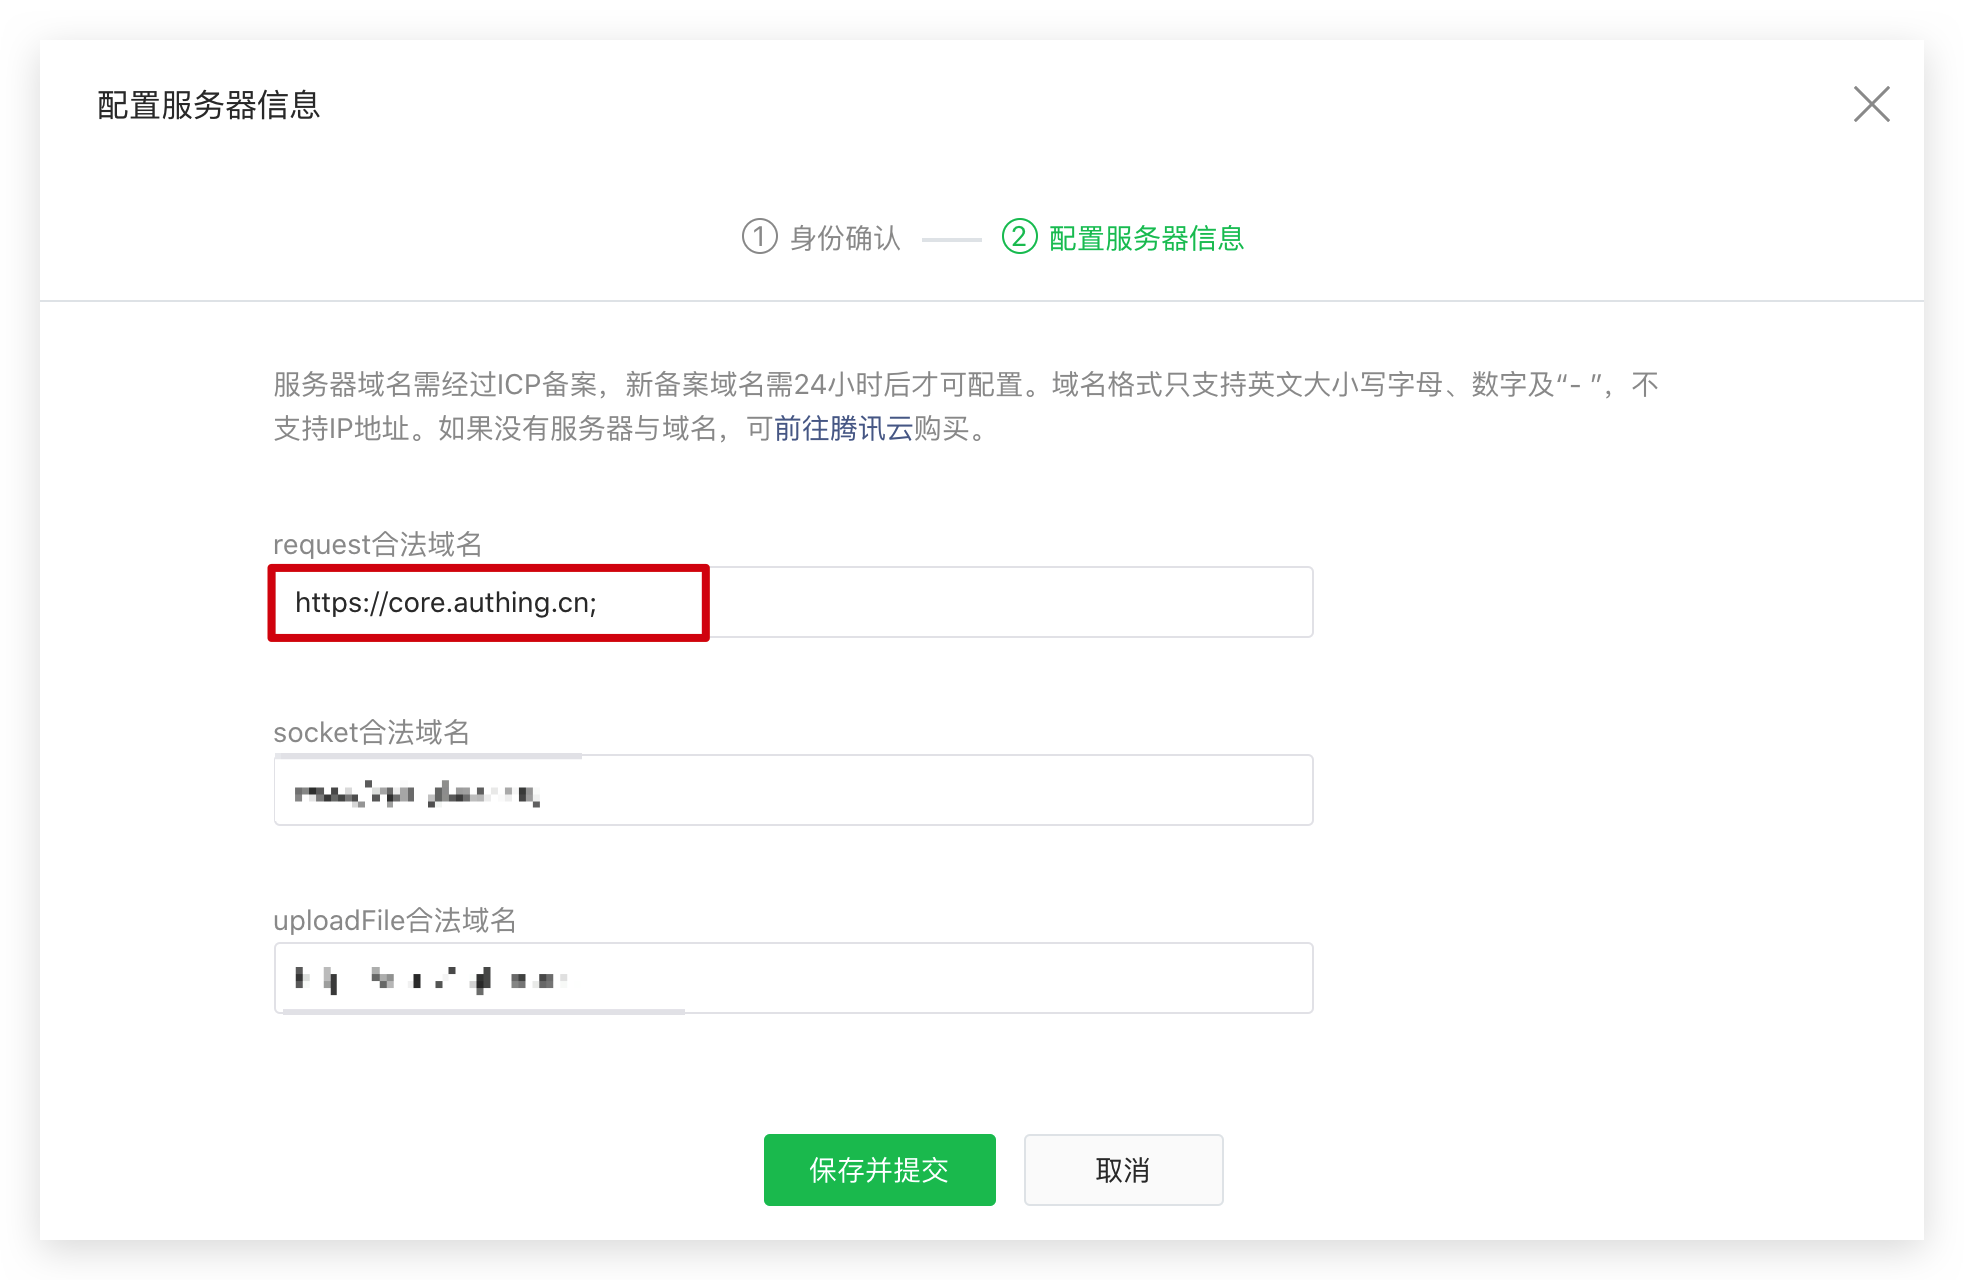
- **如果你需要获取用户手机号,需要通过微信认证。**
- 将 `core.authing.cn` 加入微信的 **request 合法域名**:
2. 在 [Authing 控制台](https://console.authing.cn/console/userpool)开启微信小程序社会化登录。
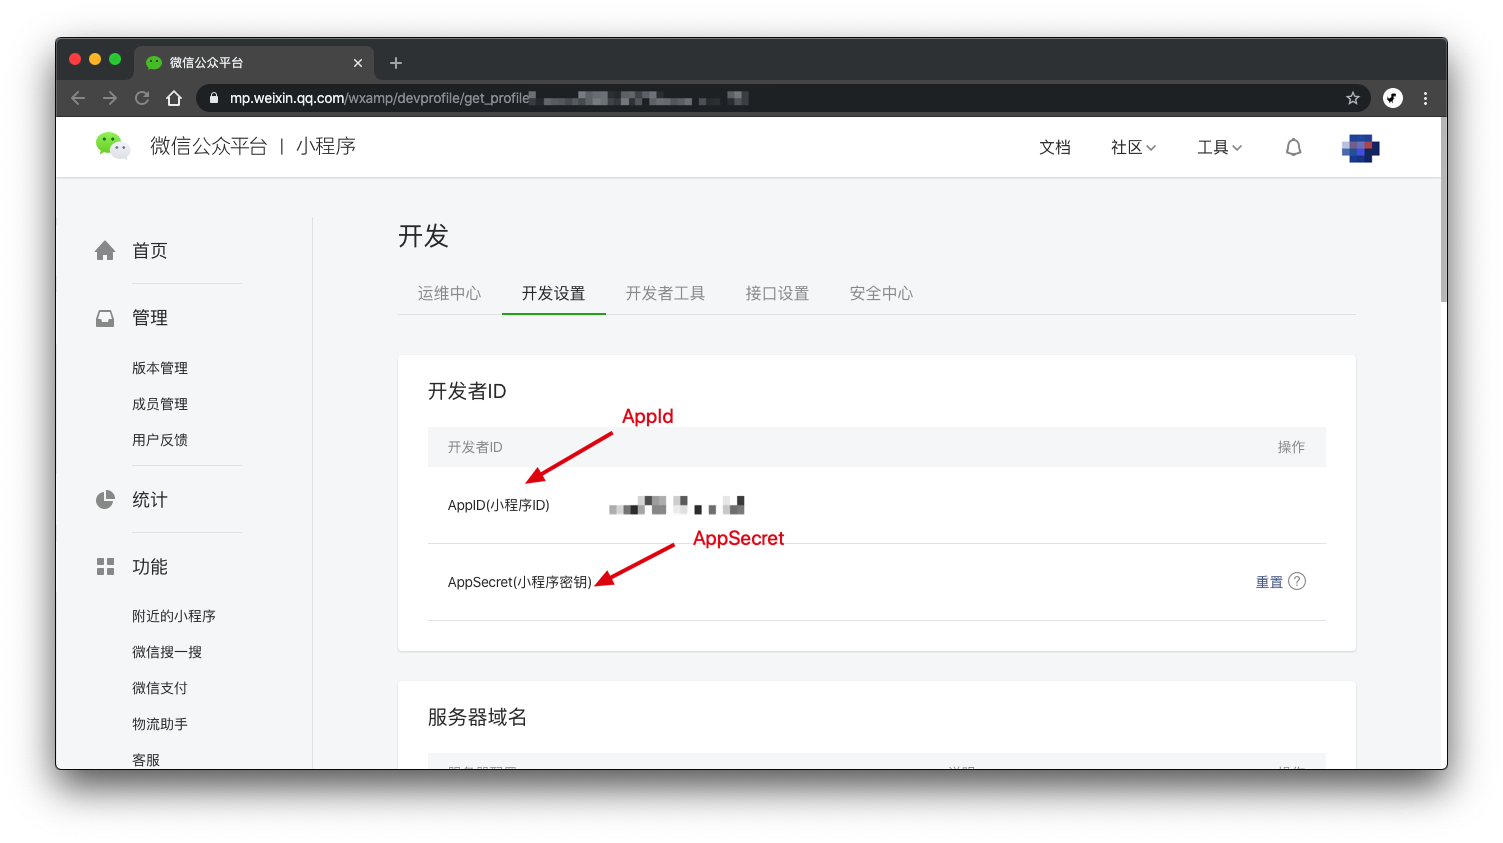
- 获取微信小程序 AppId 和 AppSecret
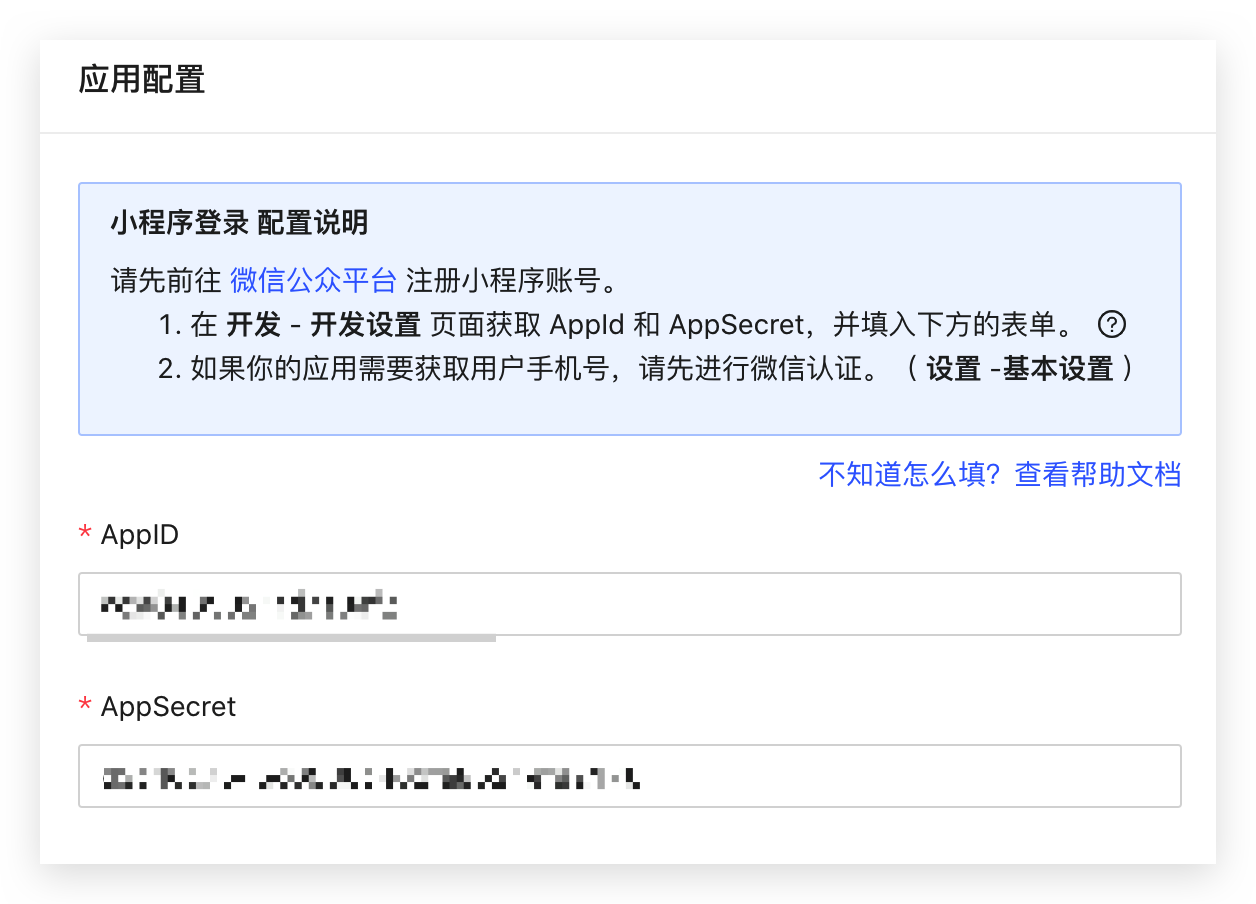
- 前往 [Authing 控制台](https://console.authing.cn/console/userpool) **连接身份源** - **社会化登录** - **小程序内登录**:

- 填入小程序 AppId 和 AppSecret,点击保存即可。
## 安装
从小程序基础库版本 2.2.1 或以上、及开发者工具 1.02.1808300 或以上开始,小程序支持使用 npm 安装第三方包,详情请见: [npm 支持 | 微信开放文档](https://developers.weixin.qq.com/miniprogram/dev/devtools/npm.html) 。
### 安装 npm 包
使用 npm:
```
npm install authing-wxapp-sdk
```
使用 yarn:
```
yarn add authing-wxapp-sdk
```
### 在小程序开发者工具中构建 npm
点击开发者工具中的菜单栏:工具 --> 构建 npm:
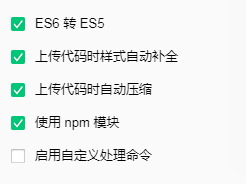
 勾选 **使用 npm 模块** 选项:
## 初始化
`AuthenticationClient` 初始化需要传入`AppId` (应用 ID):
> 你可以在控制台的 **应用** 中查看自己的应用列表。
```js
const { AuthenticationClient } = require("authing-wxapp-sdk");
const authing = new AuthenticationClient({
appId: "YOUR_APP_ID",
});
```
完整参数列表如下:
- `appId`: Authing 应用 ID(必填);
- `accessToken`: 通过用户的 token 初始化 SDK(可选,你可以在前端 localStorage 中缓存用户 token,实现记住登录的目的) 。
- `timeout`: 请求超时时间,单位为毫秒,默认为 10000 (10 秒)。
- `onError`: 错误处理函数,你可以用其来全局捕捉 Authing 客户端请求的所有异常。函数定义为:
```js
(code: number, message: string, data: any) => void
```
> 完整的错误代码请见[此文档](https://docs.authing.cn/v2/reference/error-code.html)。
- `host`: Authing 服务器地址。如果你使用的是公有云版本,请忽略请参数。如果你使用的是私有化部署的版本,此参数必填。格式如下: `https://authing-api.mydomain.com`,最后不带 `/`。
## 使用方法
在用户完成登录之后,SDK 会将用户的 `token` 写入到微信的 Storage 中,后续请求会自动携带 `token` 访问。

```js
const { code } = await wx.login();
// 无需用户授权
const user = await authing.loginByCode(code); // 成功登录,将 token 写入微信 Storage
// 登录之后可以进行此操作
await authing.updateProfile((nickname: "Bob"));
```
后续用户再次打开小程序,如果小程序的 Storage 中保存有用户的 token,访问 authing 的请求将会自动带上该 token。
```javascript
// 该请求可以成功,因为该用户出于登录状态。
await authing.updateProfile((nickname: "Mick"));
```
## API Reference
> 你可以使用 `authing-js-sdk` [AuthenticationClient](https://docs.authing.cn/v2/reference/sdk-for-node/) 中的所有方法,调用方法和 `authing-js-sdk` 完全一致。
### loginByCode
> 使用微信授权的方式登录。
- 如果用户第一次在小程序中登录,且用户没有使用和该小程序绑定同一主体的微信应用登录过,将会创建一个新账号。
- 如果用户第一次在小程序中登录,但是该用户使用和该小程序绑定同一主体的微信应用登录过,将会返回对应的微信账号。
#### 参数
- `code`: 调用 [wx.login()](https://developers.weixin.qq.com/miniprogram/dev/api/open-api/login/wx.login.html) 获取的 `code`,不需要用户授权。必填。
- `options`: 选填。
- `options.iv`: `open-type` 为 `getUserInfo` 的[微信 Button 组件](https://developers.weixin.qq.com/miniprogram/dev/component/button.html) 点击事件返回的 `iv`。`iv` 和 `encryptedData` 必须同时传递,Authing Server 会尝试从 `iv` 和 `encryptedData` 中加密出用户资料。第一次需要用户手动授权。选填。
- `options.encryptedData`: `open-type` 为 `getUserInfo` 的[微信 Button 组件](https://developers.weixin.qq.com/miniprogram/dev/component/button.html) 点击事件返回的 `encryptedData`。`iv` 和 `encryptedData` 必须同时传递,Authing Server 会尝试从 `iv` 和 `encryptedData` 中加密出用户资料。第一次需要用户手动授权。选填。
- `options.rawData`: `open-type` 为 `getUserInfo` 的[微信 Button 组件](https://developers.weixin.qq.com/miniprogram/dev/component/button.html) 点击事件返回的 `rawData`。和 `iv` + `encryptedData` 二选一,如果传了 `rawData`, Authing Server 会直接使用该数据作为用户的 profile。第一次需要用户手动授权。选填。
#### 示例
1. 静默授权
首次注册的用户的 profile 中的 nickname, avatar 将为空,因为没有获取到用户的头像和昵称。
```javascript
const { code } = await wx.login();
const data = await authing.loginByCode(code);
```
2. 用户手动授权获取昵称头像
> 仅第一次需要授权,用户授权之后可以使用 `wx.getUserInfo` 直接获取头像昵称。
- 第一次请求用户手动授权
```html
```
```javascript
getUserInfo: async function (e) {
const { code } = await wx.login()
const { rawData } = e.detail
const user = await authing.loginByCode(code, { rawData })
// 或者传 iv encryptedData
// const { iv, encryptedData } = e.detail
// const user = await authing.loginByCode(code, { iv, encryptedData })
console.log(user)
}
```
- 之后可以通过 `wx.getUserInfo` 自动获取
```javascript
const { rawData } = await wx.getUserInfo();
const user = await authing.loginByCode(code, { rawData });
// 或者传 iv encryptedData
// const { iv, encryptedData } = e.detail
// const user = await authing.loginByCode(code, { iv, encryptedData })
```
### loginByPhone
> 通过微信手机号授权的方式登录。每次调用都需要用户手动授权。
- 如果该手机号第一次注册,该会把该手机号与该微信账号绑定(不存在会创建)。
- 如果该手机号之前注册过,将会返回该手机号对应的账号,并且将该手机号与当前微信账号绑定。
#### 参数
- `code`: 调用 [wx.login()](https://developers.weixin.qq.com/miniprogram/dev/api/open-api/login/wx.login.html) 获取的 `code`,不需要用户授权。必填。
- `iv`: `open-type` 为 `getPhoneNumber` 的[微信 Button 组件](https://developers.weixin.qq.com/miniprogram/dev/component/button.html) 点击事件返回的 `iv`。必填.
- `encryptedData`: `open-type` 为 `getPhoneNumber` 的[微信 Button 组件](https://developers.weixin.qq.com/miniprogram/dev/component/button.html) 点击事件返回的 `encryptedData`。必填.
#### 示例
```html
```
```javascript
getPhone: async function(e) {
const { code } = await wx.login()
const { iv, encryptedData } = e.detail
const data = await authing.loginByPhone(code, iv, encryptedData)
console.log(data)
}
```
### getPhone
> 获取当前用户的手机号(不会使用该手机号注册或绑定账号)
#### 参数
- `code`: 调用 [wx.login()](https://developers.weixin.qq.com/miniprogram/dev/api/open-api/login/wx.login.html) 获取的 `code`,不需要用户授权。必填。
- `iv`: `open-type` 为 `getPhoneNumber` 的[微信 Button 组件](https://developers.weixin.qq.com/miniprogram/dev/component/button.html) 点击事件返回的 `iv`。必填.
- `encryptedData`: `open-type` 为 `getPhoneNumber` 的[微信 Button 组件](https://developers.weixin.qq.com/miniprogram/dev/component/button.html) 点击事件返回的 `encryptedData`。必填.
#### 示例
```html
```
```javascript
getPhone: async function(e) {
const { code } = await wx.login()
const { iv, encryptedData } = e.detail
const data = await authing.getPhone(code, iv, encryptedData)
console.log(data)
}
```
返回的数据示例:
```json
{
"countryCode": "86",
"phoneNumber": "176xxxx6754",
"purePhoneNumber": "176xxxx6754",
"openid": "o1p9H4wAgb9uTqpxG5Z1g0pIr3FE",
"unionid": "o0pqE6Fbr5M-exSu_PeL_sjwN44U"
}
```
### updateAvatar
> 更新用户头像,该方法会自动调用 `wx.chooseImage` 获取图片并上传到 Authing 的 cdn,仅需一行代码调用。
#### 示例
```javascript
const { photo } = await authing.updateAvatar();
console.log(photo);
```
## 最佳实践
我们推荐用户第一次使用小程序的时候,使用 `loginByCode` 获取该小程序账号对应的 Authing 账号,如果该账号之前绑定了手机号,就无须再次请求用户授权手机号。如果该账号没有绑定手机号,再调用 `loginByPhone` 方法请求用户授权手机号。
用户登录之后,`authing-wxapp-sdk` 会将 `token` 写入小程序的 `Storage`,你可以调用 `authing.checkLoginStatus()` 判断该用户的 token 是否有效,当 token 失效的时候再重新登录。
## 错误处理
你可以使用 `try catch` 进行错误处理:
```js
try {
const user = await authing.loginByEmail("test@example.com", "passw0rd");
} catch (error) {
console.log(error.code); // 2004
console.log(error.message); // 用户不存在
}
```
> 完整的错误代码请见[此文档](https://docs.authing.cn/v2/reference/error-code.html)。
你还可以指定 `onError` 统一捕捉所有 Authing 请求异常,如使用 `wx.showModal` 等微信组件显示错误提示。
```js
const authing = new AuthenticationClient({
userPoolId,
onError: (code, message) => {
wx.showModal({
content: message,
showCancel: false,
});
},
});
```
## 获取帮助
Join us on Gitter: [#authing-chat](https://gitter.im/authing-chat/community)
勾选 **使用 npm 模块** 选项:

## 初始化
`AuthenticationClient` 初始化需要传入`AppId` (应用 ID):
> 你可以在控制台的 **应用** 中查看自己的应用列表。
```js
const { AuthenticationClient } = require("authing-wxapp-sdk");
const authing = new AuthenticationClient({
appId: "YOUR_APP_ID",
});
```
完整参数列表如下:
- `appId`: Authing 应用 ID(必填);
- `accessToken`: 通过用户的 token 初始化 SDK(可选,你可以在前端 localStorage 中缓存用户 token,实现记住登录的目的) 。
- `timeout`: 请求超时时间,单位为毫秒,默认为 10000 (10 秒)。
- `onError`: 错误处理函数,你可以用其来全局捕捉 Authing 客户端请求的所有异常。函数定义为:
```js
(code: number, message: string, data: any) => void
```
> 完整的错误代码请见[此文档](https://docs.authing.cn/v2/reference/error-code.html)。
- `host`: Authing 服务器地址。如果你使用的是公有云版本,请忽略请参数。如果你使用的是私有化部署的版本,此参数必填。格式如下: `https://authing-api.mydomain.com`,最后不带 `/`。
## 使用方法
在用户完成登录之后,SDK 会将用户的 `token` 写入到微信的 Storage 中,后续请求会自动携带 `token` 访问。

```js
const { code } = await wx.login();
// 无需用户授权
const user = await authing.loginByCode(code); // 成功登录,将 token 写入微信 Storage
// 登录之后可以进行此操作
await authing.updateProfile((nickname: "Bob"));
```
后续用户再次打开小程序,如果小程序的 Storage 中保存有用户的 token,访问 authing 的请求将会自动带上该 token。
```javascript
// 该请求可以成功,因为该用户出于登录状态。
await authing.updateProfile((nickname: "Mick"));
```
## API Reference
> 你可以使用 `authing-js-sdk` [AuthenticationClient](https://docs.authing.cn/v2/reference/sdk-for-node/) 中的所有方法,调用方法和 `authing-js-sdk` 完全一致。
### loginByCode
> 使用微信授权的方式登录。
- 如果用户第一次在小程序中登录,且用户没有使用和该小程序绑定同一主体的微信应用登录过,将会创建一个新账号。
- 如果用户第一次在小程序中登录,但是该用户使用和该小程序绑定同一主体的微信应用登录过,将会返回对应的微信账号。
#### 参数
- `code`: 调用 [wx.login()](https://developers.weixin.qq.com/miniprogram/dev/api/open-api/login/wx.login.html) 获取的 `code`,不需要用户授权。必填。
- `options`: 选填。
- `options.iv`: `open-type` 为 `getUserInfo` 的[微信 Button 组件](https://developers.weixin.qq.com/miniprogram/dev/component/button.html) 点击事件返回的 `iv`。`iv` 和 `encryptedData` 必须同时传递,Authing Server 会尝试从 `iv` 和 `encryptedData` 中加密出用户资料。第一次需要用户手动授权。选填。
- `options.encryptedData`: `open-type` 为 `getUserInfo` 的[微信 Button 组件](https://developers.weixin.qq.com/miniprogram/dev/component/button.html) 点击事件返回的 `encryptedData`。`iv` 和 `encryptedData` 必须同时传递,Authing Server 会尝试从 `iv` 和 `encryptedData` 中加密出用户资料。第一次需要用户手动授权。选填。
- `options.rawData`: `open-type` 为 `getUserInfo` 的[微信 Button 组件](https://developers.weixin.qq.com/miniprogram/dev/component/button.html) 点击事件返回的 `rawData`。和 `iv` + `encryptedData` 二选一,如果传了 `rawData`, Authing Server 会直接使用该数据作为用户的 profile。第一次需要用户手动授权。选填。
#### 示例
1. 静默授权
首次注册的用户的 profile 中的 nickname, avatar 将为空,因为没有获取到用户的头像和昵称。
```javascript
const { code } = await wx.login();
const data = await authing.loginByCode(code);
```
2. 用户手动授权获取昵称头像
> 仅第一次需要授权,用户授权之后可以使用 `wx.getUserInfo` 直接获取头像昵称。
- 第一次请求用户手动授权
```html
```
```javascript
getUserInfo: async function (e) {
const { code } = await wx.login()
const { rawData } = e.detail
const user = await authing.loginByCode(code, { rawData })
// 或者传 iv encryptedData
// const { iv, encryptedData } = e.detail
// const user = await authing.loginByCode(code, { iv, encryptedData })
console.log(user)
}
```
- 之后可以通过 `wx.getUserInfo` 自动获取
```javascript
const { rawData } = await wx.getUserInfo();
const user = await authing.loginByCode(code, { rawData });
// 或者传 iv encryptedData
// const { iv, encryptedData } = e.detail
// const user = await authing.loginByCode(code, { iv, encryptedData })
```
### loginByPhone
> 通过微信手机号授权的方式登录。每次调用都需要用户手动授权。
- 如果该手机号第一次注册,该会把该手机号与该微信账号绑定(不存在会创建)。
- 如果该手机号之前注册过,将会返回该手机号对应的账号,并且将该手机号与当前微信账号绑定。
#### 参数
- `code`: 调用 [wx.login()](https://developers.weixin.qq.com/miniprogram/dev/api/open-api/login/wx.login.html) 获取的 `code`,不需要用户授权。必填。
- `iv`: `open-type` 为 `getPhoneNumber` 的[微信 Button 组件](https://developers.weixin.qq.com/miniprogram/dev/component/button.html) 点击事件返回的 `iv`。必填.
- `encryptedData`: `open-type` 为 `getPhoneNumber` 的[微信 Button 组件](https://developers.weixin.qq.com/miniprogram/dev/component/button.html) 点击事件返回的 `encryptedData`。必填.
#### 示例
```html
```
```javascript
getPhone: async function(e) {
const { code } = await wx.login()
const { iv, encryptedData } = e.detail
const data = await authing.loginByPhone(code, iv, encryptedData)
console.log(data)
}
```
### getPhone
> 获取当前用户的手机号(不会使用该手机号注册或绑定账号)
#### 参数
- `code`: 调用 [wx.login()](https://developers.weixin.qq.com/miniprogram/dev/api/open-api/login/wx.login.html) 获取的 `code`,不需要用户授权。必填。
- `iv`: `open-type` 为 `getPhoneNumber` 的[微信 Button 组件](https://developers.weixin.qq.com/miniprogram/dev/component/button.html) 点击事件返回的 `iv`。必填.
- `encryptedData`: `open-type` 为 `getPhoneNumber` 的[微信 Button 组件](https://developers.weixin.qq.com/miniprogram/dev/component/button.html) 点击事件返回的 `encryptedData`。必填.
#### 示例
```html
```
```javascript
getPhone: async function(e) {
const { code } = await wx.login()
const { iv, encryptedData } = e.detail
const data = await authing.getPhone(code, iv, encryptedData)
console.log(data)
}
```
返回的数据示例:
```json
{
"countryCode": "86",
"phoneNumber": "176xxxx6754",
"purePhoneNumber": "176xxxx6754",
"openid": "o1p9H4wAgb9uTqpxG5Z1g0pIr3FE",
"unionid": "o0pqE6Fbr5M-exSu_PeL_sjwN44U"
}
```
### updateAvatar
> 更新用户头像,该方法会自动调用 `wx.chooseImage` 获取图片并上传到 Authing 的 cdn,仅需一行代码调用。
#### 示例
```javascript
const { photo } = await authing.updateAvatar();
console.log(photo);
```
## 最佳实践
我们推荐用户第一次使用小程序的时候,使用 `loginByCode` 获取该小程序账号对应的 Authing 账号,如果该账号之前绑定了手机号,就无须再次请求用户授权手机号。如果该账号没有绑定手机号,再调用 `loginByPhone` 方法请求用户授权手机号。
用户登录之后,`authing-wxapp-sdk` 会将 `token` 写入小程序的 `Storage`,你可以调用 `authing.checkLoginStatus()` 判断该用户的 token 是否有效,当 token 失效的时候再重新登录。
## 错误处理
你可以使用 `try catch` 进行错误处理:
```js
try {
const user = await authing.loginByEmail("test@example.com", "passw0rd");
} catch (error) {
console.log(error.code); // 2004
console.log(error.message); // 用户不存在
}
```
> 完整的错误代码请见[此文档](https://docs.authing.cn/v2/reference/error-code.html)。
你还可以指定 `onError` 统一捕捉所有 Authing 请求异常,如使用 `wx.showModal` 等微信组件显示错误提示。
```js
const authing = new AuthenticationClient({
userPoolId,
onError: (code, message) => {
wx.showModal({
content: message,
showCancel: false,
});
},
});
```
## 获取帮助
Join us on Gitter: [#authing-chat](https://gitter.im/authing-chat/community)