# Tensorflow-Tutorial
**Repository Path**: RunAtWorld/Tensorflow-Tutorial
## Basic Information
- **Project Name**: Tensorflow-Tutorial
- **Description**: No description available
- **Primary Language**: Unknown
- **License**: Not specified
- **Default Branch**: master
- **Homepage**: None
- **GVP Project**: No
## Statistics
- **Stars**: 0
- **Forks**: 0
- **Created**: 2020-02-07
- **Last Updated**: 2020-12-19
## Categories & Tags
**Categories**: Uncategorized
**Tags**: None
## README
# Tensorflow-Tutorial
2018-04 更新说明
时间过去一年,TensorFlow 已经从 1.0 版本更新到了 1.8 版本,而且最近更新的非常频繁。最烦的就是每次更新很多 API 都改了,一些老版本的代码就跑不通了。因为本项目关注的人越来越多了,所以自己也感觉到非常有必要更新并更正一些之前的错误,否则误人子弟就不好了。这里不少内容可以直接在官方的教程中找到,官方文档也在不断完善中,我也是把里边的例子跑一下,加深理解而已,更多的还是要自己在具体任务中去搭模型,训模型才能很好地掌握。
这一次更新主要内容如下:
- 使用较新版本的 tfmaster
- 所有的代码改成 python3.5
- 重新整理了基础用例
- 添加实战例子
因为工作和学习比较忙,所以这些内容也没办法一下子完成。和之前的版本不同,之前我是作为一个入门菜鸟一遍学一边做笔记。虽然现在依然还是理解得不够,但是比之前掌握的知识应该多了不少,希望能够整理成一个更好的教程。
之前的代码我放在了另外一个分支上: https://github.com/yongyehuang/Tensorflow-Tutorial/tree/1.2.1
如果有什么问题或者建议,欢迎开issue或者邮件与我联系:yongye@bupt.edu.cn
## 运行环境
- python 3.5
- tensorflow master (gpu version)
## 文件结构
```
|- Tensorflow-Tutorial
| |- example-notebook # 入门教程 notebook 版
| |- example-python # 入门教程 .py 版
| |- utils # 一些工具函数(logging, tf.flags)
| |- models # 一些实战的例子(BN, GAN, 序列标注,seq2seq 等,持续更新)
| |- data # 数据
| |- doc # 相关文档
```
## 1.入门例子
#### T_01.TensorFlow 的基本用法
- [notebook](https://github.com/yongyehuang/Tensorflow-Tutorial/blob/master/example-notebook/Tutorial_01%20Basic%20Usage.ipynb)
介绍 TensorFlow 的变量、常量和基本操作,最后介绍了一个非常简单的回归拟合例子。
#### T_02.实现一个两层的全连接网络对 MNIST 进行分类
- [notebook](https://github.com/yongyehuang/Tensorflow-Tutorial/blob/master/example-notebook/Tutorial_02%20A%20simple%20feedforward%20network%20for%20MNIST.ipynb)
#### T_03.TensorFlow 变量命名管理机制
- [notebook1](https://github.com/yongyehuang/Tensorflow-Tutorial/blob/master/example-notebook/Tutorial_03_1%20The%20usage%20of%20%20name_scope%20and%20variable_scope.ipynb)
介绍 tf.Variable() 和 tf.get_variable() 创建变量的区别;介绍如何使用 tf.name_scope() 和 tf.variable_scope() 管理命名空间。
- [notebook2](https://github.com/yongyehuang/Tensorflow-Tutorial/blob/master/example-notebook/Tutorial_03_2%20The%20usage%20of%20%20Collection.ipynb)
除了使用变量命名来管理变量之外,还经常用到 collection 的方式来聚合一些变量或者操作。
#### T_04.实现一个两层的卷积神经网络(CNN)对 MNIST 进行分类
- [notebook1-使用原生API构建CNN](https://github.com/yongyehuang/Tensorflow-Tutorial/blob/master/example-notebook/Tutorial_04_1%20Convolutional%20network%20for%20MNIST(1).ipynb)
构建一个非常简单的 CNN 网络,同时输出中间各个核的可视化来理解 CNN 的原理。
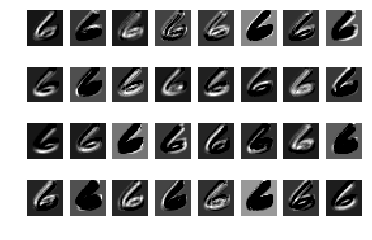 第一层卷积核可视化
- [notebook2-自定义函数构建CNN](https://github.com/yongyehuang/Tensorflow-Tutorial/blob/master/example-notebook/Tutorial_04_2%20Convolutional%20network%20for%20MNIST(2).ipynb)
- [notebook3-使用tf.layers高级API构建CNN](https://github.com/yongyehuang/Tensorflow-Tutorial/blob/master/example-notebook/Tutorial_04_3%20Convolutional%20network%20for%20MNIST(3).ipynb)
- [code-加入 BN 层的 CNN](https://github.com/yongyehuang/Tensorflow-Tutorial/tree/master/utils_and_models/m01_batch_normalization)
在上一个例子的基础上,加入 BN 层。在 CNN 中,使用 BN 层可以加速收敛速度,同时也能够减小初始化方式的影响。在使用 BN 层的时候要注意训练时用的是 mini-batch 的均值方差,测试时用的是指数平均的均值方差。所以在训练的过程中,一定要记得更新并保存均值方差。
在这个小网络中:迭代 10000 步,batch_size=100,大概耗时 45s;添加了 BN 层之后,迭代同样的次数,大概耗时 90s.
#### T_05.实现多层的 LSTM 和 GRU 网络对 MNIST 进行分类
- [LSTM-notebook](https://github.com/yongyehuang/Tensorflow-Tutorial/blob/master/example-notebook/Tutorial_05_1%20An%20understandable%20example%20to%20implement%20Multi-LSTM%20for%20MNIST.ipynb)
- [GRU-notebook](https://github.com/yongyehuang/Tensorflow-Tutorial/blob/master/example-notebook/Tutorial_05_2%20An%20understandable%20example%20to%20implement%20Multi-GRU%20for%20MNIST.ipynb)
- [Bi-GRU-notebook](https://github.com/yongyehuang/Tensorflow-Tutorial/blob/master/example-notebook/Tutorial_05_3%20Bi-GRU%20for%20MNIST.ipynb)
第一层卷积核可视化
- [notebook2-自定义函数构建CNN](https://github.com/yongyehuang/Tensorflow-Tutorial/blob/master/example-notebook/Tutorial_04_2%20Convolutional%20network%20for%20MNIST(2).ipynb)
- [notebook3-使用tf.layers高级API构建CNN](https://github.com/yongyehuang/Tensorflow-Tutorial/blob/master/example-notebook/Tutorial_04_3%20Convolutional%20network%20for%20MNIST(3).ipynb)
- [code-加入 BN 层的 CNN](https://github.com/yongyehuang/Tensorflow-Tutorial/tree/master/utils_and_models/m01_batch_normalization)
在上一个例子的基础上,加入 BN 层。在 CNN 中,使用 BN 层可以加速收敛速度,同时也能够减小初始化方式的影响。在使用 BN 层的时候要注意训练时用的是 mini-batch 的均值方差,测试时用的是指数平均的均值方差。所以在训练的过程中,一定要记得更新并保存均值方差。
在这个小网络中:迭代 10000 步,batch_size=100,大概耗时 45s;添加了 BN 层之后,迭代同样的次数,大概耗时 90s.
#### T_05.实现多层的 LSTM 和 GRU 网络对 MNIST 进行分类
- [LSTM-notebook](https://github.com/yongyehuang/Tensorflow-Tutorial/blob/master/example-notebook/Tutorial_05_1%20An%20understandable%20example%20to%20implement%20Multi-LSTM%20for%20MNIST.ipynb)
- [GRU-notebook](https://github.com/yongyehuang/Tensorflow-Tutorial/blob/master/example-notebook/Tutorial_05_2%20An%20understandable%20example%20to%20implement%20Multi-GRU%20for%20MNIST.ipynb)
- [Bi-GRU-notebook](https://github.com/yongyehuang/Tensorflow-Tutorial/blob/master/example-notebook/Tutorial_05_3%20Bi-GRU%20for%20MNIST.ipynb)
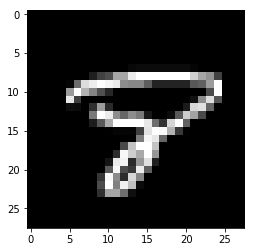 字符 8
字符 8
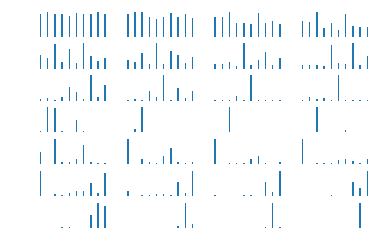 lstm 对字符 8 的识别过程
#### T_06.tensorboard 的简单用法
- [notebook](https://github.com/yongyehuang/Tensorflow-Tutorial/blob/master/example-notebook/Tutorial_06%20A%20very%20simple%20example%20for%20tensorboard.ipynb)
lstm 对字符 8 的识别过程
#### T_06.tensorboard 的简单用法
- [notebook](https://github.com/yongyehuang/Tensorflow-Tutorial/blob/master/example-notebook/Tutorial_06%20A%20very%20simple%20example%20for%20tensorboard.ipynb)
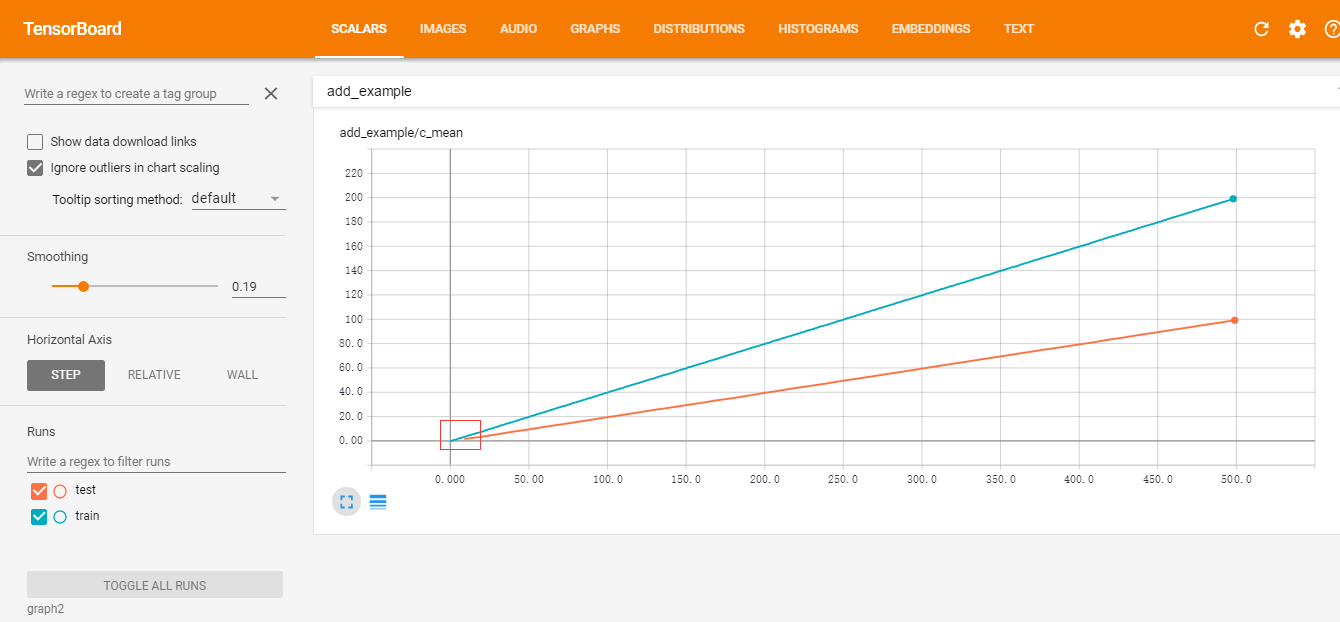 简单的 tensorboard 可视化
#### T_07.使用 tf.train.Saver() 来保存模型
- [notebook](https://github.com/yongyehuang/Tensorflow-Tutorial/blob/master/example-notebook/Tutorial_07%20How%20to%20save%20the%20model.ipynb)
#### T_08.【迁移学习】往一个已经保存好的 模型添加新的变量
- [notebook](https://github.com/yongyehuang/Tensorflow-Tutorial/blob/master/example-notebook/Tutorial_08%20%20%5Btransfer%20learning%5D%20Add%20new%20variables%20to%20graph%20and%20save%20the%20new%20model.ipynb)
#### T_09.使用 tfrecord 打包不定长的序列数据
- [notebook](https://github.com/yongyehuang/Tensorflow-Tutorial/blob/master/example-notebook/Tutorial_09%20%5Btfrecord%5D%20use%20tfrecord%20to%20store%20sequences%20of%20different%20length.ipynb)
- [reader-code](https://github.com/yongyehuang/Tensorflow-Tutorial/blob/master/utils_and_models/u02_tfrecord/tfrecord_2_seqence_reader.py)
- [writer-code](https://github.com/yongyehuang/Tensorflow-Tutorial/blob/master/utils_and_models/u02_tfrecord/tfrecord_2_seqence_writer.py)
#### T_10.使用 tf.data.Dataset 和 tfrecord 给 numpy 数据构建数据集
- [dataset-notebook](https://github.com/yongyehuang/Tensorflow-Tutorial/blob/master/example-notebook/Tutorial_10%20%5BDataset%5D%20numpy%20data.ipynb)
- [tfrecord-reader-code](https://github.com/yongyehuang/Tensorflow-Tutorial/blob/master/utils_and_models/u02_tfrecord/tfrecord_1_numpy_reader.py)
- [tfrecord-writer-code](https://github.com/yongyehuang/Tensorflow-Tutorial/blob/master/utils_and_models/u02_tfrecord/tfrecord_1_numpy_writer.py)
下面是对 MNIST 数据训练集 55000 个样本 读取的一个速度比较,统一 `batch_size=128`,主要比较 `one-shot` 和 `initializable` 两种迭代方式:
|iter_mode|buffer_size|100 batch(s)|
|:----:|:---:|:---:|
|one-shot|2000|125|
|one-shot|5000|149|
|initializable|2000|0.7|
|initializable|5000|0.7|
可以看到,使用 `initializable` 方式的速度明显要快很多。因为使用 `one-shot` 方式会把整个矩阵放在图中,计算非常非常慢。
#### T_11.使用 tf.data.Dataset 和 tfrecord 给 图片数据 构建数据集
- [dataset-notebook](https://github.com/yongyehuang/Tensorflow-Tutorial/blob/master/example-notebook/Tutorial_11%20%5BDataset%5D%20image%20data.ipynb)
- [tfrecord-writer-code](https://github.com/yongyehuang/Tensorflow-Tutorial/blob/master/utils_and_models/u02_tfrecord/tfrecord_3_image_writer.py)
- [tfrecord-reader-code](https://github.com/yongyehuang/Tensorflow-Tutorial/blob/master/utils_and_models/u02_tfrecord/tfrecord_3_image_reader.py)
对于 png 数据的读取,我尝试了 3 组不同的方式: one-shot 方式, tf 的队列方式(queue), tfrecord 方式. 同样是在机械硬盘上操作, 结果是 tfrecord 方式明显要快一些。(batch_size=128,图片大小为256*256,机械硬盘)
|iter_mode|buffer_size|100 batch(s)|
|:----:|:---:|:---:|
|one-shot|2000|75|
|one-shot|5000|86|
|tf.queue|2000|11|
|tf.queue|5000|11|
|tfrecord|2000|5.3|
|tfrecord|5000|5.3|
如果是在 SSD 上面的话,tf 的队列方式应该也是比较快的.打包成 tfrecord 格式只是减少了小文件的读取,其实现也是使用队列的。
#### T_12.TensorFlow 高级API tf.layers 的使用
- [notebook](https://github.com/yongyehuang/Tensorflow-Tutorial/blob/master/example-notebook/Tutorial_12%20%5Btf.layer%5Dhigh%20layer%20API.ipynb)
使用 TensorFlow 原生的 API 能够帮助自己很好的理解网络的细节,但是往往比较低效。 tf.layers 和 tf.keras 一样,是一个封装得比较好的一个高级库,接口用着挺方便的。所以在开发的时候,可以使用高级的接口能够有效的提高工作效率。
# 2.TensorFlow 实战(持续更新)
下面的每个例子都是相互独立的,每个文件夹下面的代码都是可以单独运行的,不依赖于其他文件夹。
## [m01_batch_normalization: Batch Normalization 的使用](https://github.com/yongyehuang/Tensorflow-Tutorial/tree/master/models/m01_batch_normalization)
参考:[tensorflow中batch normalization的用法](https://www.cnblogs.com/hrlnw/p/7227447.html)
## [m02_dcgan: 使用 DCGAN 生成二次元头像](https://github.com/yongyehuang/Tensorflow-Tutorial/tree/master/models/m02_dcgan)
参考:
- [原论文:Unsupervised Representation Learning with Deep Convolutional Generative Adversarial Networks](https://link.zhihu.com/?target=https%3A//arxiv.org/abs/1511.06434)
- [GAN学习指南:从原理入门到制作生成Demo](https://zhuanlan.zhihu.com/p/24767059)
- [代码:carpedm20/DCGAN-tensorflow](https://github.com/carpedm20/DCGAN-tensorflow)
- [代码:aymericdamien/TensorFlow-Examples](https://github.com/aymericdamien/TensorFlow-Examples/blob/master/examples/3_NeuralNetworks/dcgan.py)
这里的 notebook 和 .py 文件的内容是一样的。本例子和下面的 GAN 模型用的数据集也是用了[GAN学习指南:从原理入门到制作生成Demo](https://zhuanlan.zhihu.com/p/24767059) 的二次元头像,感觉这里例子比较有意思。如果想使用其他数据集的话,只需要把数据集换一下就行了。
下载链接: https://pan.baidu.com/s/1HBJpfkIFaGh0s2nfNXJsrA 密码: x39r
下载后把所有的图片解压到一个文件夹中,比如本例中是: `data_path = '../../data/anime/'`
运行: `python dcgan.py `
## [m03_wgan: 使用 WGAN 生成二次元头像](https://github.com/yongyehuang/Tensorflow-Tutorial/tree/master/models/m03_wgan)
这里的生成器和判别器我只实现了 DCGAN,没有实现 MLP. 如果想实现的话可以参考下面的两个例子。
参考:
- [原论文:Wasserstein GAN](https://arxiv.org/pdf/1701.07875.pdf)
- [代码:jiamings/wgan](https://github.com/jiamings/wgan)
- [代码:Zardinality/WGAN-tensorflow](https://github.com/Zardinality/WGAN-tensorflow)
原版的 wgan: `python wgan.py `
改进的 wgan-gp: `python wgan_gp.py`
## [m04_pix2pix: image-to-image](https://github.com/yongyehuang/Tensorflow-Tutorial/tree/master/models/m04_pix2pix)
代码来自:[affinelayer/pix2pix-tensorflow](https://github.com/affinelayer/pix2pix-tensorflow)
简单的 tensorboard 可视化
#### T_07.使用 tf.train.Saver() 来保存模型
- [notebook](https://github.com/yongyehuang/Tensorflow-Tutorial/blob/master/example-notebook/Tutorial_07%20How%20to%20save%20the%20model.ipynb)
#### T_08.【迁移学习】往一个已经保存好的 模型添加新的变量
- [notebook](https://github.com/yongyehuang/Tensorflow-Tutorial/blob/master/example-notebook/Tutorial_08%20%20%5Btransfer%20learning%5D%20Add%20new%20variables%20to%20graph%20and%20save%20the%20new%20model.ipynb)
#### T_09.使用 tfrecord 打包不定长的序列数据
- [notebook](https://github.com/yongyehuang/Tensorflow-Tutorial/blob/master/example-notebook/Tutorial_09%20%5Btfrecord%5D%20use%20tfrecord%20to%20store%20sequences%20of%20different%20length.ipynb)
- [reader-code](https://github.com/yongyehuang/Tensorflow-Tutorial/blob/master/utils_and_models/u02_tfrecord/tfrecord_2_seqence_reader.py)
- [writer-code](https://github.com/yongyehuang/Tensorflow-Tutorial/blob/master/utils_and_models/u02_tfrecord/tfrecord_2_seqence_writer.py)
#### T_10.使用 tf.data.Dataset 和 tfrecord 给 numpy 数据构建数据集
- [dataset-notebook](https://github.com/yongyehuang/Tensorflow-Tutorial/blob/master/example-notebook/Tutorial_10%20%5BDataset%5D%20numpy%20data.ipynb)
- [tfrecord-reader-code](https://github.com/yongyehuang/Tensorflow-Tutorial/blob/master/utils_and_models/u02_tfrecord/tfrecord_1_numpy_reader.py)
- [tfrecord-writer-code](https://github.com/yongyehuang/Tensorflow-Tutorial/blob/master/utils_and_models/u02_tfrecord/tfrecord_1_numpy_writer.py)
下面是对 MNIST 数据训练集 55000 个样本 读取的一个速度比较,统一 `batch_size=128`,主要比较 `one-shot` 和 `initializable` 两种迭代方式:
|iter_mode|buffer_size|100 batch(s)|
|:----:|:---:|:---:|
|one-shot|2000|125|
|one-shot|5000|149|
|initializable|2000|0.7|
|initializable|5000|0.7|
可以看到,使用 `initializable` 方式的速度明显要快很多。因为使用 `one-shot` 方式会把整个矩阵放在图中,计算非常非常慢。
#### T_11.使用 tf.data.Dataset 和 tfrecord 给 图片数据 构建数据集
- [dataset-notebook](https://github.com/yongyehuang/Tensorflow-Tutorial/blob/master/example-notebook/Tutorial_11%20%5BDataset%5D%20image%20data.ipynb)
- [tfrecord-writer-code](https://github.com/yongyehuang/Tensorflow-Tutorial/blob/master/utils_and_models/u02_tfrecord/tfrecord_3_image_writer.py)
- [tfrecord-reader-code](https://github.com/yongyehuang/Tensorflow-Tutorial/blob/master/utils_and_models/u02_tfrecord/tfrecord_3_image_reader.py)
对于 png 数据的读取,我尝试了 3 组不同的方式: one-shot 方式, tf 的队列方式(queue), tfrecord 方式. 同样是在机械硬盘上操作, 结果是 tfrecord 方式明显要快一些。(batch_size=128,图片大小为256*256,机械硬盘)
|iter_mode|buffer_size|100 batch(s)|
|:----:|:---:|:---:|
|one-shot|2000|75|
|one-shot|5000|86|
|tf.queue|2000|11|
|tf.queue|5000|11|
|tfrecord|2000|5.3|
|tfrecord|5000|5.3|
如果是在 SSD 上面的话,tf 的队列方式应该也是比较快的.打包成 tfrecord 格式只是减少了小文件的读取,其实现也是使用队列的。
#### T_12.TensorFlow 高级API tf.layers 的使用
- [notebook](https://github.com/yongyehuang/Tensorflow-Tutorial/blob/master/example-notebook/Tutorial_12%20%5Btf.layer%5Dhigh%20layer%20API.ipynb)
使用 TensorFlow 原生的 API 能够帮助自己很好的理解网络的细节,但是往往比较低效。 tf.layers 和 tf.keras 一样,是一个封装得比较好的一个高级库,接口用着挺方便的。所以在开发的时候,可以使用高级的接口能够有效的提高工作效率。
# 2.TensorFlow 实战(持续更新)
下面的每个例子都是相互独立的,每个文件夹下面的代码都是可以单独运行的,不依赖于其他文件夹。
## [m01_batch_normalization: Batch Normalization 的使用](https://github.com/yongyehuang/Tensorflow-Tutorial/tree/master/models/m01_batch_normalization)
参考:[tensorflow中batch normalization的用法](https://www.cnblogs.com/hrlnw/p/7227447.html)
## [m02_dcgan: 使用 DCGAN 生成二次元头像](https://github.com/yongyehuang/Tensorflow-Tutorial/tree/master/models/m02_dcgan)
参考:
- [原论文:Unsupervised Representation Learning with Deep Convolutional Generative Adversarial Networks](https://link.zhihu.com/?target=https%3A//arxiv.org/abs/1511.06434)
- [GAN学习指南:从原理入门到制作生成Demo](https://zhuanlan.zhihu.com/p/24767059)
- [代码:carpedm20/DCGAN-tensorflow](https://github.com/carpedm20/DCGAN-tensorflow)
- [代码:aymericdamien/TensorFlow-Examples](https://github.com/aymericdamien/TensorFlow-Examples/blob/master/examples/3_NeuralNetworks/dcgan.py)
这里的 notebook 和 .py 文件的内容是一样的。本例子和下面的 GAN 模型用的数据集也是用了[GAN学习指南:从原理入门到制作生成Demo](https://zhuanlan.zhihu.com/p/24767059) 的二次元头像,感觉这里例子比较有意思。如果想使用其他数据集的话,只需要把数据集换一下就行了。
下载链接: https://pan.baidu.com/s/1HBJpfkIFaGh0s2nfNXJsrA 密码: x39r
下载后把所有的图片解压到一个文件夹中,比如本例中是: `data_path = '../../data/anime/'`
运行: `python dcgan.py `
## [m03_wgan: 使用 WGAN 生成二次元头像](https://github.com/yongyehuang/Tensorflow-Tutorial/tree/master/models/m03_wgan)
这里的生成器和判别器我只实现了 DCGAN,没有实现 MLP. 如果想实现的话可以参考下面的两个例子。
参考:
- [原论文:Wasserstein GAN](https://arxiv.org/pdf/1701.07875.pdf)
- [代码:jiamings/wgan](https://github.com/jiamings/wgan)
- [代码:Zardinality/WGAN-tensorflow](https://github.com/Zardinality/WGAN-tensorflow)
原版的 wgan: `python wgan.py `
改进的 wgan-gp: `python wgan_gp.py`
## [m04_pix2pix: image-to-image](https://github.com/yongyehuang/Tensorflow-Tutorial/tree/master/models/m04_pix2pix)
代码来自:[affinelayer/pix2pix-tensorflow](https://github.com/affinelayer/pix2pix-tensorflow)