# SipRtcProxy
**Repository Path**: anyRTC_admin/SipRtcProxy
## Basic Information
- **Project Name**: SipRtcProxy
- **Description**: No description available
- **Primary Language**: Unknown
- **License**: Not specified
- **Default Branch**: master
- **Homepage**: None
- **GVP Project**: No
## Statistics
- **Stars**: 0
- **Forks**: 2
- **Created**: 2020-08-20
- **Last Updated**: 2024-06-26
## Categories & Tags
**Categories**: Uncategorized
**Tags**: None
## README
## SRProxy介绍
目前 WebRTC 协议跟 SIP 协议互通场景主要运用在企业呼叫中心、企业内部通信、电话会议(PSTN)、智能门禁等场景,要想让 WebRTC 与 SIP 互通,要解决两个层面的问题:**信令层**和**媒体层**。两个网络使用的信令机制不同,所以要进行信令的转换,才能完成媒体的协商,建立会话。媒体层要完成编码的转换,以及 rtp/srtp 转换等功能。anyRTC 开源 SRProxy 网关,解决了WebRTC与SIP的协议转换,配合 anyRTC 开源的 ARCall 音视频呼叫 demo,演示如何通过 App/Web 端呼叫落地,下文就如何使用部署 SRProxy 网关,以及如何跟ARCall 互通进行展开,熟悉如何使用后,可集成SDK到自己的应用中,配合自身业务做对应的场景。
## 呼叫流程
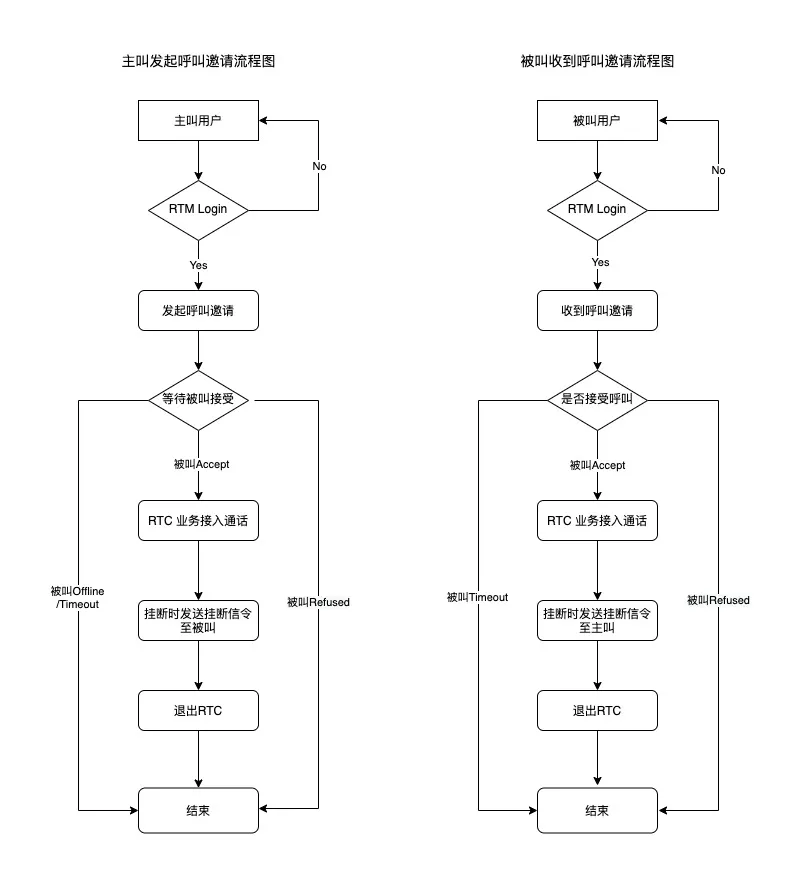
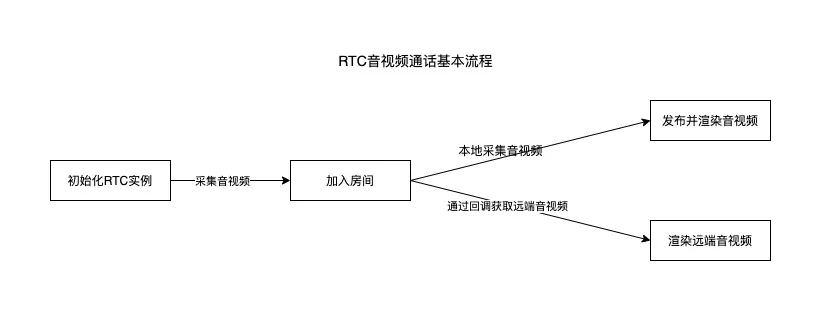
### 一、ARCall呼叫逻辑
### 二、SRProxy转发逻辑
#### 1、SRProxy能做什么?
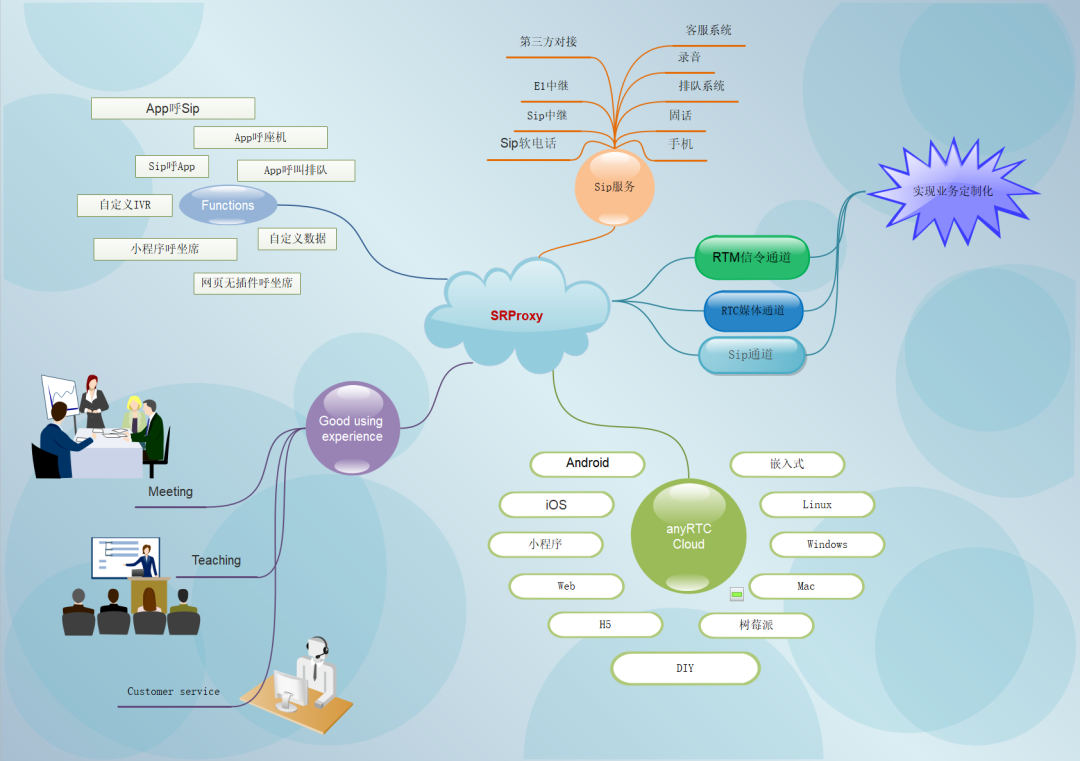
从上图简单概括一下:SRProxy是实现RTC和SIP之间业务互通的桥梁,更是实现业务拓展的关键服务。
#### 2、呼叫流程
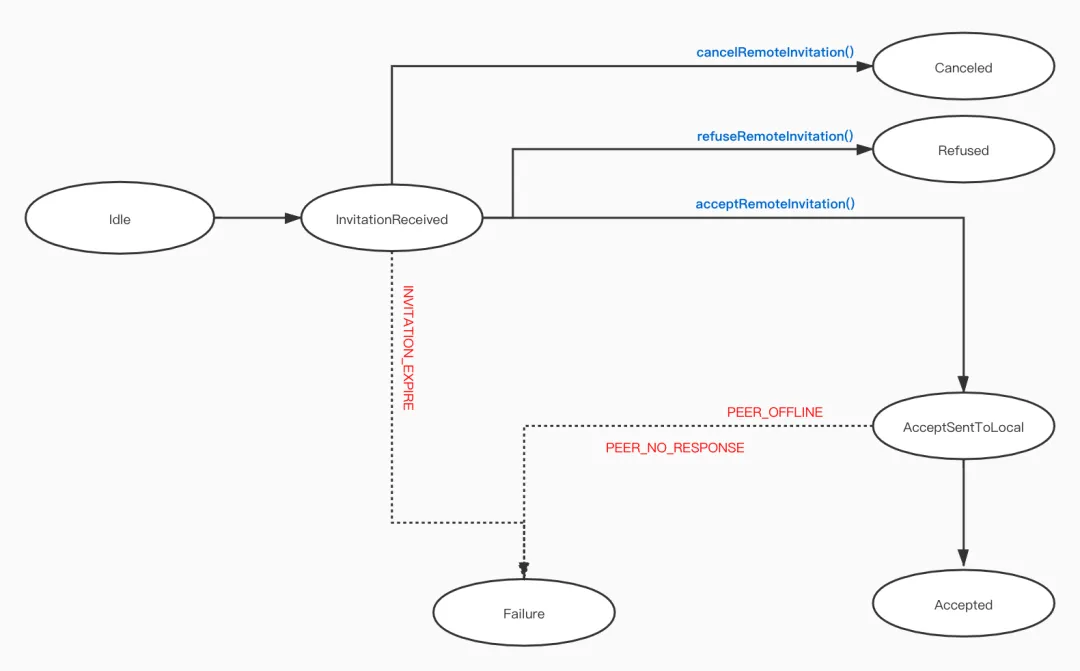
##### 1、状态流转图
呼叫邀请中,主叫可以通过 [LocalInvitation] 对象提供的 [getState] 方法查询当前呼叫邀请的有关状态;被叫可以通过 SDK 返回的 [RemoteInvitation]对象的 [getState]方法查询当前呼叫邀请的相关状态。
**LocalInvitationState**
下图描述了与主叫相关的呼叫邀请状态流转图:
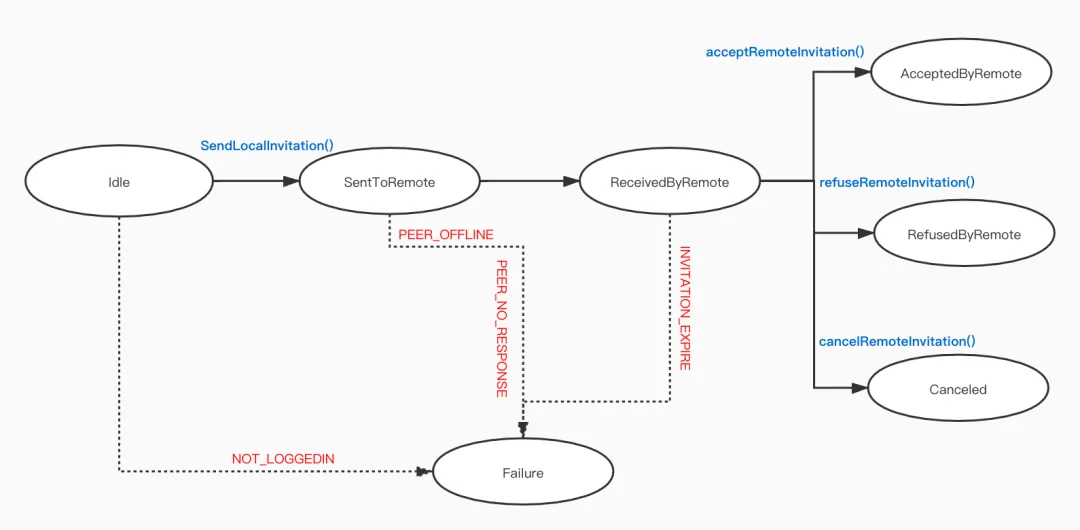
**RemoteInvitationState**
下图描述了与被叫相关的呼叫邀请状态流转图:
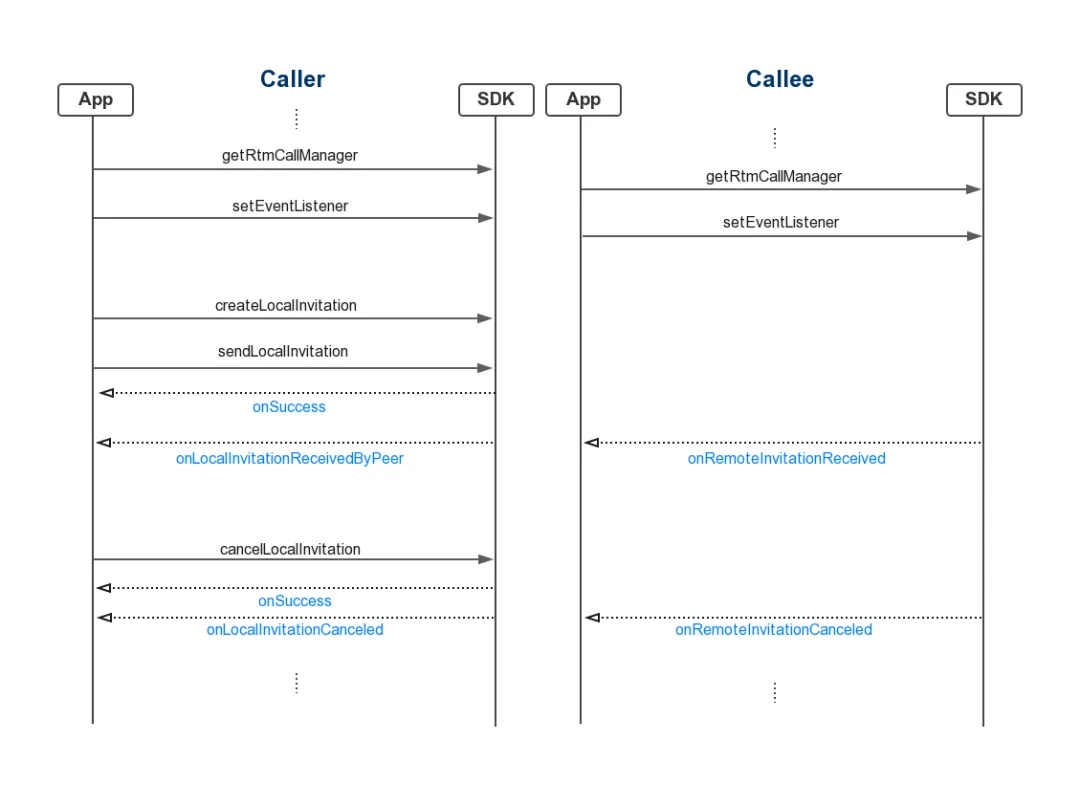
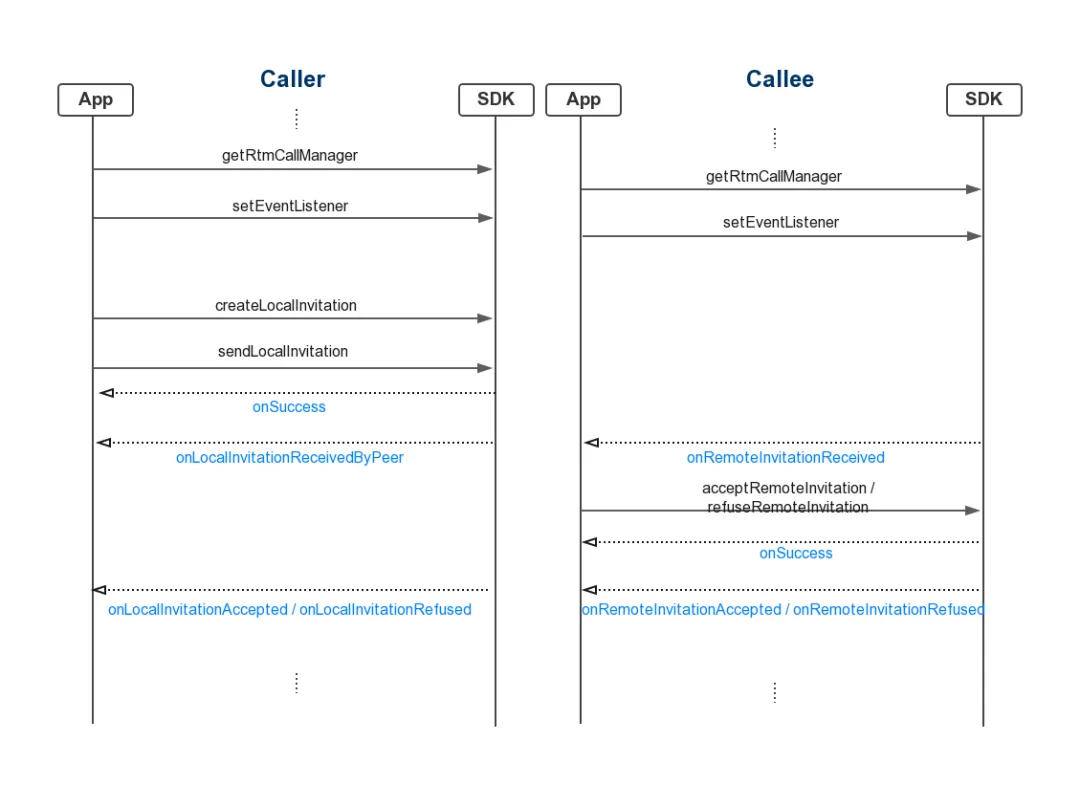
##### 2、API 时序图
**取消已发送呼叫邀请**
**接受/拒绝呼叫邀请**
**注意事项及限制条件**
- 主叫设置的呼叫邀请 content 的字符串长度:8 KB,格式为 UTF-8。
- 被叫设置的呼叫邀请响应 response 的字符串长度:8 KB,格式为 UTF-8。
- 呼叫邀请的 channel ID 仅用于与老信令互通时设置。设置的 channel ID 必须与老信令 SDK 设置相同才能实现互通。字符串长度:64 字节,格式为 UTF-8。
## **创建一个应用**
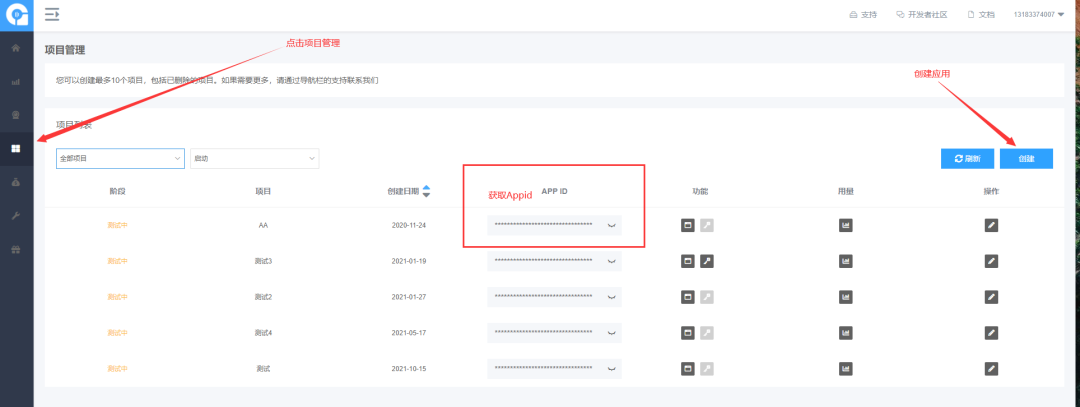
### 一、注册账号
> 到[anyRTC官网](https://console.anyrtc.io/signin)注册一个开发者账号,并创建一个应用

### 二、创建应用获取AppId
## **部署freeswitch**
### 一、准备
一、系统
> Centos 7.9 最好是纯净服务器 不然可能会存在依赖装不上或冲突情况
二、防火墙
> 参考freeswitch防火墙: https://freeswitch.org/confluence/display/FREESWITCH/Firewall
```
# 开放sip端口tcp协议
[root@localhost ~]# firewall-cmd --permanent --add-port=5060/tcp
# 开放sip端口udp协议
[root@localhost ~]# firewall-cmd --permanent --add-port=5060/udp
# 开放ws端口
[root@localhost ~]# firewall-cmd --permanent --add-port=5066/tcp
# 开放wss端口
[root@localhost ~]# firewall-cmd --permanent --add-port=7443/tcp
# 开放rtp端口(范围)
[root@localhost ~]# firewall-cmd --permanent --add-port=16384-32768/udp
# 让防火墙配置生效
[root@localhost ~]# firewall-cmd --reload
# 也可以直接关闭防火墙
[root@localhost ~]# systemctl stop firewalld
[root@localhost ~]# systemctl disable firewalld
```
### 二、编译环境和FreeSwitch依赖库
```c
# 更新yum源
[root@localhost ~]# yum update -y
# 安装lib相关需求依赖
[root@localhost ~]# yum install -y yum-utils git gcc gcc-c++ automake autoconf libtool libtiff-devel libjpeg-devel openssl-devel vim
# 添加环境变量
[root@localhost ~]# vim /etc/profile
export PKG_CONFIG_PATH=/usr/local/lib/pkgconfig
[root@localhost ~]# source /etc/profile
# 单独下载spandsp源码
[root@localhost ~]# cd /usr/local/src
[root@localhost src]# git clone https://github.com/freeswitch/spandsp.git
[root@localhost src]# cd spandsp
[root@localhost spandsp]# ./bootstrap.sh
[root@localhost spandsp]# ./configure
[root@localhost spandsp]# make
[root@localhost spandsp]# make install
[root@localhost spandsp]# ldconfig
# 单独下载sofia-sip(SIP协议栈)源码 尝试使用过码云上面的,但是freeswitch编译的时候一直报错需要sofia-sip
[root@localhost ~]# cd /usr/local/src
[root@localhost src]# git clone https://github.com/freeswitch/sofia-sip.git
[root@localhost src]# cd sofia-sip
[root@localhost sofia-sip]# ./bootstrap.sh -j
[root@localhost sofia-sip]# ./configure
[root@localhost sofia-sip]# make
[root@localhost sofia-sip]# make install
[root@localhost sofia-sip]# ldconfig
# 单独下载libuuid源码
[root@localhost ~]# cd /usr/local/src
[root@localhost src]# wget https://jaist.dl.sourceforge.net/project/libuuid/libuuid-1.0.3.tar.gz
[root@localhost src]# tar -zxvf libuuid-1.0.3.tar.gz
[root@localhost src]# cd libuuid-1.0.3
[root@localhost libuuid-1.0.3]# ./configure
[root@localhost libuuid-1.0.3]# make
[root@localhost libuuid-1.0.3]# make install
# 编译安装cmake 3.8.2
[root@localhost ~]# cd /usr/local/src
[root@localhost src]# wget https://cmake.org/files/v3.8/cmake-3.8.2.tar.gz
[root@localhost src]# tar zxvf cmake-3.8.2.tar.gz
[root@localhost cmake]# cd cmake-3.8.2
[root@localhost cmake-3.8.2]# ./bootstrap
[root@localhost cmake-3.8.2]# gmake
[root@localhost cmake-3.8.2]# gmake install
# 安装libatomic
[root@localhost ~]# yum install -y libatomic
# 单独下载libks源码(需要cmake 3.7.2以上版本)
[root@localhost ~]# cd /usr/local/src
[root@localhost src]# git clone https://github.com/signalwire/libks.git
[root@localhost libks]# cmake .
## 如果出现uuid错误,就重新编译libuuid源码,还是uuid错误就退出终端重新进入在执行cmake .
[root@localhost libks]# make
[root@localhost libks]# make install
# 安装fs依赖
[root@localhost ~]# yum install -y http://files.freeswitch.org/freeswitch-release-1-6.noarch.rpm epel-release
# 安装ffmpeg需要
[root@localhost ~]# rpm --import http://li.nux.ro/download/nux/RPM-GPG-KEY-nux.ro
[root@localhost ~]# rpm -Uvh http://li.nux.ro/download/nux/dextop/el7/x86_64/nux-dextop-release-0-1.el7.nux.noarch.rpm
# yum安装相关依赖
[root@localhost ~]# yum install -y alsa-lib-devel bison broadvoice-devel bzip2 curl-devel libdb4-devel e2fsprogs-devel erlang flite-devel g722_1-devel gdbm-devel gnutls-devel ilbc2-devel ldns-devel libcodec2-devel libcurl-devel libedit-devel libidn-devel libmemcached-devel libogg-devel libsilk-devel libsndfile-devel libtheora-devel libuuid-devel libvorbis-devel libxml2-devel lua-devel lzo-devel ncurses-devel net-snmp-devel opus-devel pcre-devel perl perl-ExtUtils-Embed pkgconfig portaudio-devel postgresql-devel python-devel python-devel soundtouch-devel speex-devel sqlite-devel unbound-devel unixODBC-devel which yasm zlib-devel libshout-devel libmpg123-devel lame-devel rpm-build libX11-devel libyuv-devel swig wget ffmpeg ffmpeg-devel
# 安装python组件
[root@localhost ~]# curl https://bootstrap.pypa.io/pip/2.7/get-pip.py --output get-pip-2.7.py
[root@localhost ~]# python get-pip-2.7.py
# 验证pip是否安装成功
[root@localhost ~]# pip --version
# pip安装python组件
[root@localhost ~]# pip install pydub python-ESL pika dbutils
```
### 三、安装FreeSwitch
```c
# git下载freeswitch
[root@localhost ~]# git clone -b v1.10 https://github.com/signalwire/freeswitch.git freeswitch
# 如果github连接不顺畅的话,可以试试码云镜像仓库(更新慢1天)
[root@localhost ~]# git clone -b v1.10 https://gitee.com/mirrors/FreeSWITCH.git freeswitch
# 编译安装freeswitch前奏
[root@localhost ~]# cd freeswitch
[root@localhost freeswitch]# ./bootstrap.sh -j
[root@localhost freeswitch]# vim modules.conf
```
`根据需要打开或关闭注释`
```
formats/mod_shout
languages/mod_python
#event_handlers/mod_cdr_pg_csv
asr_tts/mod_unimrcp
endpoints/mod_rtmp
```
`如果需要使用mod_xml_curl的话`
```
xml_int/mod_xml_curl
```
`给不需要的模块加上注释`
```
#applications/mod_av
#applications/mod_signalwire
```
`编译安装`
```
[root@localhost freeswitch]# ./configure --with-python=/usr/bin/python2.7 --with-lua=/usr/bin/lua --enable-core-pgsql-support
# 如果在spandsp位置报错,可以尝试执行下面这句 在执行./configure
[root@localhost freeswitch]# export PKG_CONFIG_PATH=/usr/local/lib/pkgconfig
# 编译freeswitch
[root@localhost freeswitch]# make
# 编译安装 mod_cdr_pg_csv-install
[root@localhost freeswitch]# make mod_unimrcp-install
# 如果需要空上模块的话
[root@localhost freeswitch]# make mod_xml_curl-install
# 编译安装音频文件(英文)
[root@localhost freeswitch]# make cd-sounds-install
[root@localhost freeswitch]# make cd-moh-install
# 编译安装freeswitch
[root@localhost freeswitch]# make install
```
`额外安装音频文件(英文)`
```
[root@localhost freeswitch]# make uhd-sounds-install
[root@localhost freeswitch]# make uhd-moh-install
[root@localhost freeswitch]# make hd-sounds-install
[root@localhost freeswitch]# make hd-moh-install
[root@localhost freeswitch]# make sounds-install
[root@localhost freeswitch]# make moh-install
```
`建立软连接`
```
[root@localhost freeswitch]# sudo ln -sf /usr/local/freeswitch/bin/freeswitch /usr/local/bin/
[root@localhost freeswitch]# sudo ln -sf /usr/local/freeswitch/bin/fs_cli /usr/local/bin/
```
`配置mod`
```
[root@localhost ~]# vim /usr/local/freeswitch/conf/autoload_configs/modules.conf.xml
```
`在前3行开启(位置可能不对,能找到)`
```
```
`打开注释`
```
```
`添加配置`
```
```
`注释掉其他不需要的模块`
```
```
> 如果没有其它要求 `部署freeswitch`到这就可以结束了
`配置acl白名单`
```
[root@localhost ~]# vim /usr/local/freeswitch/conf/autoload_configs/acl.conf.xml
```
```
```
```
# 保存后,在freeswitch客户端,输入reloadacl reloadxml进行重新加载acl文件
[root@localhost ~]# fs_cli
freeswitch@localhost>reloadacl reloadxml
```
`配置ESL`
```
[root@localhost ~]# vim /usr/local/freeswitch/conf/autoload_configs/event_socket.conf.xml
```
```
```
`适配WebRTC(JSSIP/SIPJS)`
```
[root@localhost ~]# vim /usr/local/freeswitch/conf/sip_profiles/internal.xml
```
```
```
`拨号计划`
```
[root@localhost ~]# vim /usr/local/freeswitch/conf/sip_profiles/internal.xml
```
```
```
`关闭ipv6`
```
[root@localhost ~]# cd /usr/local/freeswitch/conf/sip_profiles
[root@localhost sip_profiles]# mv internal-ipv6.xml internal-ipv6.xml.removed
[root@localhost sip_profiles]# mv external-ipv6.xml external-ipv6.xml.removed
```
### 四:配置Sip的Proxy转发规则
> [root@localhost ~]# vim /usr/local/freeswitch/conf/dialplan/default.xml ##配置文件中加入以下配置,多个SRProxy 就配置多个号码
```xml
]]>
```
> 意思是:如果呼叫的SIP号码前面加0,则自动路由到1000号码上;这个1000号码是SRProxy中配置的Proxy账号,这样SRProxy就可以收到Sip外呼的请求,从发对RTC发起呼叫。
> 注:配置中192.168.x.xx是你机器的真实IP,有公网EIP填公网EIP地址,局域网则填局域网IP地址。
### 五、FreeSwitch呼叫时间修改
> 安装完freeswitch发现进行sip呼叫的时候出现差不多延时10秒左右才能接收呼叫 主要原因是freeswitch中默认配置了延时时间 只需要注释掉就能解决这个问题
> [root@localhost freeswitch]# vim /usr/local/freeswitch/conf/dialplan/default.xml
```xml
#注释这一行即可
```
`启动生效`
### 六、FreeSwitch显示主叫号码
>[root@localhost freeswitch]# cd /usr/local/freeswitch/conf/directory/default
>[root@localhost default]# vim 1000.xml
```xml
# 注释
# 注释这两行
```
`启动生效`
```
## 后台快速启动
[root@localhost ~]# freeswitch -nc -nonat
## 控制台启动(退出即关闭服务)
[root@localhost ~]# freeswitch
```
### 七、FreeSwitch自动增加号码
>freeswitch是一个开源的呼叫中心服务,默认号码是1000-1019
>只有20个号码时,无法满足时,需要增加号码使用
> [root@localhost ~]# vim /usr/local/freeswitch/conf/dialplan/default.xml
```xml
# 注释这一行 或者修改这一行
# 重新定义号码段 段为1000~2099
```
> [root@localhost ~]# freeswitch.sh
```shell
#!/bin/bash
# Author: lzy
# data: 2021-11-16
# 设置变量
# freeswitch存放号码目录
TARGET_FREESWITCH_PREFIX=/usr/local/freeswitch/conf/directory/default/
# 因为默认已经有1000-1019 所以设置从1020开始,可以随时改
i=1020
# 设置循环,-le 小于等于2099结束
while [ $i -le 2599 ]
do
# i=$i+1 $i=1020 逐步往上+1
let i=$i+1
# cp 复制1000.xml 重命名$i 逐步+1
cp $TARGET_FREESWITCH_PREFIX/1000.xml $TARGET_FREESWITCH_PREFIX/$i.xml
# sed将1000.xml文件里面的1000 改为文件本身的数值
sed -i "s/1000/$i/" $TARGET_FREESWITCH_PREFIX/$i.xml
done
```
```c
## 脚本授权 执行脚本
[root@localhost ~]# chmod +x freeswitch.sh
[root@localhost ~]# ./freeswitch.sh
## 保存后,在freeswitch客户端,输入reloadxml进行重新加载.xml文件
[root@localhost ~]# fs_cli
freeswitch@localhost>reloadxml
```
## **部署SRProxy**
> 源码地址:https://github.com/anyRTC-UseCase/SipRtcProxy
### 一、Windows 7 +
双击:SipRtcProxy.sln ,直接运行
项目是VS2017创建,VS2015,VS2019可自行验证。
### 二、Linux - Centos7.0 +
` 下载代码到本地`
> [root@localhost ~]# git clone https://github.com/anyRTC-UseCase/SipRtcProxy.git
>
> [root@localhost ~]# cd SipRtcProxy.git
`环境变量`
```shell
[root@localhost SipRtcProxy]# vim /etc/profile
export LD_LIBRARY_PATH=$LD_LIBRARY_PATH:/root/SipRtcProxy/so/
[root@localhost SipRtcProxy]# source /etc/profile
```
`执行`
> [root@localhost SipRtcProxy]# make
`配置文件`
>[root@localhost SipRtcProxy]# vim rtx.conf
```c
[global]
appid=XXXXX ## 创建应用时注册的Appid
sip_svr=IP:5060 ## freeswitch_IP地址和端口,目前仅支持freeswitch默认端口
## 配置私有云RTC环境 注释默认连接公网环境
#[rtc]
#ip=RTC_IP
#port=6080
## 配置私有云RTM环境 注释默认连接公网环境
#[rtm]
#ip=RTM_IP
#port=7080
[rtm2sip]
on=1 ## 是否开启RTM2SIP;0:不开启 1:开启
acc_rule=1005;10[06-19] ## 号码范围根据freeswitch进行调整;号码情况:1005,1006-1019 共15个号码,同Appid下多个SRProxy 号码不能冲突
[proxy]
on=1 ## 是否开启SIP代理;0:不开启 1:开启
sip_account=1000 ## freeswitch代理账号:1000,客户端不可与此号码冲突;且一个SRProxy只能用一个号码,换个环境需换个号码,如:1001
sip_pwd=1234 ## freeswitch密码
rtm_account=1086 ## 登入RTM账号,客户端不可与此号码冲突,且一个appid只能用一个号码,换个环境需换个号码,如:1087
[log]
#* 0:SENSITIVE 1:VERBOSE 2:INFO 3:WARNING 4:ERROR 5:NONE
level=2
file=rtc_sip.log
max_file_size=100
```
` 前台启动`
> [root@localhost SipRtcProxy]# ./SRProxy rtx.conf
### 三、Linux - Centos7.0 + 已编译
> 链接:https://pan.baidu.com/s/1QhhIsO3NEf9olX19xVxBKg
> 提取码:l1f2
`创建目录`
>[root@localhost ~]# mkdir /usr/local/ar4/
>
>[root@localhost ~]# tar zxvf SRProxy.tar.gz
`将srproxy.tar.gz放到/usr/local/ar4/解压`
> [root@localhost ~]# cd /usr/local/ar4/
>
> [root@localhost ar4]# tar zxvf srproxy.tar.gz
`将rtx.sh脚本放入/usr/bin下面并赋予权限`
> [root@localhost ~]# chmod +x /usr/bin/rtx.sh
`进入目录`
> [root@localhost ~]# cd /usr/local/ar4/srproxy/
> [root@localhost srproxy]# vim conf/rtx.conf
```c
[global]
appid=XXXXX ## 创建应用时注册的Appid
sip_svr=IP:5060 ## freeswitch_IP地址和端口,目前仅支持freeswitch默认端口
## 配置私有云RTC环境 注释默认连接公网环境
#[rtc]
#ip=RTC_IP
#port=6080
## 配置私有云RTM环境 注释默认连接公网环境
#[rtm]
#ip=RTM_IP
#port=7080
[rtm2sip]
on=1 ## 是否开启RTM2SIP;0:不开启 1:开启
acc_rule=1005;10[06-19] ## 号码范围根据freeswitch进行调整;号码情况:1005,1006-1019 共15个号码,同Appid下多个SRProxy 号码不能冲突
[proxy]
on=1 ## 是否开启SIP代理;0:不开启 1:开启
sip_account=1000 ## freeswitch代理账号:1000,客户端不可与此号码冲突;且一个SRProxy只能用一个号码,换个环境需换个号码,如:1001
sip_pwd=1234 ## freeswitch密码
rtm_account=1086 ## 登入RTM账号,客户端不可与此号码冲突,且一个appid只能用一个号码,换个环境需换个号码,如:1087
[log]
#* 0:SENSITIVE 1:VERBOSE 2:INFO 3:WARNING 4:ERROR 5:NONE
level=2
file=rtc_sip.log
max_file_size=100
```
`配置没有问题后启动SRProxy`
> 进入目录:
>
> [root@localhost ~]# cd /usr/local/ar4/srproxy/
>
> [root@localhost srproxy]# rtx.sh start SRProxy ## 启动
>
> [root@localhost srproxy]# rtx.sh restart SRProxy ## 重启
>
> [root@localhost srproxy]# rtx.sh stop SRProxy ## 停止
`添加任务计划 实现自启动`
> [root@localhost ~]# crontab -e
> */1 * * * * sh /usr/local/ar4/srproxy/moni_srp.sh >/dev/null 2>&1
## Demo演示
### 一、登入ARCall (连接公网RTC、RTM)
> ARCall源码下载地址: https://github.com/anyRTC-UseCase/ARCall
>
> 配置AppId一定要和SRProxy 配置文件一致
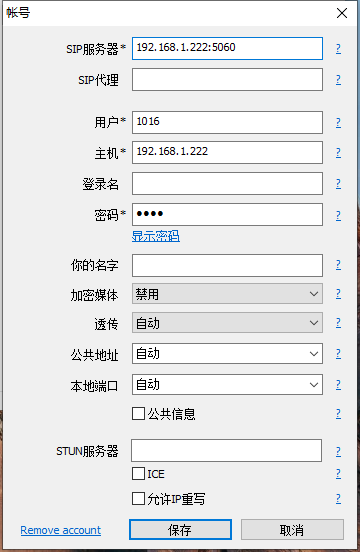
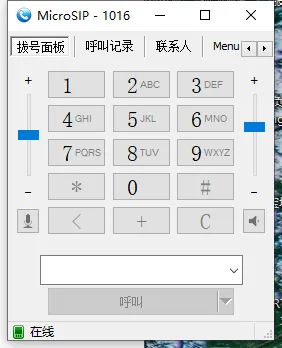
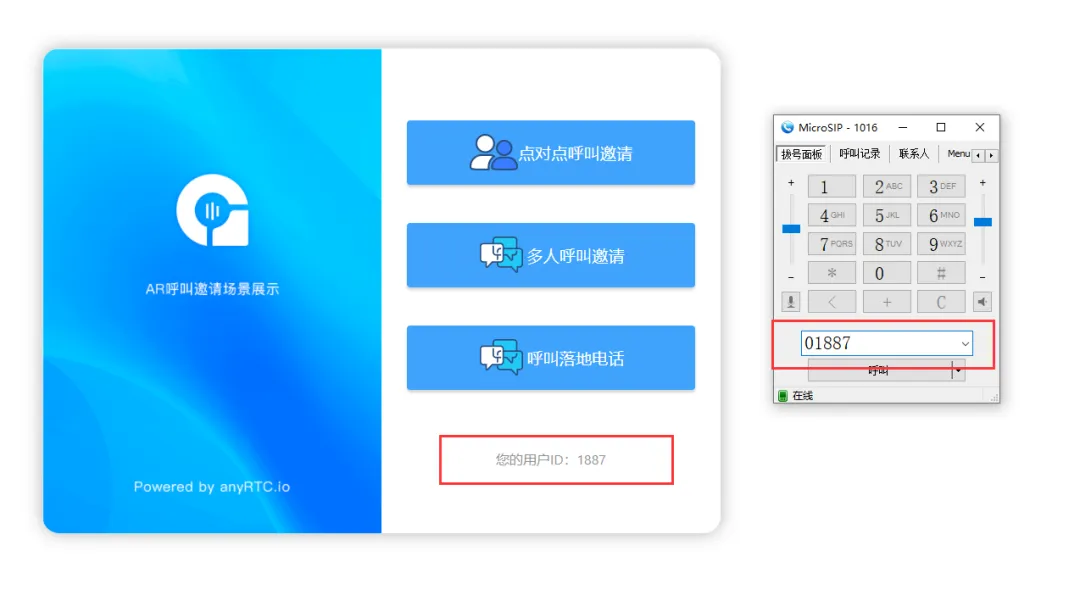
### 二、登入sip(模拟电话 连接FreeSwitch)
> 下载地址:https://www.microsip.org/downloads
>
> 连接的freeswitch一定要和SRProxy配置的一致
>
> 添加账户 点击Menu--->Add account
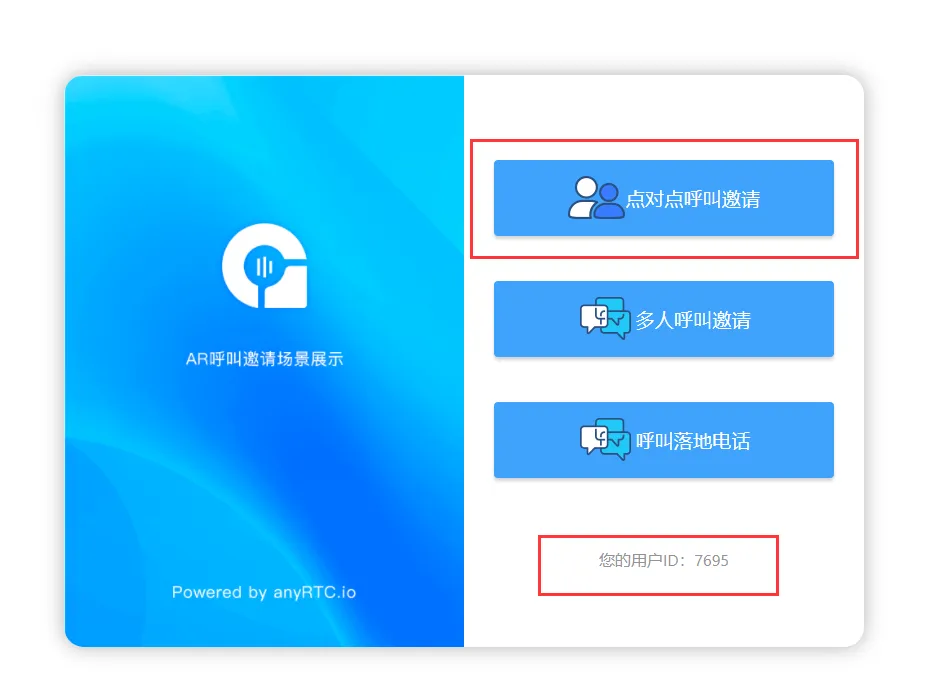
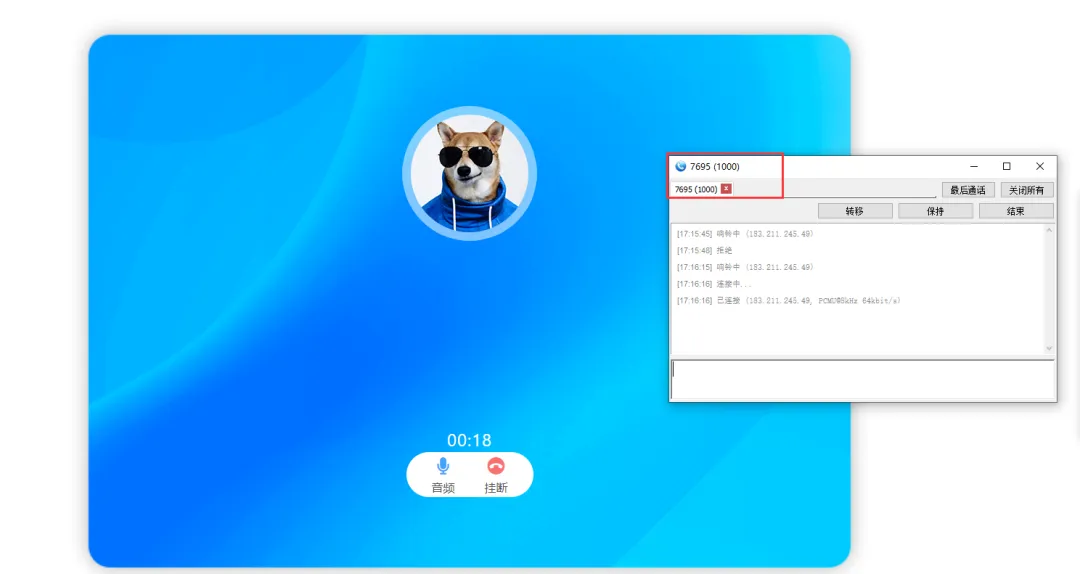
### 三、ARCall拨打sip
> ARCall拨打sip 使用正常流程即可,号码多少就拨打多少
>
> 注意: 拨打设备 一定要有麦克风才可拨通
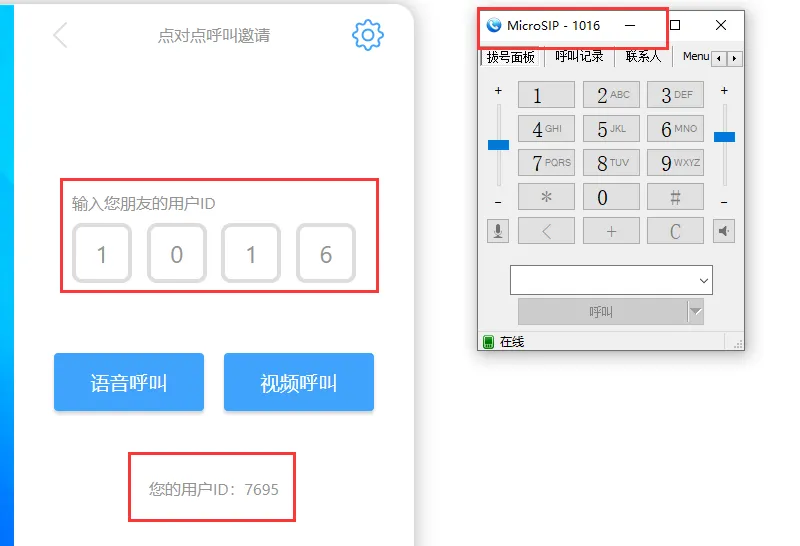
`呼叫成功`
### 四、sip拨打ARCall
> sip打ARCall需要前面加个0 ,根据配置Sip转发规则而定
>
> 注意: 拨打设备 一定要有麦克风才可拨通
`呼叫成功`
