# CarBode-Barcode-Scanner-For-SwiftUI
**Repository Path**: curryluya-github/CarBode-Barcode-Scanner-For-SwiftUI
## Basic Information
- **Project Name**: CarBode-Barcode-Scanner-For-SwiftUI
- **Description**: No description available
- **Primary Language**: Unknown
- **License**: MIT
- **Default Branch**: master
- **Homepage**: None
- **GVP Project**: No
## Statistics
- **Stars**: 0
- **Forks**: 0
- **Created**: 2025-04-16
- **Last Updated**: 2025-04-16
## Categories & Tags
**Categories**: Uncategorized
**Tags**: None
## README
"The name CarBode is a playful twist on the word Barcode. It’s a Thai wordplay technique, where syllables are reversed to create a new, catchy name. This adds a touch of humor and a unique Thai flair that makes the project memorable."
---
# CarBode
## Free and Opensource Barcode scanner & Barcode generator for swiftUI
# Why you must use CarBode
1. CarBode have both Barcode Scanner and Barcode Generator
1. CarBode is a lightweight components
1. CarBode build on AVFoundation it will supported all of barcodes types that AVFoundation supported
1. CarBode can turn on the torch light and it can toggle between front and back camera
## index
- [Installation](#installation)
- [Example project](#example-project)
- [How to use scanner view](#how-to-use-scanner-view)
- [Add camera usage description to `info.plist`](#add-camera-usage-description-to-your-infoplist)
- [Simple Scanner](#simple-scanner)
- [Draw box around the barcode](#draw-box-around-the-barcode)
- [torch light on/off](#how-to-turn-torch-light-onoff)
- [Switch front/back camera](#switch-to-front-camera)
- [Barcode types support](#barcode-types-support)
- [Test on iOS simulator](#test-on-ios-simulator)
- [How to use barcode generator view](#how-to-use-barcode-generator-view)
- [Barcode type you can generate](#barcode-type-you-can-generate)
- [Rotate your barcode](#rotate-your-barcode)
- [How to contributing](#contributing)
- [Version Change logs](#changelog)
# Installation
The preferred way of installing SwiftUIX is via the [Swift Package Manager](https://swift.org/package-manager/).
> Xcode 11 integrates with libSwiftPM to provide support for iOS, watchOS, and tvOS platforms.
1. In Xcode, open your project and navigate to **File** → **Swift Packages** → **Add Package Dependency...**
2. Paste the repository URL (`https://github.com/heart/CarBode-Barcode-Scanner-For-SwiftUI`) and click **Next**.
3. For **Rules**, select **Branch** (with branch set to `2.1.2` ).
4. Click **Finish**.
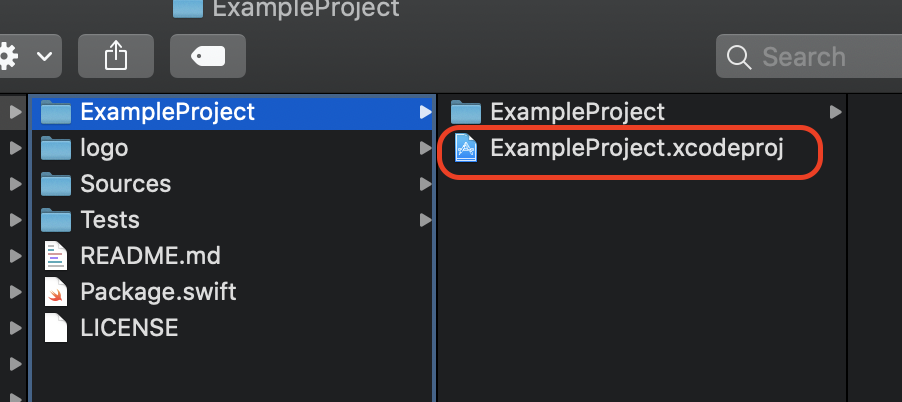
# Example project
CarBode-Barcode-Scanner-For-SwiftUI/ExampleProject/ExampleProject.xcodeproj
# How to use Scanner View
## Add camera usage description to your `info.plist`
```XML
NSCameraUsageDescription
This app needs access to the camera, to be able to read barcodes.
```
# Simple Scanner
```Swift
import SwiftUI
import CarBode
import AVFoundation //import to access barcode types you want to scan
struct ContentView: View {
var body: some View {
VStack{
CBScanner(
supportBarcode: .constant([.qr, .code128]), //Set type of barcode you want to scan
scanInterval: .constant(5.0) //Event will trigger every 5 seconds
){
//When the scanner found a barcode
print("BarCodeType =",$0.type.rawValue, "Value =",$0.value)
}
}
}
```
# Draw box around the barcode
```Swift
import SwiftUI
import CarBode
import AVFoundation //import to access barcode types you want to scan
struct ContentView: View {
var body: some View {
VStack{
CBScanner(
supportBarcode: .constant([.qr, .code128]), //Set type of barcode you want to scan
scanInterval: .constant(5.0) //Event will trigger every 5 seconds
){
//When the scanner found a barcode
print("BarCodeType =",$0.type.rawValue, "Value =",$0.value)
}
onDraw: {
print("Preview View Size = \($0.cameraPreviewView.bounds)")
print("Barcode Corners = \($0.corners)")
//line width
let lineWidth = 2
//line color
let lineColor = UIColor.red
//Fill color with opacity
//You also can use UIColor.clear if you don't want to draw fill color
let fillColor = UIColor(red: 0, green: 1, blue: 0.2, alpha: 0.4)
//Draw box
$0.draw(lineWidth: lineWidth, lineColor: lineColor, fillColor: fillColor)
}
}
}
```
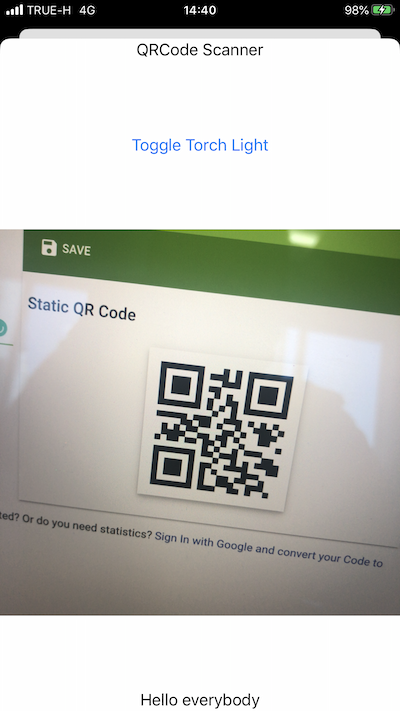
# How to turn torch light on/off
```Swift
import SwiftUI
import CarBode
import AVFoundation //import to access barcode types you want to scan
@State var torchIsOn = false
struct ContentView: View {
var body: some View {
VStack{
Button(action: {
self.torchIsOn.toggle() //Toggle On/Off
}) {
Text("Toggle Torch Light")
}
Spacer()
CBScanner(
supportBarcode: .constant([.qr, .code128]), //Set type of barcode you want to scan
scanInterval: .constant(5.0), //Event will trigger every 5 seconds
torchLightIsOn: $torchIsOn // Bind a Bool to enable/disable torch light
){
//When the scanner found a barcode
print("BarCodeType =",$0.type.rawValue, "Value =",$0.value)
}
}
}
}
```
# Switch to front camera
```swift
import SwiftUI
import CarBode
import AVFoundation //import to access barcode types you want to scan
@State var torchIsOn = false
struct ContentView: View {
var body: some View {
VStack{
@State var cameraPosition = AVCaptureDevice.Position.back
// Click to Toggle camera
Button(action: {
if cameraPosition == .back {
cameraPosition = .front
}else{
cameraPosition = .back
}
}) {
if cameraPosition == .back{
Text("Swicth Camera to Front")
}else{
Text("Swicth Camera to Back")
}
}
Spacer()
CBScanner(
supportBarcode: .constant([.qr, .code128]), //Set type of barcode you want to scan
scanInterval: .constant(5.0), //Event will trigger every 5 seconds
cameraPosition: $cameraPosition //Bind to switch front/back camera
){
//When the scanner found a barcode
print("BarCodeType =",$0.type.rawValue, "Value =",$0.value)
}
}
}
}
```
# Test on iOS simulator
The iOS simulator doesn't support the camera yet
but you can set a mock barcode for iOS simulator.
No need to remove the mock barcode from the production app it will only use for iOS simulator.
```Swift
CBScanner(
supportBarcode: .constant([.qr, .code128]), //Set type of barcode you want to scan
scanInterval: .constant(5.0), //Event will trigger every 5 seconds
mockBarCode: .constant(BarcodeData(value:"Mocking data", type: .qr))
){
//When you click the button on screen mock data will appear here
print("BarCodeType =",$0.type.rawValue, "Value =",$0.value)
}
```
## Barcode Types Support
Read here [https://developer.apple.com/documentation/avfoundation/avmetadataobject/objecttype](https://developer.apple.com/documentation/avfoundation/avmetadataobject/objecttype)
# How to use barcode generator view
## Example code
```Swift
import SwiftUI
struct ModalBarcodeGenerator: View {
@State var dataString = "Hello Carbode"
@State var barcodeType = CBBarcodeView.BarcodeType.qrCode
@State var rotate = CBBarcodeView.Orientation.up
var body: some View {
var body: some View {
VStack {
CBBarcodeView(data: $dataString,
barcodeType: $barcodeType,
orientation: $rotate)
.frame(minWidth: 0, maxWidth: .infinity, minHeight: 400, maxHeight: 400, alignment: .topLeading)
}
}
}
}
```
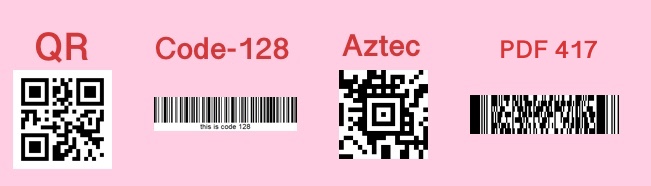
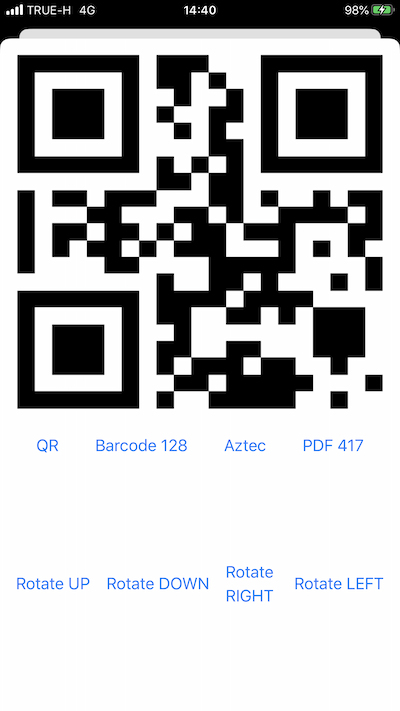
# Barcode type you can generate
```Swift
//QR Code
// CBBarcodeView.BarcodeType.qrCode
//Code 128
// CBBarcodeView.BarcodeType.barcode128
//Aztec Code
// CBBarcodeView.BarcodeType.aztecCode
//PDF417
// CBBarcodeView.BarcodeType.PDF417
@State var barcodeType = CBBarcodeView.BarcodeType.qrCode
CBBarcodeView(data: ..... ,
barcodeType: $barcodeType ,
orientation: ... )
```
# Rotate your barcode
```Swift
/*Youcan rotate 4 directions
CBBarcodeView.Orientation.up
CBBarcodeView.Orientation.down
CBBarcodeView.Orientation.left
CBBarcodeView.Orientation.right*/
@State var rotate = CBBarcodeView.Orientation.left
CBBarcodeView(data: ..... ,
barcodeType: ..... ,
orientation: $rotate)
```
# Contributing
CarBode welcomes contributions in the form of GitHub issues and pull-requests.
## Changelog
- 2.1.2 When scan on difference barcode scanner will ignore the delay time
- 2.1.1 Fixed bugs
- 2.1.0 You can draw a box around the barcode
- 2.0.1 Fixed bugs
- 2.0.0 I learned many more things about SwiftUI then I decide to restructure the scanner I hope you will like it. And this version you can switch front and back camera.
- 1.5.0 Fixed bugs and you can read the barcode type when scanner found it
- 1.4.0 Rename component and add new barcode generator view component
- 1.3.0 You can set a mock barcode when running with an iOS simulator.
- 1.2.0 Add feature allows to turn torch light on or off.
- 1.0.1 Fixed bug camera delay 10 seconds when use on modal.