# keras-vis
**Repository Path**: deeplearningrepos/keras-vis
## Basic Information
- **Project Name**: keras-vis
- **Description**: Neural network visualization toolkit for keras
- **Primary Language**: Unknown
- **License**: MIT
- **Default Branch**: master
- **Homepage**: None
- **GVP Project**: No
## Statistics
- **Stars**: 0
- **Forks**: 0
- **Created**: 2021-03-30
- **Last Updated**: 2021-08-31
## Categories & Tags
**Categories**: Uncategorized
**Tags**: None
## README
# Keras Visualization Toolkit
[](https://travis-ci.org/raghakot/keras-vis)
[](https://github.com/raghakot/keras-vis/blob/master/LICENSE)
[](https://keras-vis.herokuapp.com/)
keras-vis is a high-level toolkit for visualizing and debugging your trained keras neural net models. Currently
supported visualizations include:
- Activation maximization
- Saliency maps
- Class activation maps
All visualizations by default support N-dimensional image inputs. i.e., it generalizes to N-dim image inputs
to your model.
The toolkit generalizes all of the above as energy minimization problems with a clean, easy to use,
and extendable interface. Compatible with both theano and tensorflow backends with 'channels_first', 'channels_last'
data format.
## Quick links
* Read the documentation at [https://raghakot.github.io/keras-vis](https://raghakot.github.io/keras-vis).
* The Japanese edition is [https://keisen.github.io/keras-vis-docs-ja](https://keisen.github.io/keras-vis-docs-ja).
* Join the slack [channel](https://keras-vis.herokuapp.com/) for questions/discussions.
* We are tracking new features/tasks in [waffle.io](https://waffle.io/raghakot/keras-vis). Would love it if you lend us
a hand and submit PRs.
## Getting Started
In image backprop problems, the goal is to generate an input image that minimizes some loss function.
Setting up an image backprop problem is easy.
**Define weighted loss function**
Various useful loss functions are defined in [losses](https://raghakot.github.io/keras-vis/vis.losses).
A custom loss function can be defined by implementing [Loss.build_loss](https://raghakot.github.io/keras-vis/vis.losses/#lossbuild_loss).
```python
from vis.losses import ActivationMaximization
from vis.regularizers import TotalVariation, LPNorm
filter_indices = [1, 2, 3]
# Tuple consists of (loss_function, weight)
# Add regularizers as needed.
losses = [
(ActivationMaximization(keras_layer, filter_indices), 1),
(LPNorm(model.input), 10),
(TotalVariation(model.input), 10)
]
```
**Configure optimizer to minimize weighted loss**
In order to generate natural looking images, image search space is constrained using regularization penalties.
Some common regularizers are defined in [regularizers](https://raghakot.github.io/keras-vis/vis.regularizers).
Like loss functions, custom regularizer can be defined by implementing
[Loss.build_loss](https://raghakot.github.io/keras-vis/vis.losses/#lossbuild_loss).
```python
from vis.optimizer import Optimizer
optimizer = Optimizer(model.input, losses)
opt_img, grads, _ = optimizer.minimize()
```
Concrete examples of various supported visualizations can be found in
[examples folder](https://github.com/raghakot/keras-vis/tree/master/examples).
## Installation
1) Install [keras](https://github.com/fchollet/keras/blob/master/README.md#installation)
with theano or tensorflow backend. Note that this library requires Keras > 2.0
2) Install keras-vis
> From sources
```bash
sudo python setup.py install
```
> PyPI package
```bash
sudo pip install keras-vis
```
## Visualizations
**NOTE: The links are currently broken and the entire documentation is being reworked.
Please see examples/ for samples.**
Neural nets are black boxes. In the recent years, several approaches for understanding and visualizing Convolutional
Networks have been developed in the literature. They give us a way to peer into the black boxes,
diagnose mis-classifications, and assess whether the network is over/under fitting.
Guided backprop can also be used to create [trippy art](https://deepdreamgenerator.com/gallery), neural/texture
[style transfer](https://github.com/jcjohnson/neural-style) among the list of other growing applications.
Various visualizations, documented in their own pages, are summarized here.
### [Conv filter visualization](https://raghakot.github.io/keras-vis/visualizations/conv_filters)
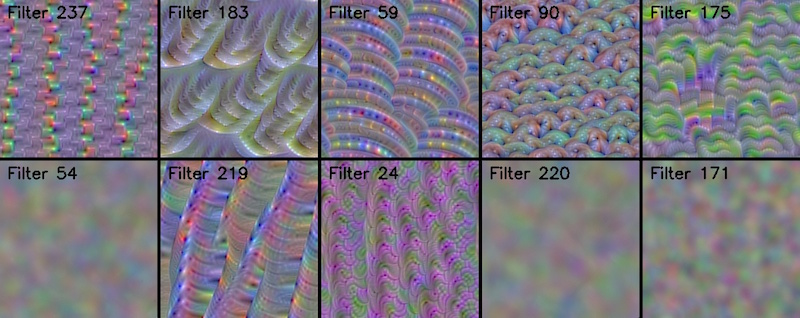 *Convolutional filters learn 'template matching' filters that maximize the output when a similar template
pattern is found in the input image. Visualize those templates via Activation Maximization.*
*Convolutional filters learn 'template matching' filters that maximize the output when a similar template
pattern is found in the input image. Visualize those templates via Activation Maximization.*
### [Dense layer visualization](https://raghakot.github.io/keras-vis/visualizations/dense)
 *How can we assess whether a network is over/under fitting or generalizing well?*
### [Attention Maps](https://raghakot.github.io/keras-vis/visualizations/attention)
 *How can we assess whether a network is attending to correct parts of the image in order to generate a decision?*
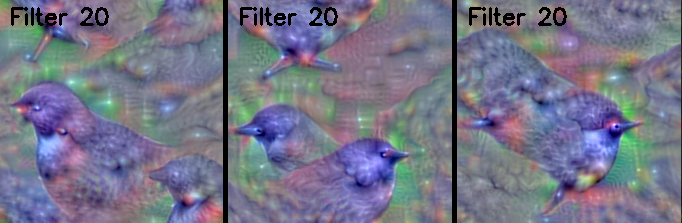
### Generating animated gif of optimization progress
It is possible to generate an animated gif of optimization progress by leveraging
[callbacks](https://raghakot.github.io/keras-vis/vis.callbacks). Following example shows how to visualize the
activation maximization for 'ouzel' class (output_index: 20).
```python
from keras.applications import VGG16
from vis.losses import ActivationMaximization
from vis.regularizers import TotalVariation, LPNorm
from vis.input_modifiers import Jitter
from vis.optimizer import Optimizer
from vis.callbacks import GifGenerator
# Build the VGG16 network with ImageNet weights
model = VGG16(weights='imagenet', include_top=True)
print('Model loaded.')
# The name of the layer we want to visualize
# (see model definition in vggnet.py)
layer_name = 'predictions'
layer_dict = dict([(layer.name, layer) for layer in model.layers[1:]])
output_class = [20]
losses = [
(ActivationMaximization(layer_dict[layer_name], output_class), 2),
(LPNorm(model.input), 10),
(TotalVariation(model.input), 10)
]
opt = Optimizer(model.input, losses)
opt.minimize(max_iter=500, verbose=True, input_modifiers=[Jitter()], callbacks=[GifGenerator('opt_progress')])
```
Notice how the output jitters around? This is because we used [Jitter](https://raghakot.github.io/keras-vis/vis.modifiers/#jitter),
a kind of [ImageModifier](https://raghakot.github.io/keras-vis/vis.modifiers/#imagemodifier) that is known to produce
crisper activation maximization images. As an exercise, try:
- Without Jitter
- Varying various loss weights
## Citation
Please cite keras-vis in your publications if it helped your research. Here is an example BibTeX entry:
```
@misc{raghakotkerasvis,
title={keras-vis},
author={Kotikalapudi, Raghavendra and contributors},
year={2017},
publisher={GitHub},
howpublished={\url{https://github.com/raghakot/keras-vis}},
}
```