# SpringBoot集成FlowableUI
**Repository Path**: dengpbs/flowable-ui
## Basic Information
- **Project Name**: SpringBoot集成FlowableUI
- **Description**: SpringBoot集成flowable-ui
- **Primary Language**: Java
- **License**: Not specified
- **Default Branch**: master
- **Homepage**: None
- **GVP Project**: No
## Statistics
- **Stars**: 3
- **Forks**: 1
- **Created**: 2022-04-15
- **Last Updated**: 2024-10-19
## Categories & Tags
**Categories**: Uncategorized
**Tags**: None
## README
# FlowableUI集成到SpringBoot
> lecture:波波老师

# 一、常见的整合方式
在Flowable工作流开发中大家最为头疼的应该就是流程设计器的整合了。常见的整合方式有两种
* 在实际项目中集成FlowableUI这个官方的设计器
* 通过开源的组件比如LogicFLow或者EasyFlow等来处理或者通过bpmn.js自己来搞定流程设计
本文就给大家介绍下在SpringBoot项目中如何的来集成FlowableUI设计器。
# 二、FlowableUI集成
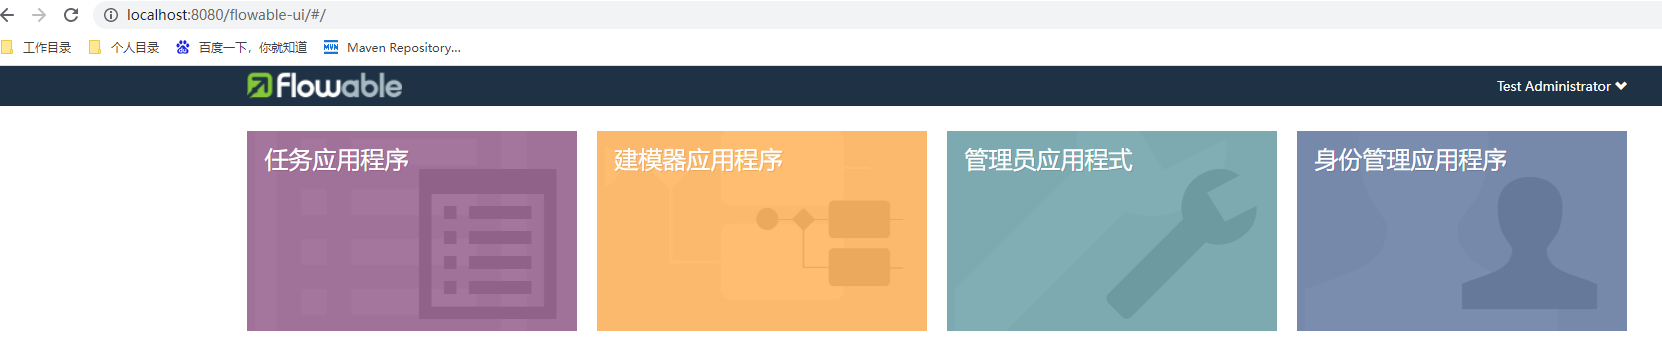
## 1.FlowableUI简单介绍
在Flowable6.4及之前在FlowableUI中都是分成了几个模块
| starter | 描述 |
| ---------------- | ------------------------------------------------------------ |
| flowable-modeler | 让具有建模权限的用户可以创建流程模型、表单、选择表与应用定义。 |
| flowable-idm | 身份管理应用。为所有Flowable UI应用提供单点登录认证功能,
并且为拥有IDM管理员权限的用户提供了管理用户、组与权限的功能 |
| flowable-task | 运行时任务应用。提供了启动流程实例、编辑任务表单、完成任务,以及查询流程实例与任务的功能。 |
| flowable-admin | 管理应用。让具有管理员权限的用户可以查询BPMN、DMN、Form及Content引擎,
并提供了许多选项用于修改流程实例、任务、作业等。管理应用通过REST API连接至引擎,
并与Flowable Task应用及Flowable REST应用一同部署。 |
| flowable-rest | Flowable页面包含的常用REST API |
在当前最新的6.7.2中已经把这几个模块都整合到了一个war包中就大大的简化了我们整合的步骤了。
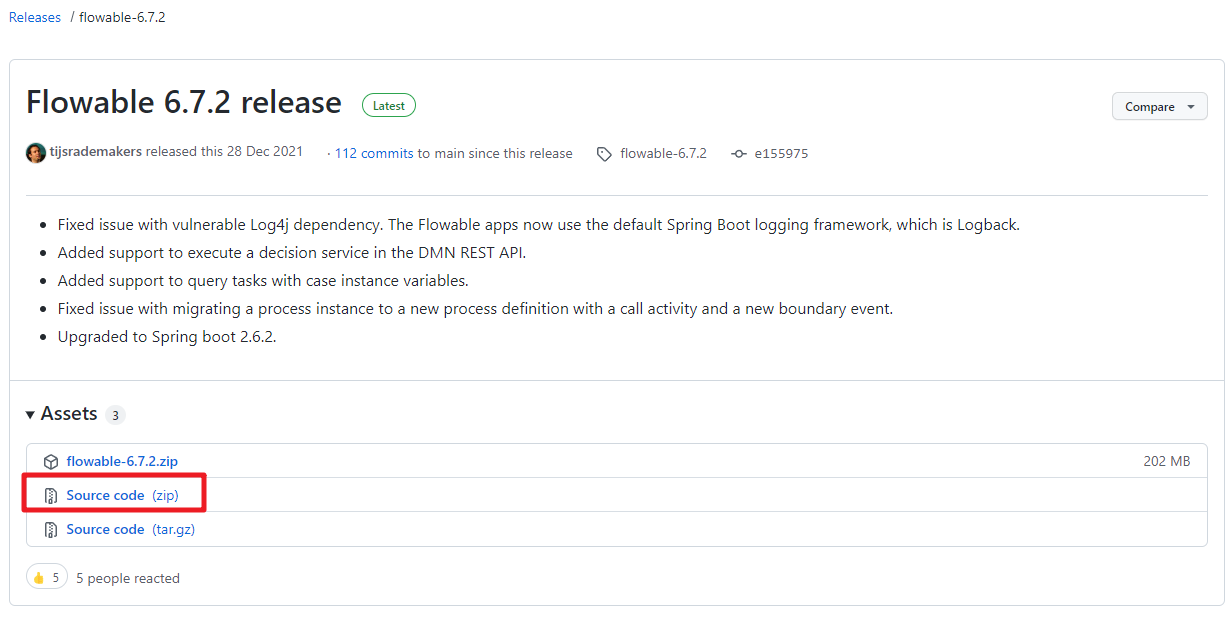
## 2.官网源码下载
首先我们需要从官方的GitHub下载最新的源码文件。地址是:https://github.com/flowable/flowable-engine/releases/tag/flowable-6.7.2
下载成功后,解压缩获取里面的flowable-ui的源码,并可以拷贝出来,放到我们独立的工作空间
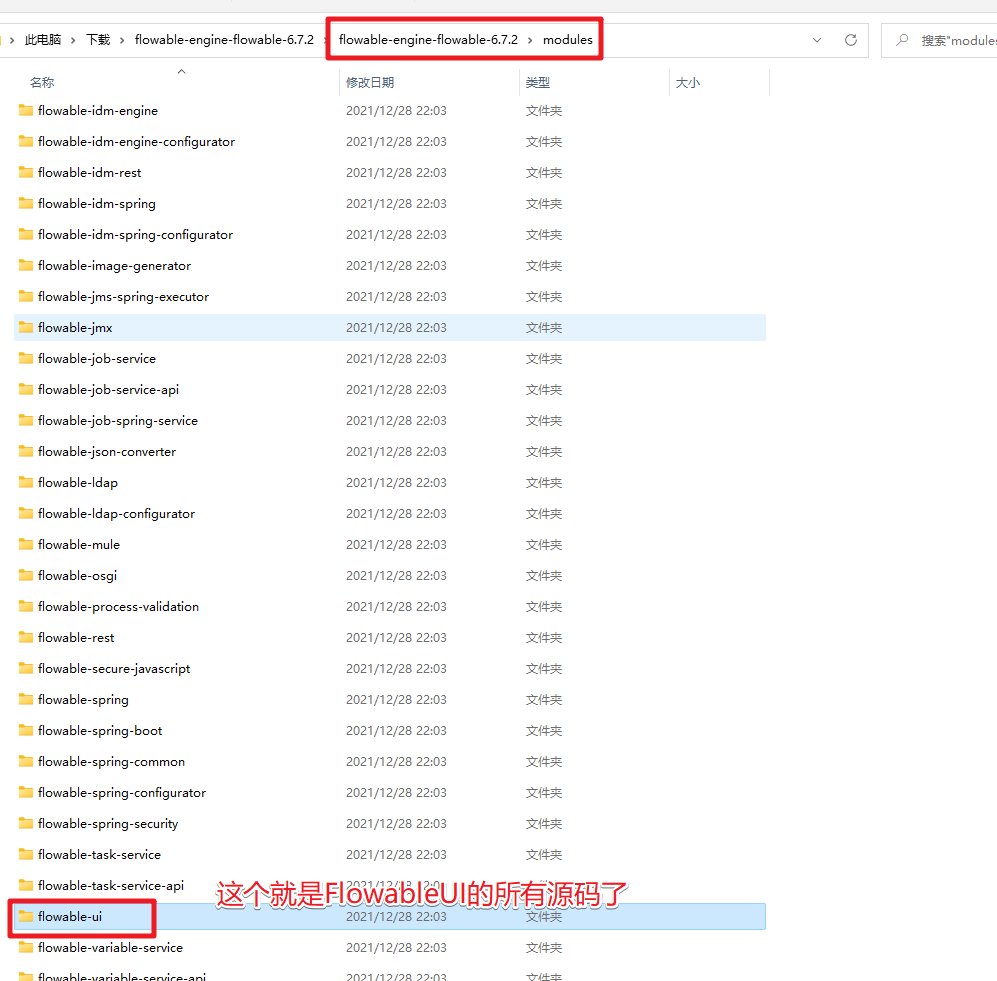
然后拷贝到对应的工作空间,就可以打开运行了。
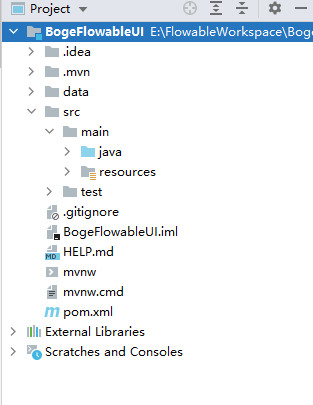
## 3.FlowableUI源码介绍
在IDEA中打开FlowableUI的源码。结构为:
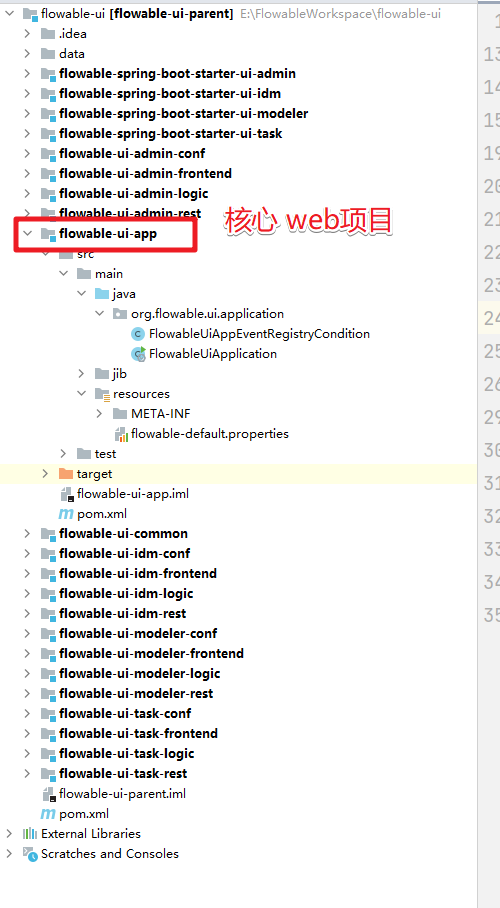
我们可以看到整个的目录结构就是一个maven的聚合项目,其中的web项目就是flowable-ui-app这个,我们可以通过其中的SpringBoot项目的启动类来直接启动这个项目就可以来访问了。
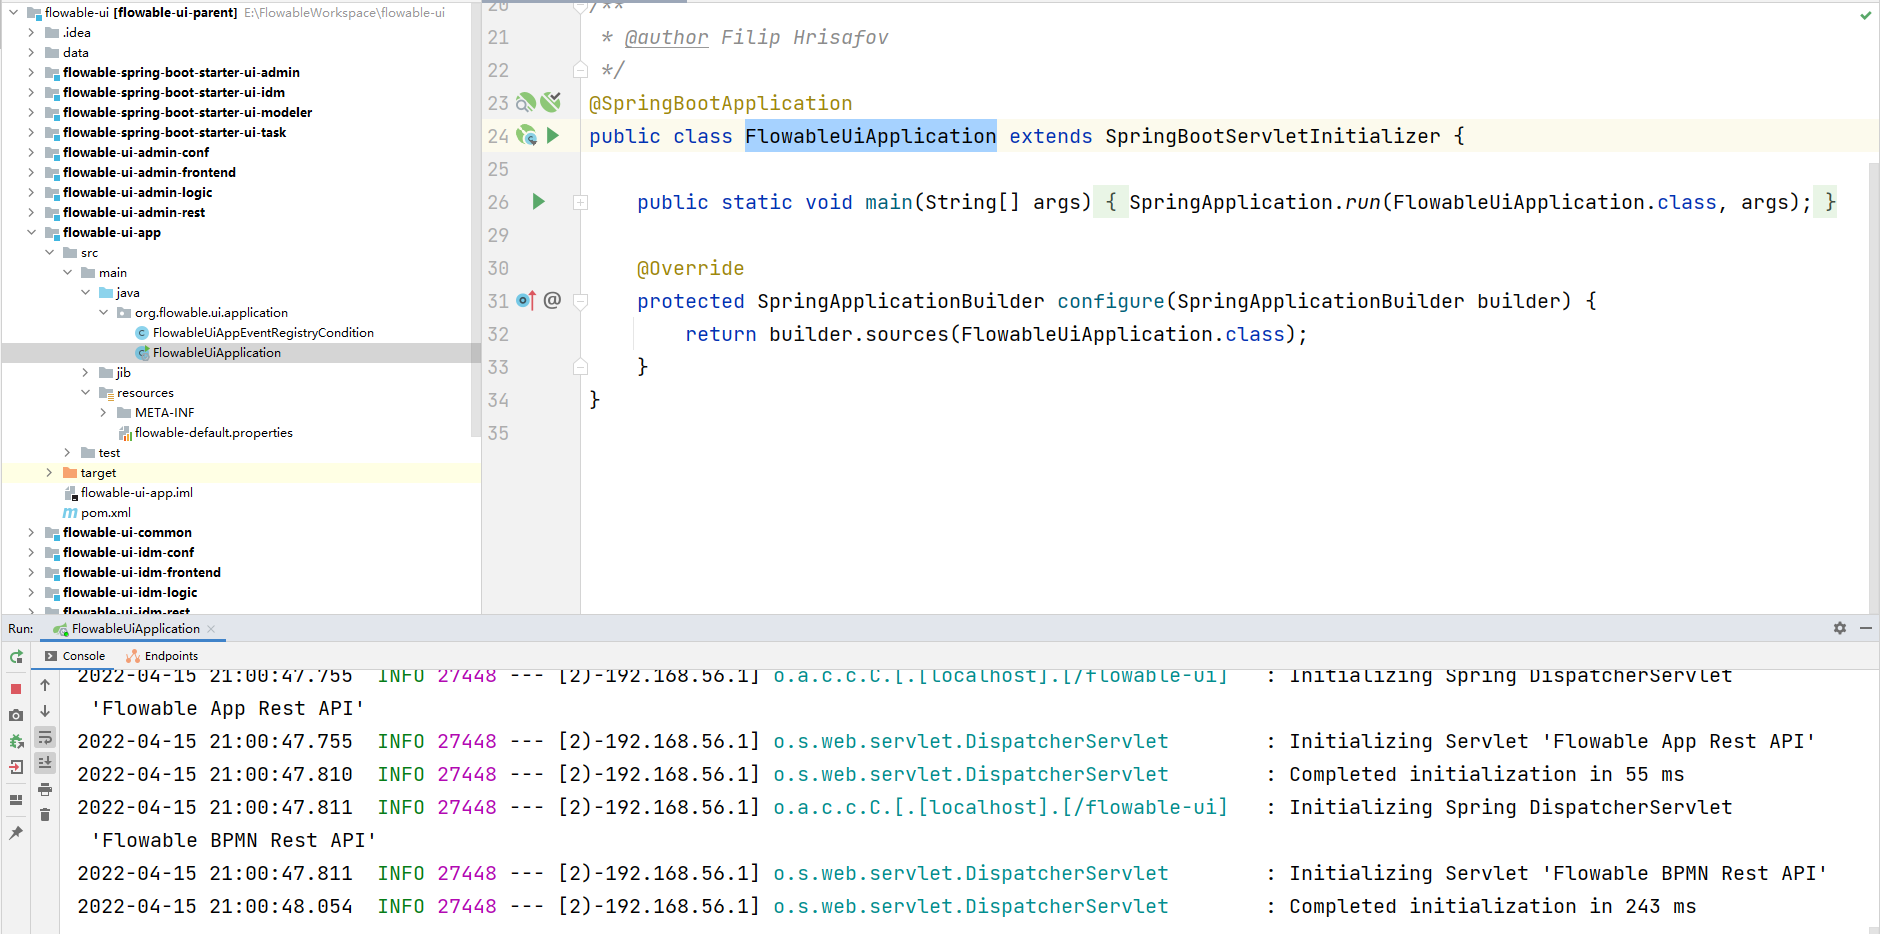
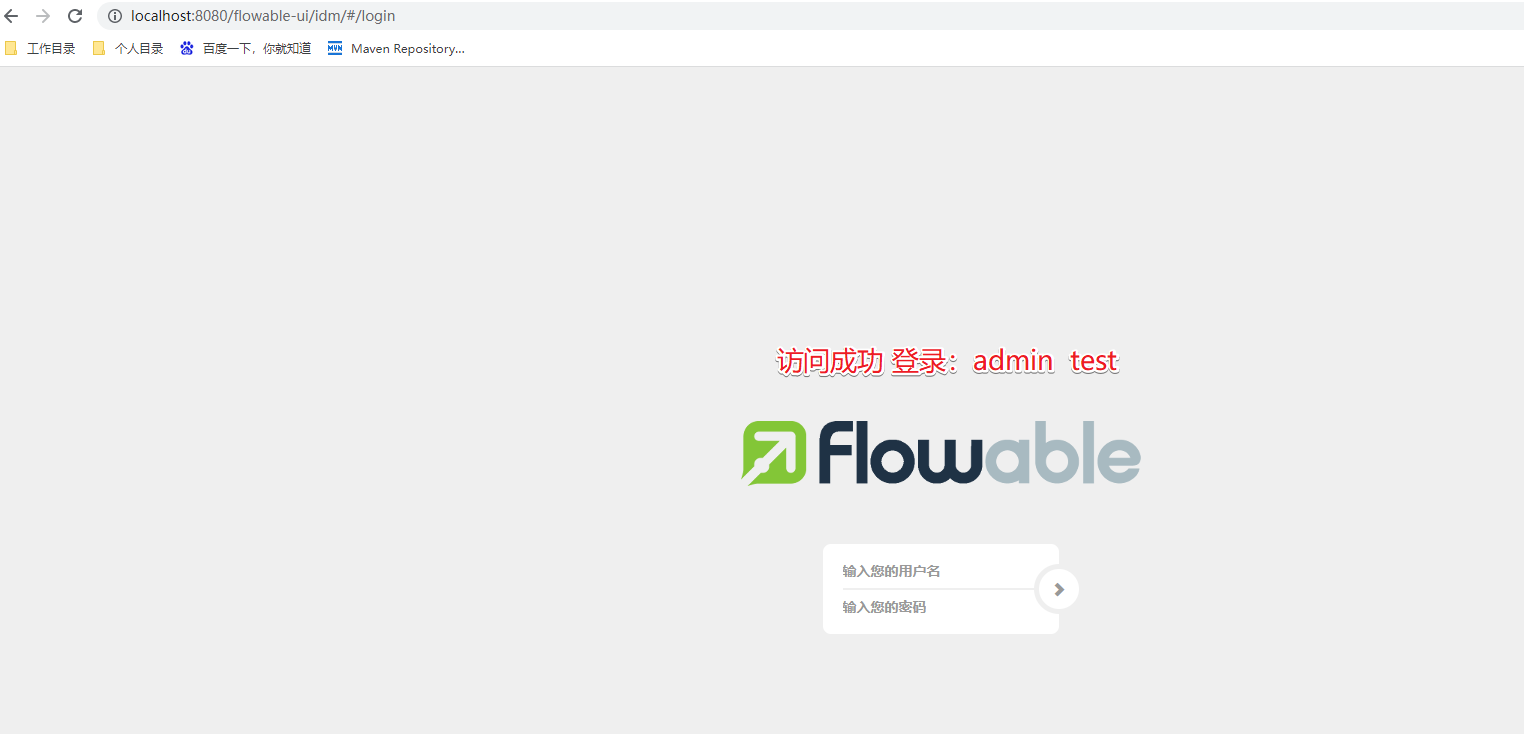
启动成功,可以访问 http://localhost:8080/flowable-ui
具体的操作步骤就不演示了。
## 4.SpringBoot项目整合
然后我们来看看怎么在我们自己创建的SpringBoot项目来整合FlowableUI,其实通过上面的操作大家应该会有对应的想法了,我们只需要创建一个SpringBoot项目,然后把flowable-ui-app中的相关资源拷贝到SpringBoot项目中,并且添加对应的依赖就可以了。
### 4.1 创建项目
我们先创建一个普通的SpringBoot项目
### 4.2 添加相关的依赖
直接从flowable-ui-app中的pom.xml中拷贝对应的依赖,并删除对应的无用的插件。同时添加mysql数据库的依赖,完整的依赖如下
```xml
4.0.0
org.flowable
flowable-ui-parent
6.7.2
com.boge.flowable
boge-flowable-ui
6.7.2
BogeFlowableUI
Demo project for Spring Boot
1.8
org.flowable
flowable-spring-boot-starter-ui-task
org.flowable
flowable-spring-boot-starter-ui-admin
org.flowable
flowable-spring-boot-starter-ui-idm
org.flowable
flowable-spring-boot-starter-ui-modeler
org.springframework.boot
spring-boot-starter-activemq
org.springframework.boot
spring-boot-starter-amqp
org.springframework.kafka
spring-kafka
org.springframework.boot
spring-boot-starter-oauth2-client
org.springframework.boot
spring-boot-starter-oauth2-resource-server
org.springframework.boot
spring-boot-starter-tomcat
provided
org.springframework.boot
spring-boot-devtools
provided
org.springframework.boot
spring-boot-starter-actuator
org.springframework.boot
spring-boot-configuration-processor
true
org.springframework.boot
spring-boot-properties-migrator
mysql
mysql-connector-java
8.0.28
org.springframework.boot
spring-boot-starter-test
test
net.javacrumbs.json-unit
json-unit-assertj
test
org.springframework.ldap
spring-ldap-core
test
com.unboundid
unboundid-ldapsdk
test
flowable-ui
src/main/resources
true
**/*
h2mem
true
com.h2database
h2
org.springframework.boot
spring-boot-maven-plugin
--com.sun.management.jmxremote.port=4001
postgresql
org.postgresql
postgresql
runtime
org.springframework.boot
spring-boot-maven-plugin
--spring.datasource.driver-class-name=org.postgresql.Driver
--spring.datasource.url=jdbc:postgresql://localhost:5432/flowable
--spring.datasource.username=flowable
--spring.datasource.password=flowable
--com.sun.management.jmxremote.port=4000
mysql
mysql
mysql-connector-java
compile
org.springframework.boot
spring-boot-maven-plugin
--spring.datasource.driver-class-name=com.mysql.jdbc.Driver
--spring.datasource.url=jdbc:mysql://127.0.0.1:3306/flowable?characterEncoding=UTF-8&serverTimezone=UTC
--spring.datasource.username=flowable
--spring.datasource.password=flowable
--com.sun.management.jmxremote.port=4001
```
### 4.3 修改配置
把flowable-ui-app中的属性文件拷贝过来。同时修改对应的数据库的信息
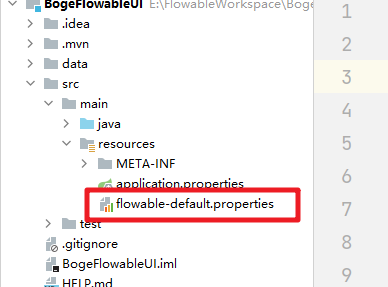
属性文件中的完整内容为:
```properties
#server.port=8080
server.servlet.context-path=/flowable-ui
spring.jmx.unique-names=true
# This is needed to force use of JDK proxies instead of using CGLIB
spring.aop.proxy-target-class=false
spring.aop.auto=false
spring.application.name=flowable-ui
spring.banner.location=classpath:/org/flowable/spring/boot/flowable-banner.txt
# The default domain for generating ObjectNames must be specified. Otherwise when multiple Spring Boot applications start in the same servlet container
# all would be created with the same name (com.zaxxer.hikari:name=dataSource,type=HikariDataSource) for example
spring.jmx.default-domain=${spring.application.name}
#
# SECURITY
#
spring.security.filter.dispatcher-types=REQUEST,FORWARD,ASYNC
# Expose all actuator endpoints to the web
# They are exposed, but only authenticated users can see /info and /health abd users with access-admin can see the others
management.endpoints.web.exposure.include=*
# Full health details should only be displayed when a user is authorized
management.endpoint.health.show-details=when_authorized
# Only users with role access-admin can access full health details
management.endpoint.health.roles=access-admin
# Spring prefixes the roles with ROLE_. However, Flowable does not have that concept yet, so we need to override that with an empty string
flowable.common.app.role-prefix=
#
# SECURITY OAuth2
# Examples are for Keycloak
#
#spring.security.oauth2.resourceserver.jwt.issuer-uri=/auth/realms/
#spring.security.oauth2.client.registration.keycloak.client-id=
#spring.security.oauth2.client.registration.keycloak.client-secret=
#spring.security.oauth2.client.registration.keycloak.client-name=Flowable UI Keycloak
#spring.security.oauth2.client.registration.keycloak.authorization-grant-type=authorization_code
#spring.security.oauth2.client.provider.keycloak.issuer-uri=/auth/realms/
#spring.security.oauth2.client.provider.keycloak.user-name-attribute=preferred_username
#flowable.common.app.security.type=oauth2
#flowable.common.app.security.oauth2.authorities-attribute=groups
#flowable.common.app.security.oauth2.groups-attribute=userGroups
#flowable.common.app.security.oauth2.default-authorities=access-task
#flowable.common.app.security.oauth2.default-groups=flowableUser
#flowable.common.app.security.oauth2.full-name-attribute=name
#flowable.common.app.security.oauth2.email-attribute=email
#
# DATABASE
#
#spring.datasource.driver-class-name=org.h2.Driver
# spring.datasource.url=jdbc:h2:~/flowable-db/engine-db;AUTO_SERVER=TRUE;AUTO_SERVER_PORT=9093;DB_CLOSE_DELAY=-1
spring.datasource.driver-class-name=com.mysql.cj.jdbc.Driver
spring.datasource.url=jdbc:mysql://localhost:3306/flowable?serverTimezone=UTC&nullCatalogMeansCurrent=true
#spring.datasource.driver-class-name=org.postgresql.Driver
#spring.datasource.url=jdbc:postgresql://localhost:5432/flowable
#spring.datasource.driver-class-name=com.microsoft.sqlserver.jdbc.SQLServerDriver
#spring.datasource.url=jdbc:sqlserver://localhost:1433;databaseName=flowablea
#spring.datasource.driver-class-name=oracle.jdbc.driver.OracleDriver
#spring.datasource.url=jdbc:oracle:thin:@localhost:1521:FLOWABLE
#spring.datasource.driver-class-name=com.ibm.db2.jcc.DB2Driver
#spring.datasource.url=jdbc:db2://localhost:50000/flowable
spring.datasource.username=root
spring.datasource.password=123456
# JNDI CONFIG
# If uncommented, the datasource will be looked up using the configured JNDI name.
# This will have preference over any datasource configuration done below that doesn't use JNDI
#
# Eg for JBoss: java:jboss/datasources/flowableDS
#
#spring.datasource.jndi-name==jdbc/flowableDS
# Set whether the lookup occurs in a J2EE container, i.e. if the prefix "java:comp/env/" needs to be added if the JNDI
# name doesn't already contain it. Default is "true".
#datasource.jndi.resourceRef=true
#
# Connection pool (see https://github.com/brettwooldridge/HikariCP#configuration-knobs-baby)
#
spring.datasource.hikari.poolName=${spring.application.name}
# 10 minutes
spring.datasource.hikari.maxLifetime=600000
# 5 minutes
spring.datasource.hikari.idleTimeout=300000
spring.datasource.hikari.minimumIdle=10
spring.datasource.hikari.maximumPoolSize=50
# test query for H2, MySQL, PostgreSQL and Microsoft SQL Server
#spring.datasource.hikari.connection-test-query=select 1
# test query for Oracle
#spring.datasource.hikari.connection-test-query=SELECT 1 FROM DUAL
# test query for DB2
#spring.datasource.hikari.connection-test-query=SELECT current date FROM sysibm.sysdummy1
#
# Default Task Executor (will be used for @Async)
#
spring.task.execution.pool.core-size=2
spring.task.execution.pool.max-size=50
spring.task.execution.pool.queue-capacity=10000
spring.task.execution.thread-name-prefix=flowable-ui-task-Executor-
#
# Task scheduling
#
spring.task.scheduling.pool.size=5
#
# EMAIL
#
#flowable.mail.server.host=localhost
#flowable.mail.server.port=1025
#flowable.mail.server.username=
#flowable.mail.server.password=
#
# FLOWABLE
#
flowable.process.definition-cache-limit=512
#flowable.dmn.strict-mode=false
flowable.process.async.executor.default-async-job-acquire-wait-time=PT5S
flowable.process.async.executor.default-timer-job-acquire-wait-time=PT5S
flowable.cmmn.async.executor.default-async-job-acquire-wait-time=PT5S
flowable.cmmn.async.executor.default-timer-job-acquire-wait-time=PT5S
# The maximum file upload limit. Set to -1 to set to 'no limit'. Expressed in bytes
spring.servlet.multipart.max-file-size=10MB
# The maximum request size limit. Set to -1 to set to 'no limit'.
# When multiple files can be uploaded this needs to be more than the 'max-file-size'.
spring.servlet.multipart.max-request-size=10MB
# For development purposes, data folder is created inside the sources ./data folder
flowable.content.storage.root-folder=data/
flowable.content.storage.create-root=true
flowable.common.app.idm-admin.user=admin
flowable.common.app.idm-admin.password=test
flowable.experimental.debugger.enabled=false
# Rest API in task application
# If false, disables the rest api in the task app
flowable.task.app.rest-enabled=true
# Configures the way user credentials are verified when doing a REST API call:
# 'any-user' : the user needs to exist and the password need to match. Any user is allowed to do the call (this is the pre 6.3.0 behavior)
# 'verify-privilege' : the user needs to exist, the password needs to match and the user needs to have the 'rest-api' privilege
# If nothing set, defaults to 'verify-privilege'
flowable.rest.app.authentication-mode=verify-privilege
# Enable form field validation after form submission on the engine side
flowable.form-field-validation-enabled=false
# Flowable Admin Properties
# Passwords for rest endpoints and master configs are stored encrypted in the database using AES/CBC/PKCS5PADDING
# It needs a 128-bit initialization vector (http://en.wikipedia.org/wiki/Initialization_vector)
# and a 128-bit secret key represented as 16 ascii characters below
#
# Do note that if these properties are changed after passwords have been saved, all existing passwords
# will not be able to be decrypted and the password would need to be reset in the UI.
flowable.admin.app.security.encryption.credentials-i-v-spec=j8kdO2hejA9lKmm6
flowable.admin.app.security.encryption.credentials-secret-spec=9FGl73ngxcOoJvmL
#flowable.admin.app.security.preemptive-basic-authentication=true
# Flowable IDM Properties
#
# LDAP
#
#flowable.idm.ldap.enabled=true
#flowable.idm.ldap.server=ldap://localhost
#flowable.idm.ldap.port=10389
#flowable.idm.ldap.user=uid=admin, ou=system
#flowable.idm.ldap.password=secret
#flowable.idm.ldap.base-dn=o=flowable
#flowable.idm.ldap.query.user-by-id=(&(objectClass=inetOrgPerson)(uid={0}))
#flowable.idm.ldap.query.user-by-full-name-like=(&(objectClass=inetOrgPerson)(|({0}=*{1}*)({2}=*{3}*)))
#flowable.idm.ldap.query.all-users=(objectClass=inetOrgPerson)
#flowable.idm.ldap.query.groups-for-user=(&(objectClass=groupOfUniqueNames)(uniqueMember={0}))
#flowable.idm.ldap.query.all-groups=(objectClass=groupOfUniqueNames)
#flowable.idm.ldap.query.group-by-id=(&(objectClass=groupOfUniqueNames)(uniqueId={0}))
#flowable.idm.ldap.attribute.user-id=uid
#flowable.idm.ldap.attribute.first-name=cn
#flowable.idm.ldap.attribute.last-name=sn
#flowable.idm.ldap.attribute.email=mail
#flowable.idm.ldap.attribute.group-id=cn
#flowable.idm.ldap.attribute.group-name=cn
#flowable.idm.ldap.cache.group-size=10000
#flowable.idm.ldap.cache.group-expiration=180000
#
# Keycloak
#
#flowable.idm.app.keycloak.enabled=true
#flowable.idm.app.keycloak.server=
#flowable.idm.app.keycloak.authentication-realm=master
#flowable.idm.app.keycloak.authentication-user=admin
#flowable.idm.app.keycloak.authentication-password=admin
#flowable.idm.app.keycloak.realm=
#
# DEFAULT ADMINISTRATOR ACCOUNT
#
flowable.idm.app.admin.user-id=admin
flowable.idm.app.admin.password=test
flowable.idm.app.admin.first-name=Test
flowable.idm.app.admin.last-name=Administrator
flowable.idm.app.admin.email=test-admin@example-domain.tld
# Enable and configure JMS
#flowable.task.app.jms-enabled=true
#spring.activemq.broker-url=tcp://localhost:61616
# Enable and configure RabbitMQ
#flowable.task.app.rabbit-enabled=true
#spring.rabbitmq.addresses=localhost:5672
#spring.rabbitmq.username=guest
#spring.rabbitmq.password=guest
# Enable and configure Kafka
#flowable.task.app.kafka-enabled=true
#spring.kafka.bootstrap-servers=localhost:9092
```
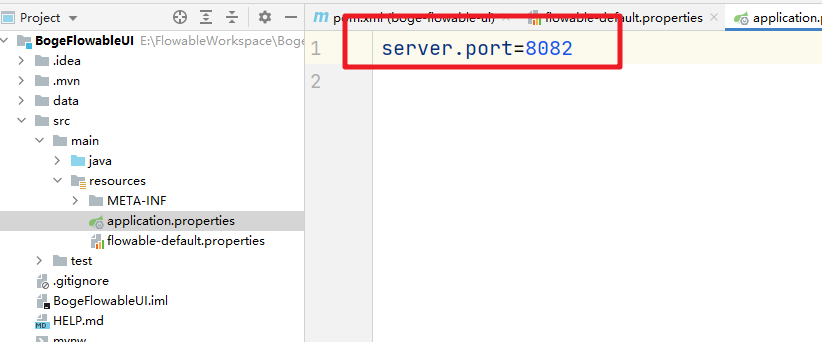
当然在SpringBoot的默认属性文件中我们也可以添加对应的配置:
### 4.4 拷贝配置类
然后把flowable-ui-app中的两个配置类拷贝过来。并且在SpringBoot项目的启动类中通过扫描来加载

### 4.5 启动测试
至此我们的集成操作就搞定了~启动服务来测试
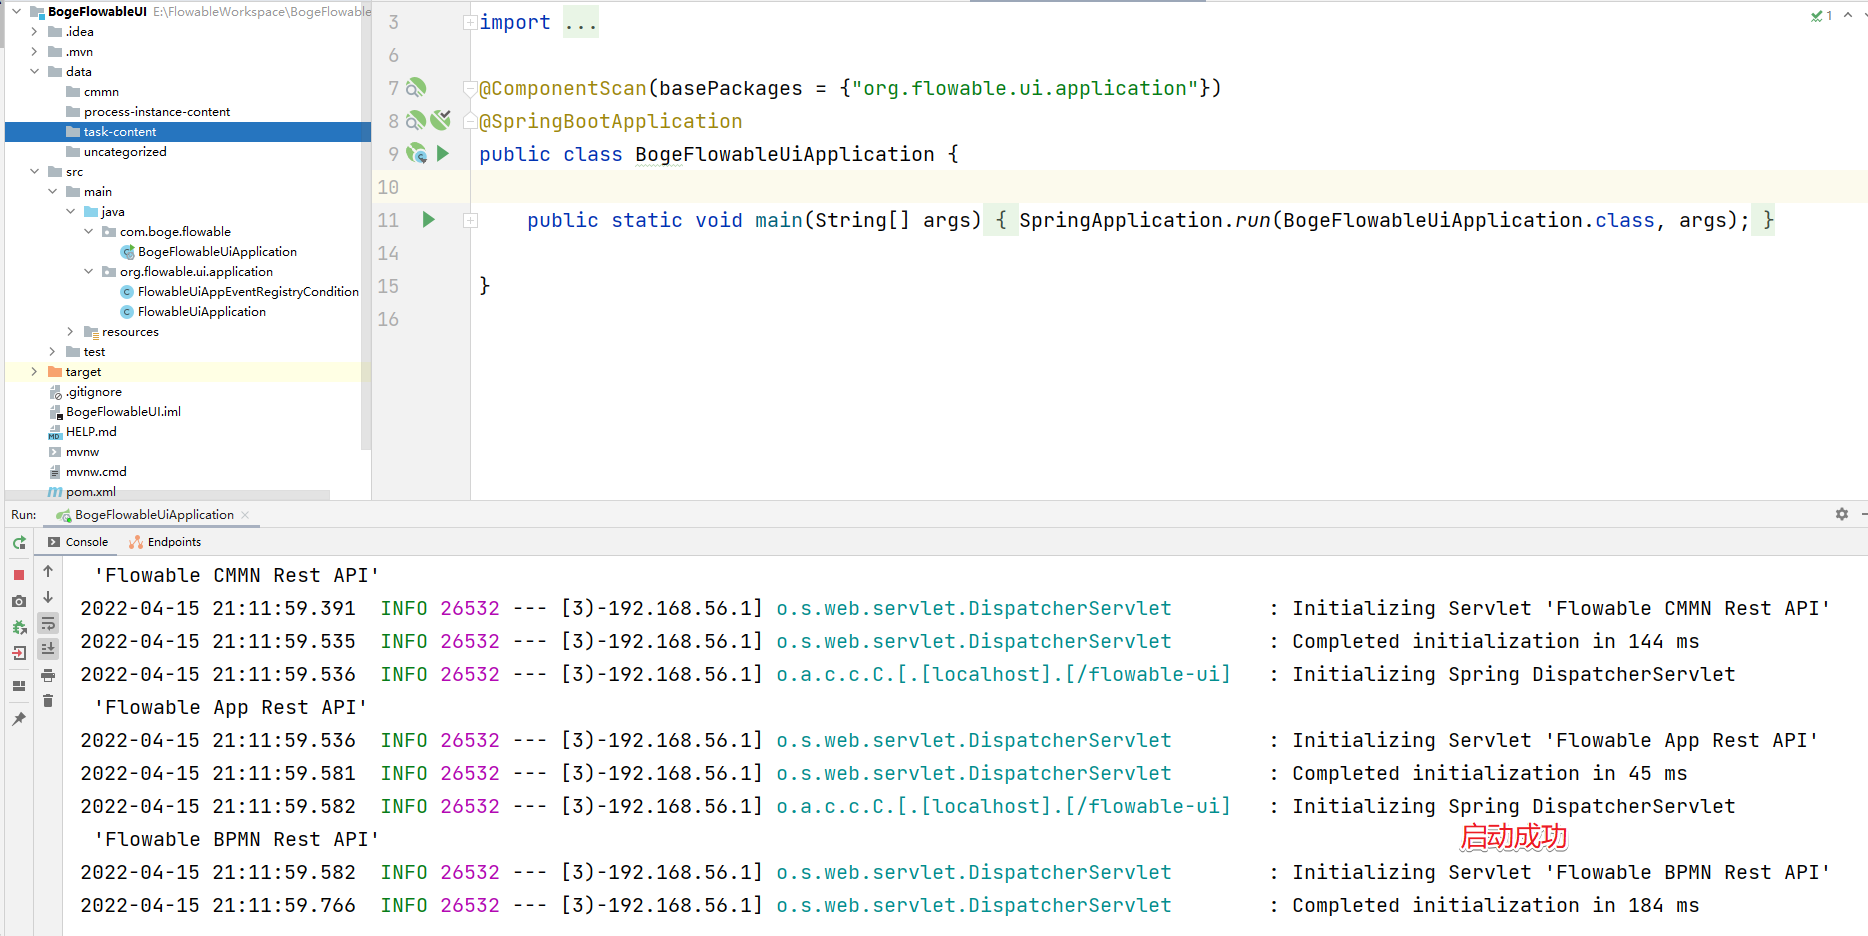
访问:http://localhost:8082/flowable-ui

通过admin和test来登录

搞定~