# vscode-sftp
**Repository Path**: exphp/vscode-sftp
## Basic Information
- **Project Name**: vscode-sftp
- **Description**: github上vscode-sftp的一个分支,我添加了快捷键上传和快捷键下载当前文件功能,修复了传输慢bug
- **Primary Language**: JavaScript
- **License**: MIT
- **Default Branch**: master
- **Homepage**: None
- **GVP Project**: No
## Statistics
- **Stars**: 0
- **Forks**: 2
- **Created**: 2024-07-03
- **Last Updated**: 2024-07-03
## Categories & Tags
**Categories**: Uncategorized
**Tags**: None
## README
# sftp sync extension for VS Code
[](https://www.paypal.com/cgi-bin/webscr?cmd=_s-xclick&hosted_button_id=BY89QD47D7MPS&source=url) [](https://paypal.me/liximomo)
# 以下内容均为第三方软件翻译
将本地目录与远程服务器目录同步。允许您选择在本地保存文件后编辑将文件上载到远程目录。这允许您或多或少地直接在服务器上编辑类似于winscp或其他类似的程序。
动力很好,功能也很好。非常简单,只需要三行配置!很快,一眨眼就完成了。
- 特性
- [带远程资源管理器的远程浏览器](#remote-explorer)
- 本地和远程差异
- 同步目录
- 上传/下载
- 保存时自动上载
- 文件监视器
- 多个配置
- 可切换配置文件
- [命令](https://github.com/liximomo/vscode-sftp/wiki/Command)
- [调试](#debug)
- [支持sftp项目](#Donation)
## 使用
如果您的最新文件在服务器上,您可以从一个空的本地文件夹开始,然后下载您的项目,然后从该点同步。
1. 在“vs code”中,打开要同步到远程服务器的本地目录(或创建一个空目录,您希望首先下载远程服务器文件夹的内容以便在本地进行编辑)。
2. `在windows/linux上按ctrl+shift+p`或在mac open command palette上使用“cmd+shift+p”,运行“sftp:config”命令。
3. 将出现一个名为`sftp.json文件`在“.vscode”目录下。编辑参数以匹配您的设置。
例如:
```json
{
"name": "Profile Name",
"host": "name_of_remote_host",
"protocol": "ftp",
"port": 21,
"secure": true,
"username": "username",
"remotePath": "/public_html/project", <---- This is the path which will be downloaded if you "Download Project"
"password": "password",
"uploadOnSave": true
}
```
password参数是可选的,但是如果不添加它,系统会不断提示您输入密码。请注意,必须用反斜杠转义任何反斜杠和其他特殊字符。
下面还有其他配置示例。
3. 保存并关闭`sftp.json文件`文件。
4. `在windows/linux上为ctrl+shift+p`或在mac open命令调色板上为`cmd+shift+p`。
5. 键入“sftp”,现在您将看到其他一些comand。
6. 如果您想从远程文件夹开始,最好先是'sftp:download project`。这将下载中的“remotepath”设置中显示的目录`sftp.json`到您的本地打开目录。
7. 完成-您现在可以在本地编辑,每次保存后,它将上载到远程文件。
8. 尽情使用把!
详细用法。请转到 [wiki](https://github.com/liximomo/vscode-sftp/wiki).
## 配置示例
你可以在这里看到完整的配置 [here](https://github.com/liximomo/vscode-sftp/wiki/config).
- [简单配置](#简单配置)
- [配置文件](#配置文件)
- [多重语境](#multiple-context)
- [连接跳变](#连接跳变)
- [单跳](#单跳)
- [跳频通信](#跳频通信)
- [用户配置中的设置](#用户配置中的设置)
### 简单配置
```json
{
"host": "host",
"username": "username",
"remotePath": "/remote/workspace"
}
```
### 配置文件
```json
{
"username": "username",
"password": "password",
"remotePath": "/remote/workspace/a",
"watcher": {
"files": "dist/*.{js,css}",
"autoUpload": false,
"autoDelete": false
},
"profiles": {
"dev": {
"host": "dev-host",
"remotePath": "/dev",
"uploadOnSave": true
},
"prod": {
"host": "prod-host",
"remotePath": "/prod"
}
},
"defaultProfile": "dev"
}
```
_注意:只有在根级别才能使用“context”和“watcher”。
使用“sftp:set profile”切换配置文件。
### 多个配置
上下文配置必须**不相同**。
```json
[
{
"name": "server1",
"context": "project/build",
"host": "host",
"username": "username",
"password": "password",
"remotePath": "/remote/project/build"
},
{
"name": "server2",
"context": "project/src",
"host": "host",
"username": "username",
"password": "password",
"remotePath": "/remote/project/src"
}
]
```
_注意:此模式下需要使用“name”。
### 连接跳变
您可以通过带有ssh协议的代理连接到目标服务器。
_注意:变量替换在跃点配置中不起作用**
#### 单跳
local -> hop -> target
```json
{
"name": "target",
"remotePath": "/path/in/target",
// hop
"host": "hopHost",
"username": "hopUsername",
"privateKeyPath": "/Users/localUser/.ssh/id_rsa", // The key file is assumed on the local.
"hop": {
// target
"host": "targetHost",
"username": "targetUsername",
"privateKeyPath": "/Users/hopUser/.ssh/id_rsa", // The key file is assumed on the hop.
}
}
```
#### 跳频通信
local -> hopa -> hopb -> target
```json
{
"name": "target",
"remotePath": "/path/in/target",
// hopa
"host": "hopAHost",
"username": "hopAUsername",
"privateKeyPath": "/Users/hopAUsername/.ssh/id_rsa" // The key file is assumed on the local.
"hop": [
// hopb
{
"host": "hopBHost",
"username": "hopBUsername",
"privateKeyPath": "/Users/hopaUser/.ssh/id_rsa" // The key file is assumed on the hopa.
},
// target
{
"host": "targetHost",
"username": "targetUsername",
"privateKeyPath": "/Users/hopbUser/.ssh/id_rsa", // The key file is assumed on the hopb.
}
]
}
```
### 用户配置中的设置
可以使用“remote”告诉sftp从[remote fs]获取配置(https://github.com/liximomo/vscode-remote-fs).
在用户设置中:
```json
"remotefs.remote": {
"dev": {
"scheme": "sftp",
"host": "host",
"username": "username",
"rootPath": "/path/to/somewhere"
},
"projectX": {
"scheme": "sftp",
"host": "host",
"username": "username",
"privateKeyPath": "/Users/xx/.ssh/id_rsa",
"rootPath": "/home/foo/some/projectx"
}
}
```
In sftp.json:
```json
{
"remote": "dev",
"remotePath": "/home/xx/",
"uploadOnSave": true,
"ignore": [".vscode", ".git", ".DS_Store"]
}
```
## 远程资源管理器
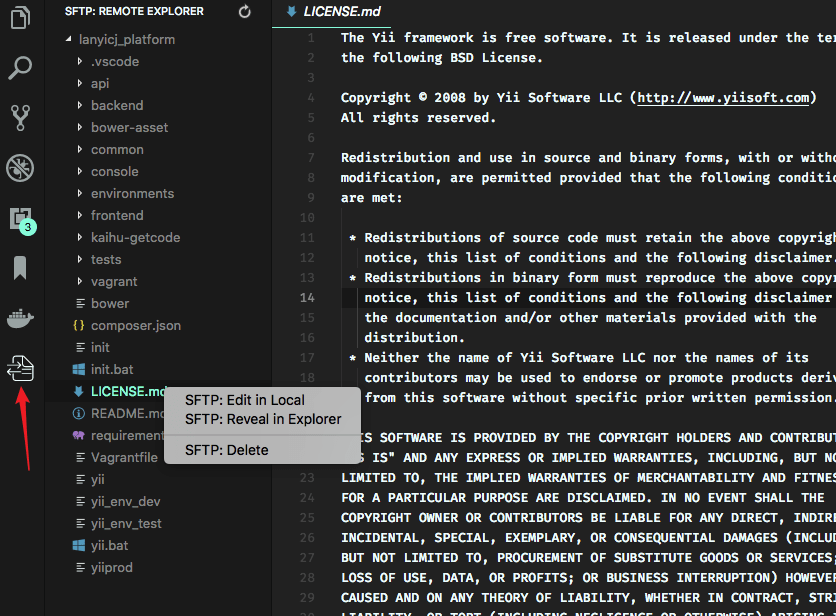
远程资源管理器允许您在远程中浏览文件。您可以通过以下方式打开远程资源管理器:
1. 运行命令“view:show sftp”。
2. 单击活动栏中的sftp视图。
只能使用远程资源管理器查看文件内容。运行命令`sftp:edit in local`以在本地编辑它。
_注意:uu在**删除**文件后,需要手动刷新父文件夹,以更新资源管理器。
## 调试
1. 打开用户设置。
- Windows/Linux系统 - `File > Preferences > Settings`
- macOS系统 - `Code > Preferences > Settings`
2. 设置`sftp调试`设置为“true”并重新加载vscode。
3. 查看“view>output>sftp”中的日志。
---
## 捐赠
如果这个项目帮助你减少了开发时间,你可以给我一杯咖啡:)
### 微信
 ### 支付宝
 ### PayPal
[](https://www.paypal.com/cgi-bin/webscr?cmd=_s-xclick&hosted_button_id=BY89QD47D7MPS&source=url) [](https://paypal.me/liximomo)
### PayPal
[](https://www.paypal.com/cgi-bin/webscr?cmd=_s-xclick&hosted_button_id=BY89QD47D7MPS&source=url) [](https://paypal.me/liximomo)