# springboot高级
**Repository Path**: java_learning2/springboot_advanced
## Basic Information
- **Project Name**: springboot高级
- **Description**: springboot高级用法
- **Primary Language**: Java
- **License**: MulanPSL-1.0
- **Default Branch**: master
- **Homepage**: None
- **GVP Project**: No
## Statistics
- **Stars**: 2
- **Forks**: 1
- **Created**: 2020-03-26
- **Last Updated**: 2024-10-25
## Categories & Tags
**Categories**: Uncategorized
**Tags**: None
## README
# springboot进阶使用
## 一 缓存
### 重要概念&缓存注解
| Cache | 缓存接口,定义缓存操作。实现有:redisCache,EhCacheCache,ConcurrentMapCache等 |
| -------------- | ------------------------------------------------------------ |
| CacheManager | 缓存管理器,管理各种缓存(Cache)组件 |
| @Cacheable | 主要针对方法配置,能够根据方法的请求参数对其结果进行缓存 |
| @CacheEvict | 清空缓存 |
| @CachePut | 保证方法被调用,又希望结果被缓存 |
| @EnableCaching | 开启基于注解的缓存 |
| KeyGenerator | 缓存数据时key生成策略 |
| serialize | 缓存数据时value序列化策略 |
```java
/**
* CacheManager管理多个Cache组件的,对缓存的真正的CRUD操作在Cache组件中,每一个缓存都有自己的名字
* 几个属性:
* cacheNames/vale:指定缓存组件的名字;
* key:缓存数据使用的key;可以用它来指定。默认是使用方法参数的值 1-方法的返回值
* 编写SpEl: #id;参数的id的值 #a0 #p0 #root.args[0]
* keyGenerator: key的生成器;可以自己指定key的生成器的组件id
* key/keyGenerator: 二选一使用
* cacheManager:指定缓存缓存器;或者cacheResolver指定获取解析器
* condition:指定符合条件的情况下才缓存
* unless:否定缓存;当unless指定的条件为true,方法的返回值就不会被缓存;可以获取到结果进行判断
* unless = "#result==null" 当为空的时候就不缓存
* sync: 异步缓存
*/
```
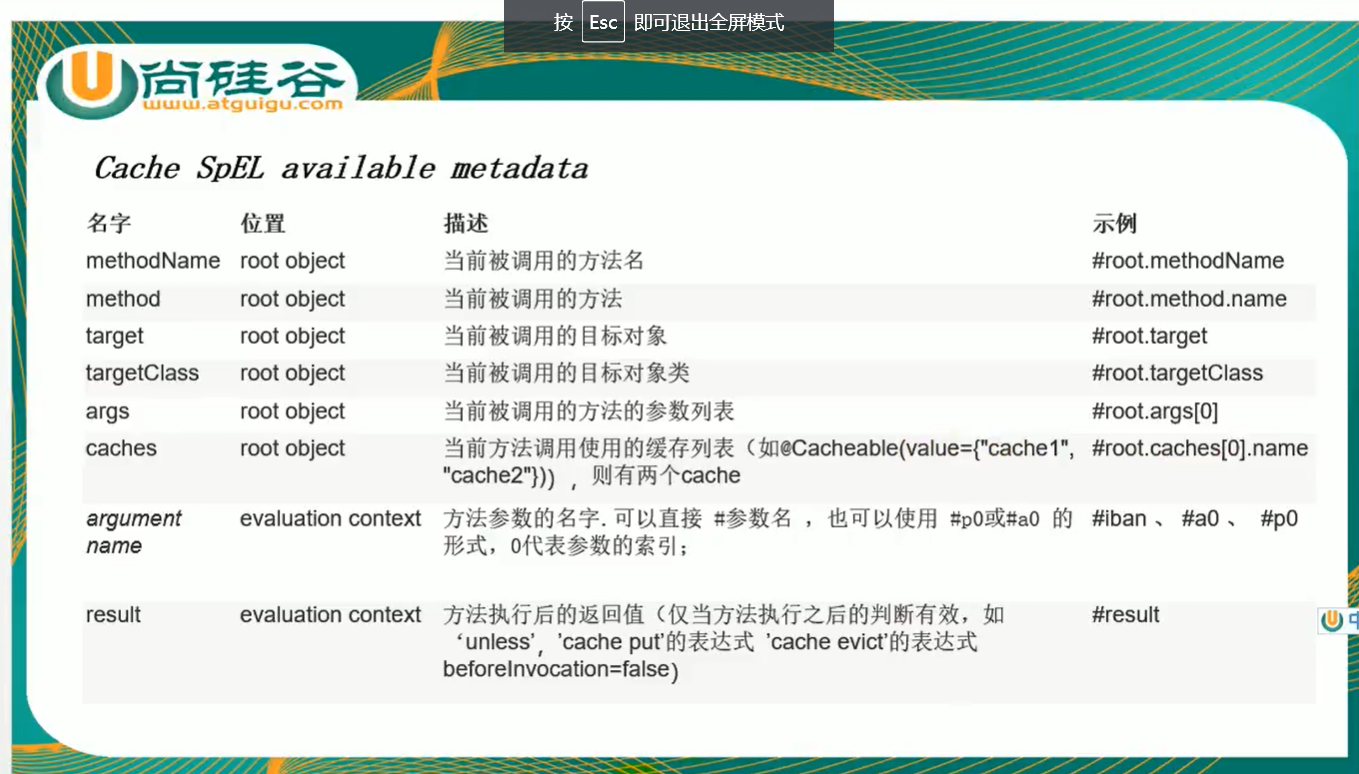
### spel可以获得的参数
### 配置文件
```properties
#mybatis配置数据源
spring.datasource.url=jdbc:mysql://101.200.91.110:3306/mydb?useUnicode=true&characterEncoding=UTF-8&zeroDateTimeBehavior=convertToNull&allowMultiQueries=true
spring.datasource.username=root
spring.datasource.password=root
spring.datasource.driver-class-name=com.mysql.cj.jdbc.Driver
server.port=8081
#开启驼峰命名法
#mybatis.configuration.map-underscore-to-camel-case=true
#开启缓存日志
logging.level.com.example.cache.mapper=debug
#redis的相关配置
spring.redis.host=101.200.91.110
spring.cache.type=redis
spring.redis.database=2
spring.redis.port=6379
spring.redis.password= 123456
```
### 缓存案例
```java
package com.example.cache.controller;
import com.example.cache.Bean.sp_type;
import com.example.cache.mapper.sp_tpeMapper;
import org.springframework.beans.factory.annotation.Autowired;
import org.springframework.cache.annotation.*;
import org.springframework.web.bind.annotation.GetMapping;
import org.springframework.web.bind.annotation.PathVariable;
import org.springframework.web.bind.annotation.RestController;
//@CacheConfig(cacheNames = "emp")//注解之后下面的所有注解都不用写 catchName
@RestController
public class TestController {
@Autowired
sp_tpeMapper sp_tpeMapper;
/**
*
* @param id
* @return
* CacheManager管理多个Cache组件的,对缓存的真正的CRUD操作在Cache组件中,每一个缓存都有自己的名字
* 几个属性:
* cacheNames/vale:指定缓存组件的名字;
* key:缓存数据使用的key;可以用它来指定。默认是使用方法参数的值 1-方法的返回值
* 编写SpEl: #id;参数的id的值 #a0 #p0 #root.args[0]
* keyGenerator: key的生成器;可以自己指定key的生成器的组件id
* key/keyGenerator: 二选一使用
* cacheManager:指定缓存缓存器;或者cacheResolver指定获取解析器
* condition:指定符合条件的情况下才缓存
* unless:否定缓存;当unless指定的条件为true,方法的返回值就不会被缓存;可以获取到结果进行判断
* unless = "#result==null" 当为空的时候就不缓存
* sync: 异步缓存
*/
//@Cacheable(cacheNames = {"emp"},key = "#root.method+'['+#id+']'")
//@Cacheable(cacheNames = {"emp"},keyGenerator = "myKeyGenerator" ,condition = "#id>1")
@Cacheable(cacheNames = {"emp"})
@GetMapping("/emp/{id}")
public sp_type getType(@PathVariable("id") Integer id){
System.out.println("查询员工");
System.out.println(sp_tpeMapper.getTypeByid(id));
return sp_tpeMapper.getTypeByid(id);
}
/**
*
* @param sp_type
* @return
* CachePut同步更新缓存
* 调用之后删除之前的缓存,更新现在的缓存
*/
@GetMapping("/emp/update")
@CachePut(value = "emp",key = "#result.type_id")
public sp_type updateType(sp_type sp_type){
sp_tpeMapper.updatetype(sp_type);
return sp_type;
}
/**
* CacheEvict删除缓存
* 参数:
* allEntries = true 删除所有数据
* beforeInvocation = true 方法是否在缓存清除之前执行
*/
@GetMapping("/delemp/{id}")
@CacheEvict(value = "emp",key = "#id",allEntries = true,beforeInvocation = true)
public void deleteEmp(@PathVariable("id") Integer id){
System.out.println("deleteEmp"+id);
}
/**
*Caching 指定多个进行缓存
*/
@Caching(
cacheable = {
@Cacheable(value = "emp",key = "#id")
},
put = {
@CachePut(value = "emp",key = "#result.delete_time"),
@CachePut(value = "emp",key = "#result.type_name")
}
)
@GetMapping("/emp2/{id}")
public sp_type getType2(@PathVariable("id") Integer id){
System.out.println("查询员工");
System.out.println(sp_tpeMapper.getTypeByid(id));
return sp_tpeMapper.getTypeByid(id);
}
}
```
### 自定义keyGenerator
```java
package com.example.cache.config;
import org.springframework.cache.interceptor.KeyGenerator;
import org.springframework.context.annotation.Bean;
import org.springframework.context.annotation.Configuration;
import java.lang.reflect.Method;
import java.util.ArrayList;
import java.util.Arrays;
/**
* 自定义缓存值的写法
*/
@Configuration
public class MykeyGenerator {
@Bean("myKeyGenerator")
public KeyGenerator keyGenerator(){
return new KeyGenerator(){
@Override
public Object generate(Object o, Method method, Object... objects) {
return method.getName()+"["+ Arrays.asList(objects).toString()+"]";
}
};
}
}
```
### redis字符编码设置
```java
package com.example.cache.config;
import org.springframework.context.annotation.Bean;
import org.springframework.context.annotation.Configuration;
import org.springframework.data.redis.cache.RedisCacheConfiguration;
import org.springframework.data.redis.cache.RedisCacheManager;
import org.springframework.data.redis.connection.RedisConnectionFactory;
import org.springframework.data.redis.core.RedisTemplate;
import org.springframework.data.redis.serializer.GenericJackson2JsonRedisSerializer;
import org.springframework.data.redis.serializer.Jackson2JsonRedisSerializer;
import org.springframework.data.redis.serializer.RedisSerializationContext;
import java.net.UnknownHostException;
/**
* 设置redis存储值的时候的字符编码
*/
@Configuration
public class MyRedisConfig {
@Bean
public RedisCacheManager JsonCacheManager(RedisConnectionFactory factory) {
RedisCacheConfiguration config = RedisCacheConfiguration.defaultCacheConfig()
// 使用GenericJackson2JsonRedisSerializer序列化得到Value
.serializeValuesWith(RedisSerializationContext.SerializationPair.
fromSerializer(new GenericJackson2JsonRedisSerializer()));
return RedisCacheManager.builder(factory)
.cacheDefaults(config)
.build();
}
}
```
## 二消息队列
### pom 文件
```xml
org.springframework.amqp
spring-rabbit-test
test
```
### 设置取数据和存数据的编码格式
```java
package com.amqp.config;
import org.springframework.amqp.support.converter.Jackson2JsonMessageConverter;
import org.springframework.amqp.support.converter.Jackson2XmlMessageConverter;
import org.springframework.amqp.support.converter.MessageConverter;
import org.springframework.context.annotation.Bean;
import org.springframework.context.annotation.Configuration;
@Configuration
public class MyAMQConfig {
@Bean
public MessageConverter messageConverter(){
return new Jackson2JsonMessageConverter();
}
}
```
### 普通模式
```java
package com.amqp;
import org.junit.jupiter.api.Test;
import org.springframework.amqp.core.AmqpAdmin;
import org.springframework.amqp.core.Binding;
import org.springframework.amqp.core.DirectExchange;
import org.springframework.amqp.core.Queue;
import org.springframework.amqp.rabbit.core.RabbitTemplate;
import org.springframework.beans.factory.annotation.Autowired;
import org.springframework.boot.test.context.SpringBootTest;
import java.util.Arrays;
import java.util.HashMap;
import java.util.Map;
@SpringBootTest
class AmqpApplicationTests {
@Autowired
RabbitTemplate rabbitTemplate;
@Autowired
AmqpAdmin amqpAdmin;
//创建交换机
@Test
void AmqpAdmin(){
//床架交换机
// amqpAdmin.declareExchange(new DirectExchange("amqpAdmin.exchange"));
// System.out.println("创建成功");
//创建队列
//amqpAdmin.declareQueue(new Queue("amqpadmin.queue",true));
//创建绑定规则
amqpAdmin.declareBinding(new Binding("amqpadmin.queue", Binding.DestinationType.QUEUE,"amqpAdmin.exchange","ampq.hahah",null));
}
@Test
void contextLoads() {
//Message需要自己构建一个;定义消息体内容和消息头
//rannitTemplate.send(exchange,routekey.message);
//object默认当做消息体,只需要传入要发送的对象,自动序列化发送给rabbitmq
//rabbitTemplate.converAndSend(exchange,routeKey,object)
Map map = new HashMap<>();
map.put("msg","这是第一个消息");
map.put("data", Arrays.asList("Helloword",123,true));
//对象默认虚拟化
rabbitTemplate.convertAndSend("exchange.direct","atguigu.news",map);
}
/**
* 取数据
*/
@Test
public void receive(){
Object o = rabbitTemplate.receiveAndConvert("atguigu.news");
System.out.println(o.getClass());
System.out.println(o);
}
/**
* 广播模式
*/
@Test
public void sendMsg(){
Map map = new HashMap<>();
map.put("msg","这是第一个消息");
map.put("data", Arrays.asList("Helloword",123,true));
rabbitTemplate.convertAndSend("exchange.fanout","",map);
}
}
```
### 基于注解的监听
```java
package com.amqp;
import org.springframework.amqp.rabbit.annotation.EnableRabbit;
import org.springframework.boot.SpringApplication;
import org.springframework.boot.autoconfigure.SpringBootApplication;
/**
* 自动配置
* 1,RabbitAutoConfiguration
* 2,有自动配置了连接工厂ConnectionFactory
* 3,RabbitProperties 封装了RabbitMq配置
* 4,RabbitTemplate:给RabbitMQ发送和接受消息
* 5,AmqpAdmin:RabbitMQ系统管理功能组件
*/
@EnableRabbit//开启基于注解的RabbitMQ
@SpringBootApplication
public class AmqpApplication {
public static void main(String[] args) {
SpringApplication.run(AmqpApplication.class, args);
}
}
```
```java
package com.amqp.Service;
import com.amqp.bean.Book;
import org.springframework.amqp.rabbit.annotation.RabbitListener;
import org.springframework.stereotype.Service;
@Service
public class BookService {
@RabbitListener(queues = "atguigu.news")
public void receive(Book book){
System.out.println("收到消息"+book);
}
}
```
## 三 全文检索 elasticsearch
### 安装
docker run -e ES_JAVA_OPTS="-Xms256m -Xmx256m" -d -p 9200:9200 -p 9300:9300 --name ES01 elasticsearch
## 四 异步任务
### 开启异步任务注解@EnableAsync
```java
package com.task;
import org.springframework.boot.SpringApplication;
import org.springframework.boot.autoconfigure.SpringBootApplication;
import org.springframework.scheduling.annotation.EnableAsync;
@EnableAsync//开启异步注解
@SpringBootApplication
public class TaskApplication {
public static void main(String[] args) {
SpringApplication.run(TaskApplication.class, args);
}
}
```
### 标注异步方法 @Async
```java
package com.task.service;
import org.springframework.scheduling.annotation.Async;
import org.springframework.stereotype.Service;
@Service
public class AsyncService {
@Async //标注为异步方法
public void hello(){
try {
Thread.sleep(3000);
} catch (InterruptedException e) {
e.printStackTrace();
}
System.out.println("数据处理中。。。。。");
}
}
```
## 五 定时任务
### cron表达式
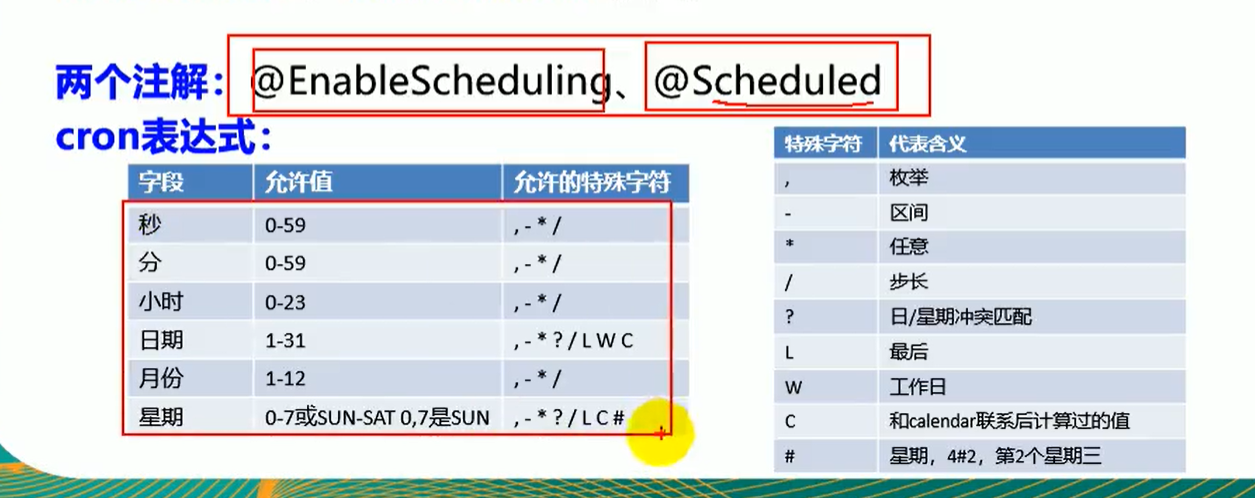
### 注解使用
```java
package com.task.service;
import org.springframework.scheduling.annotation.Scheduled;
import org.springframework.stereotype.Service;
@Service
public class ScheduledService {
/**
* second(秒) ,minute(分),hour(时),day of month,month(月),day of week(周几)
* 0*****MON-FRI 周一到周五每秒启动一次
* 【0 0/5 14,18 ** ?】 每天14点整,和18点整,每个5分钟执行一次
* 【0 15 10 ? * 1-6】 每个月的周一到周六10:15执行一次
* 【0 0 2 ? * 6L】 每个月的最后一个工作日凌晨2点执行一次
* 【0 0 2-4 ? * 1#1】 每个月的第一个周一凌晨2点到四点期间,每个整点都执行一次
*
*/
@Scheduled(cron = "0 * * * * MON-FRI")
public void hello(){
System.out.println("hello ...");
}
}
```
### 主方法使用
```java
package com.task;
import org.springframework.boot.SpringApplication;
import org.springframework.boot.autoconfigure.SpringBootApplication;
import org.springframework.scheduling.annotation.EnableAsync;
import org.springframework.scheduling.annotation.EnableScheduling;
@EnableAsync//开启异步注解
@EnableScheduling//开启基于注解的定时任务
@SpringBootApplication
public class TaskApplication {
public static void main(String[] args) {
SpringApplication.run(TaskApplication.class, args);
}
}
```
## 六 邮件发送
### 邮件地址的配置
```properties
#邮件地址等信息
spring.mail.username=3095329264@qq.com
spring.mail.password=tnipdtmjucuideag
spring.mail.host=smtp.qq.com
```
### 操作邮箱
```java
package com.task;
import org.junit.jupiter.api.Test;
import org.springframework.beans.factory.annotation.Autowired;
import org.springframework.boot.test.context.SpringBootTest;
import org.springframework.mail.SimpleMailMessage;
import org.springframework.mail.javamail.JavaMailSenderImpl;
import org.springframework.mail.javamail.MimeMessageHelper;
import javax.mail.internet.MimeMessage;
import java.io.File;
@SpringBootTest
class TaskApplicationTests {
@Autowired
JavaMailSenderImpl mailSender;
@Test
void contextLoads() {
SimpleMailMessage message = new SimpleMailMessage();
//邮件测试
message.setSubject("通知-今晚开会");
message.setText("今晚7:30开会");
message.setTo("3095329264@qq.com");
message.setFrom("3095329264@qq.com");
mailSender.send(message);
}
@Test
void test() throws Exception{
MimeMessage mimeMessage = mailSender.createMimeMessage();
MimeMessageHelper helper = new MimeMessageHelper(mimeMessage,true);
//邮件测试
helper.setSubject("通知-今晚开会");
helper.setText("今晚7:30开会",true);
helper.setTo("3095329264@qq.com");
helper.setFrom("3095329264@qq.com");
//上传文件
helper.addAttachment("1.jpg",new File("C:\\Users\\方玉龙\\Pictures\\Saved Pictures\\heise_zhuti-005.jpg"));
mailSender.send(mimeMessage);
}
}
```
## 七 安全
```xml
org.springframework.boot
spring-boot-starter-security
```
```java
package com.config;
import org.springframework.security.config.annotation.authentication.builders.AuthenticationManagerBuilder;
import org.springframework.security.config.annotation.web.builders.HttpSecurity;
import org.springframework.security.config.annotation.web.builders.WebSecurity;
import org.springframework.security.config.annotation.web.configuration.EnableWebSecurity;
import org.springframework.security.config.annotation.web.configuration.WebSecurityConfigurerAdapter;
@EnableWebSecurity
public class MySecurityConfig extends WebSecurityConfigurerAdapter {
@Override
protected void configure(AuthenticationManagerBuilder auth) throws Exception {
auth.inMemoryAuthentication().withUser("zhangshan").password("123456").roles("VIP1","VIP2")
.and()
.withUser("zhangshan2").password("123456").roles("VIP1","VIP2");
}
@Override
public void configure(HttpSecurity http) throws Exception {
//定制请求的授权规则
http.authorizeRequests().antMatchers("/").permitAll()
.antMatchers("/level1/**").hasRole("VIP1")
.antMatchers("/level2/**").hasRole("VIP2")
.antMatchers("/level3/**").hasRole("VIP3");
//开启自动配置的登录功能
http.formLogin().loginPage("/");
//1 /login来到登录页面 没有权限跳转登录页面
//2 重定向到/login?error表示登录失败
//3 更多详细规定
//开启自动配置的注销功能
http.logout().logoutSuccessUrl("/");
// 访问/logout表示用户注销,清空session
//记住登录状态
http.rememberMe();
}
}
```
## 八 分布式
### eureka
#### 配置
```properties
server:
port: 8761
eureka:
instance:
hostname: eureka-server #eureka实例的主机名
client:
register-with-eureka: false #不把自己注册到eureka上
fetch-registry: false #不从eureka上来获取服务的注册信息
service-url:
defaultZone: http://localhost:8761/eureka/
```
#### 开启
```java
@EnableEurekaServer
```
### 服务提供者
#### 配置
```properties
server:
port: 8001
spring:
application:
name: provider-ticket
eureka:
instance:
prefer-ip-address: true #注册服务的时候用到ip地址
client:
service-url:
defaultZone: http://localhost:8761/eureka/
```
#### Service
```java
package com.service;
import org.springframework.stereotype.Service;
@Service
public class testService {
public String hello(){
return "厉害了我的哥";
}
}
```
#### Controller
```java
package com.controller;
import com.service.testService;
import org.springframework.beans.factory.annotation.Autowired;
import org.springframework.beans.factory.annotation.Value;
import org.springframework.stereotype.Controller;
import org.springframework.web.bind.annotation.GetMapping;
import org.springframework.web.bind.annotation.ResponseBody;
import org.springframework.web.bind.annotation.RestController;
@RestController
public class TestController {
@Autowired
testService testService;
@Value("${server.port}")
String port;
@GetMapping(value = "/hello")
public String controller(){
System.out.println(port);
return testService.hello()+port;
}
}
```
### 服务消费者
#### 配置
```yml
spring:
application:
name: consumer-user
server:
port: 8200
eureka:
instance:
prefer-ip-address: true #注册服务的时候用到ip地址
client:
service-url:
defaultZone: http://localhost:8761/eureka/
```
#### controller
```java
package com.user.controller;
import org.springframework.beans.factory.annotation.Autowired;
import org.springframework.web.bind.annotation.GetMapping;
import org.springframework.web.bind.annotation.RestController;
import org.springframework.web.client.RestTemplate;
@RestController
public class UserController {
@Autowired
RestTemplate restTemplate;
@GetMapping("/buy")
public String butTicket(String name){
String s = restTemplate.getForObject("http://PROVIDER-TICKET/hello",String.class);
return name+"购买了"+""+s;
}
}
```
## 九 热部署插件
```xml
org.springframework.boot
spring-boot-devtools
true
```
ctrl + F9之后自动修改