# wasabi
**Repository Path**: mirrors_gspandy/wasabi
## Basic Information
- **Project Name**: wasabi
- **Description**: Wasabi A/B Testing Service is a real-time, enterprise-grade, 100% API driven project.
- **Primary Language**: Unknown
- **License**: Apache-2.0
- **Default Branch**: develop
- **Homepage**: None
- **GVP Project**: No
## Statistics
- **Stars**: 0
- **Forks**: 0
- **Created**: 2020-09-24
- **Last Updated**: 2025-10-12
## Categories & Tags
**Categories**: Uncategorized
**Tags**: None
## README
# Wasabi - A/B Testing Platform
**Support:** [](https://gitter.im/intuit/wasabi?utm_source=badge&utm_medium=badge&utm_campaign=pr-badge&utm_content=badge)
**Documentation:** [User Guide](https://intuit.github.io/wasabi/v1/guide/index.html), [JavaDocs](https://intuit.github.io/wasabi/v1/javadocs/latest/)
**A/B Testing Overview:** [](https://www.youtube.com/watch?v=_HtvJwBPUqk&feature=youtu.be) [](https://medium.com/blueprint-by-intuit/open-sourcing-wasabi-the-a-b-testing-platform-by-intuit-a8d5abc958d) [](https://medium.com/blueprint-by-intuit/the-architecture-behind-wasabi-an-open-source-a-b-testing-platform-b52430d3fd80)
**Continuous Integration:** [](https://travis-ci.org/intuit/wasabi)
[](https://coveralls.io/github/intuit/wasabi?branch=develop)
[](https://maven-badges.herokuapp.com/maven-central/com.intuit.wasabi/wasabi)
**License:** [](http://www.apache.org/licenses/LICENSE-2.0)
## Project
Wasabi A/B Testing Service is a real-time, enterprise-grade, 100% API driven project. Users are empowered to own their own data, and run experiments across web, mobile, and desktop. It’s fast, easy to use, it’s chock full of features, and instrumentation is minimal.
Learn more about how Wasabi can empower your team to move from hunches to actionable, data-driven user insights with our simple, flexible, and scalable experimentation platform.
### Features
* **Own your own data** - Wasabi runs on your servers, in the cloud or on-premise, where you have complete control over your data.
* **Proven** - Wasabi is battle-tested in production at Intuit, Inc., a financial technology company. Wasabi is the experimentation platform for TurboTax, QuickBooks, Mint.com, and other Intuit offerings.
* **High Performance** - Consistent server-side response times for user assignments within 30ms.
* **100% API-Driven** - The Wasabi REST API is compatible with any language and environment.
* **Platform Agnostic** - Uniform, consistent testing across Web, mobile, desktop. Also supports front-end, back-end integrations.
* **Real-time user assignments** - Assign users into experiments in real time, to preserve traffic for other parallel A/B tests.
* **Cloud and on-premise** - Designed to live in the cloud or in your own data center.
* **Analytics** - Core experiment analytics and metrics visualization out of the box, as well as the ability to send data to your existing analytics infrastructure.
* **Pluggable** - Well-defined interfaces for plugging in your own access control, sending data to data pipelines, and providing fully custom bucket allocations.
* **Experiment Management UI** - Setup and manage experiments via a modern Web interface. Management via REST API is also possible.
* **Dockerized** - Spin up a Wasabi Docker instance in 5 minutes and be in production with the platform, instrumentation, and experiments within a day.
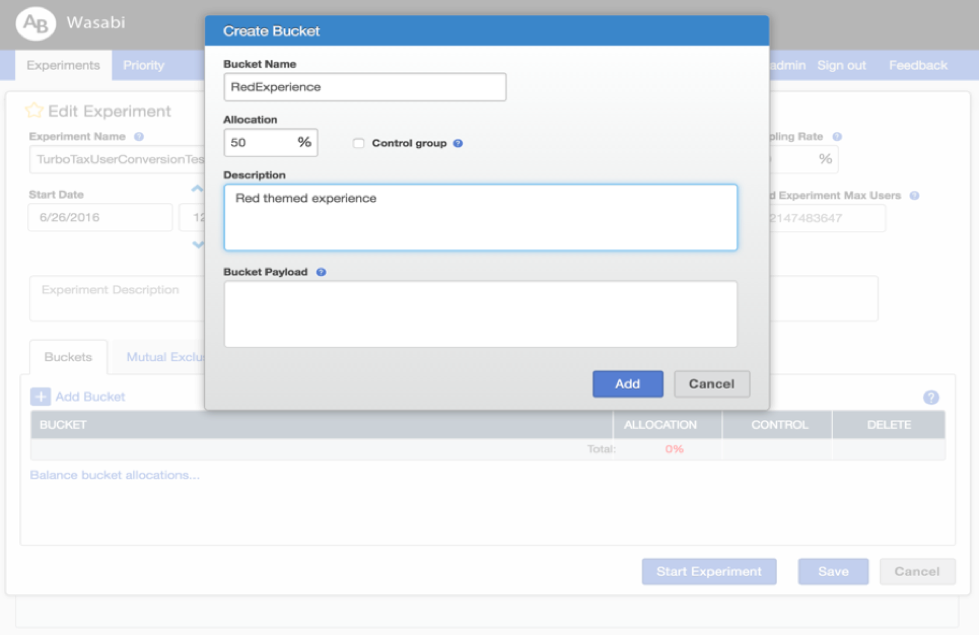
### User Interface
* **Create an experiment and its buckets:**
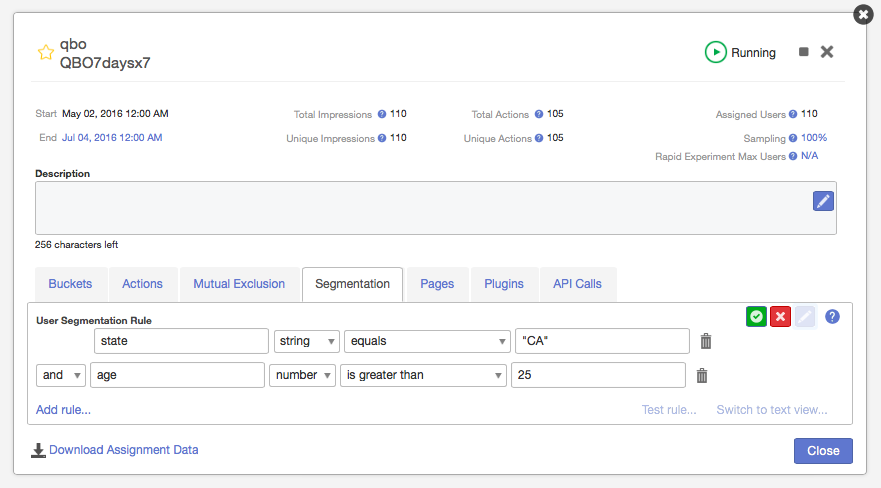
* **Filter which customers are considered for your experiment:**
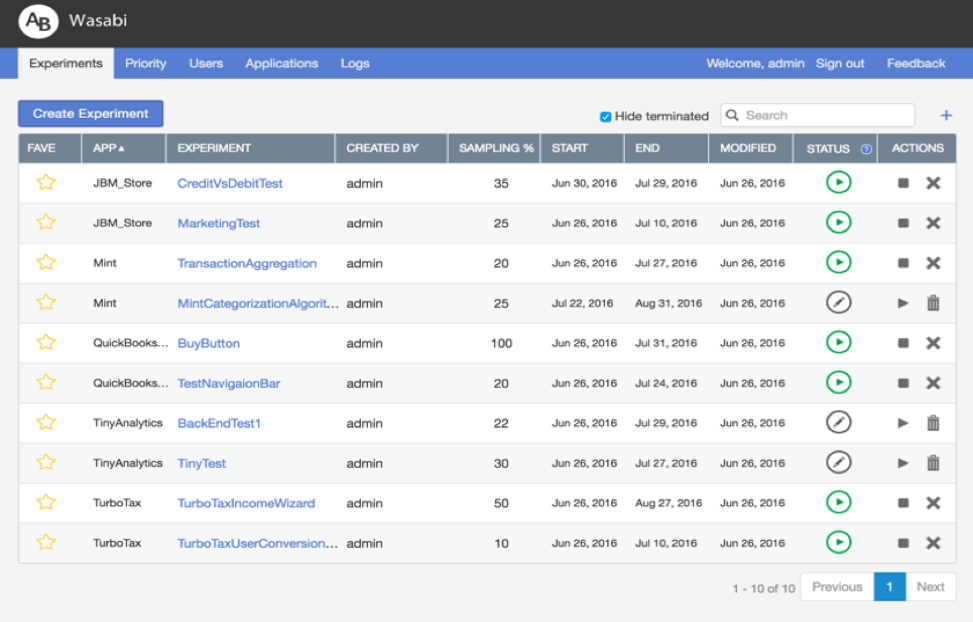
* **Follow your currently running experiments:**
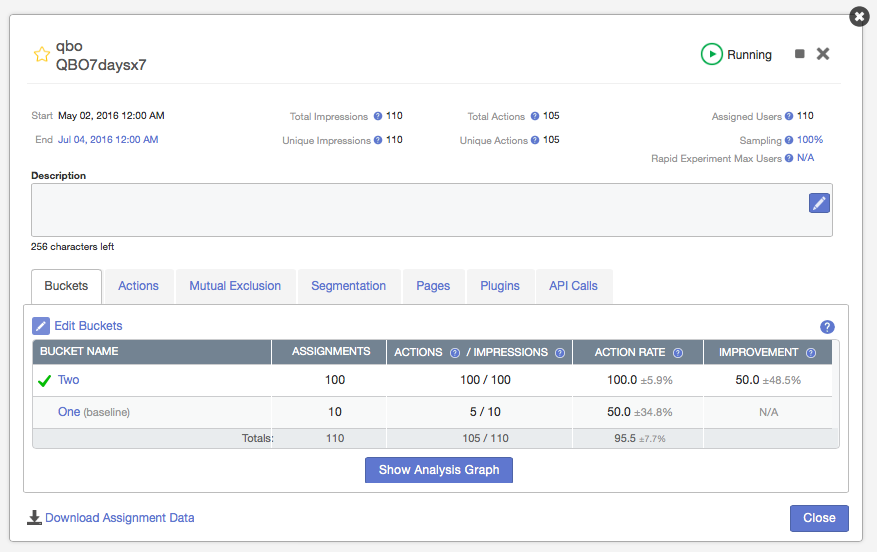
* **Track your experiment results in real-time:**
## Get Started
The following steps will help you install the needed tools, then build and run a complete Wasabi stack.
#### Bootstrap Your Environment
##### Mac OS
```bash
% /usr/bin/ruby \
-e "$(curl -fsSL https://raw.githubusercontent.com/Homebrew/install/master/install)"
% brew install git
% git clone https://github.com/intuit/wasabi.git
% cd wasabi
% ./bin/wasabi.sh bootstrap
```
Installed tools include: [homebrew 0.9](http://brew.sh), [git 2](https://git-scm.com),
[maven 3](https://maven.apache.org), [java 1.8](http://www.oracle.com/technetwork/java/javase/overview/index.html),
[docker 1.12](https://docker.com), [node 6](https://nodejs.org/en) and [python 2.7](https://www.python.org).
##### Ubuntu
Bootstrapping on Ubuntu requires sudo privileges to install all the required dependencies. You will be prompted to enter your password. Currently only 16.04 (x64) is supported.
```bash
% sudo apt-get install git
% git clone https://github.com/intuit/wasabi.git
% cd wasabi
% ./bin/wasabi.sh bootstrap
% sudo reboot
```
NOTE: A reboot is required after running the bootstrap command on Ubuntu.
For all other processes (build, start etc.) the commands are same for Ubuntu and Mac OS.
Installed tools include: [git 2](https://git-scm.com),
[maven 3](https://maven.apache.org), [OpenJdk 8](http://openjdk.java.net/projects/jdk8/),
[docker 1.12](https://docker.com), [node 6](https://nodejs.org/en) and [python 2.7](https://www.python.org)
Similar tooling will work for Windows. Contribute a patch :)
#### Start Wasabi
Now that we have the necessary tools in place, let's move on to build and start Wasabi, followed by issuing a _ping_
command to verify the build:
```bash
% ./bin/wasabi.sh build start
...
wasabi is operational:
ui: % open http://localhost:8080 note: sign in as admin/admin
ping: % curl -i http://localhost:8080/api/v1/ping
debug: attach to localhost:8180
% curl -i http://localhost:8080/api/v1/ping
HTTP/1.1 200 OK
Date: Wed, 25 May 2016 00:25:47 GMT
...
X-Application-Id: wasabi-api-20151215171929-SNAPSHOT-development
Content-Type: application/json
Transfer-Encoding: chunked
Server: Jetty(9.3.z-SNAPSHOT)
{
"componentHealths":[
{
"componentName":"Experiments Cassandra",
"healthy":true
},
{
"componentName":"MySql","healthy":true
}
],
"wasabiVersion":"wasabi-api-20151215171929-SNAPSHOT-development"
}
```
Congratulations! You are the proud owner of a newly minted Wasabi instance. :)
### Running Wasabi with remote storage
##### Set Mysql and Cassandra credentials
* Modify /pom.xml to set the values that apply to your environment
##### Download Cassandra migration tool https://oss.sonatype.org/content/repositories/public/com/builtamont/cassandra-migration/0.9/cassandra-migration-0.9-jar-with-dependencies.jar
##### Set up your environment variables
* Set location of the migration tool
```bash
export CASSANDRA_MIGRATION=/location/of/cassandra-migration-0.9-jar-with-dependencies.jar
```
* Set location of migration scripts within your project
```bash
export MIGRATION_SCRIPT=/location/of/modules/repository-datastax/src/main/resources/com/intuit/wasabi/repository/impl/cassandra/migration
```
##### Set up Cassandra tables
```bash
CQLSH_VERSION= CQLSH_USERNAME= CQLSH_PASSWORD= CQLSH_HOST= bin/docker/migration.sh
```
##### Run Wasabi with env variables for remote storage hosts
```bash
MYSQL_HOST= NODE_HOST= ./bin/wasabi.sh start:wasabi
```
##### Run Wasabi outside of docker with WASABI_CONFIGURATION for remote storage hosts
```bash
WASABI_CONFIGURATION="
-Ddatabase.url.host=$MYSQL_HOST\
-Ddatabase.url.port=$MYSQL_PORT\
-Ddatabase.url.dbname=$MYSQL_DATABASE\
-Ddatabase.user=$MYSQL_USER\
-Ddatabase.password=$MYSQL_PASSWORD\
-Ddatabase.pool.connections.min=$MYSQL_MIN_CONNECTIONS\
-Ddatabase.pool.connections.max=$MYSQL_MAX_CONNECTIONS\
-Dusername=$CASSANDRA_USER\
-Dpassword=$CASSANDRA_PASSWORD\
-DnodeHosts=$CASSANDRA_HOST\
-DtokenAwareLoadBalancingLocalDC=$CASSANDRA_DATACENTER\
-Dapplication.http.port=$PORT" bash usr/local/wasabi-main-*/bin/run
```
#### Troubleshooting
* While starting Wasabi, if you see an error when the docker containers are starting up, you could do the following:
* Look at the current docker containers that have been successfully started.
```bash
% ./bin/wasabi.sh status
CONTAINER ID IMAGE COMMAND CREATED STATUS PORTS NAMES
8c12458057ef wasabi-main "entrypoint.sh wasabi" 25 minutes ago Up 25 minutes 0.0.0.0:8080->8080/tcp, 0.0.0.0:8090->8090/tcp, 0.0.0.0:8180->8180/tcp wasabi-main
979ecc885239 mysql:5.6 "docker-entrypoint.sh" 26 minutes ago Up 26 minutes 0.0.0.0:3306->3306/tcp wasabi-mysql
2d33a96abdcb cassandra:2.1 "/docker-entrypoint.s" 27 minutes ago Up 27 minutes 7000-7001/tcp, 0.0.0.0:9042->9042/tcp, 7199/tcp, 0.0.0.0:9160->9160/tcp wasabi-cassandra
```
* The above shell output shows a successful start of 3 docker containers needed by Wasabi: wasabi-main (the Wasabi server),
wasabi-mysql, and wasabi-cassandra. If any of these are not running, try starting them individually. For example, if the
MySQL container is running, but Cassandra and Wasabi containers failed to start (perhaps due to a network timeout docker
could not download the Cassandra image), do the following:
```bash
% ./bin/wasabi.sh start:cassandra
% ./bin/wasabi.sh start:wasabi
```
#### Call Wasabi
These are the 3 common REST endpoints that you will use to instrument your client application with Wasabi.
Let's assume that you've created and started an experiment, 'BuyButton,' in the 'Demo_App' application with the following buckets:
* 'BucketA': green button (control bucket)
* 'BucketB': orange button bucket
You can assign a user with a unique ID (e.g. 'userID1') to the experiment by making this HTTP request:
> Assign a user to experiment and bucket:
```bash
% curl -H "Content-Type: application/json" \
http://localhost:8080/api/v1/assignments/applications/Demo_App/experiments/BuyButton/users/userID1
{
"cache":true,
"payload":"green",
"assignment":"BucketA",
"context":"PROD",
"status":"NEW_ASSIGNMENT"
}
```
Now the 'userID1' user is assigned into the 'BucketA' bucket. Let's further record an impression, meaning the user has seen a given experience:
> Record an impression:
```bash
% curl -H "Content-Type: application/json" \
-d "{\"events\":[{\"name\":\"IMPRESSION\"}]}" \
http://localhost:8080/api/v1/events/applications/Demo_App/experiments/BuyButton/users/userID1
```
If the 'userID1' user performs an action such as clicking the Buy button, you'd record that action with the following request:
> Record an action:
```bash
% curl -H "Content-Type: application/json" \
-d "{\"events\":[{\"name\":\"BuyClicked\"}]}" \
http://localhost:8080/api/v1/events/applications/Demo_App/experiments/BuyButton/users/userID1
```
#### Explore Various Resources
The following developer resources are available:
> API: Swagger API playground
```bash
% ./bin/wasabi.sh resource:api
```
> Javadoc
```bash
% ./bin/wasabi.sh resource:doc
```
> Wasabi UI
```bash
% ./bin/wasabi.sh resource:ui
```
> Cassandra: cqlsh shell
```bash
% ./bin/wasabi.sh resource:cassandra
```
> MySQL: mysql shell
```bash
% ./bin/wasabi.sh resource:mysql
```
> Java Debugger: Remote attach configuration
```bash
-agentlib:jdwp=transport=dt_socket,server=y,suspend=n,address=8180
```
#### Stop Wasabi
Alas, all good things must come to an end. Let's clean things up a bit stop the newly created Wasabi stack:
At this point in time, we now have all the requisite tools installed, and subsequent invocations of Wasabi will
start up much more quickly.
```bash
% ./bin/wasabi.sh stop
```
#### Get Familiar with wasabi.sh
Further, there are a number of additional wasabi.sh options available you should become familiar with:
```bash
% ./bin/wasabi.sh --help
usage: wasabi.sh [options] [commands]
options:
-e | --endpoint [ host:port ] : api endpoint; default: localhost:8080
-v | --verify [ true | false ] : verify installation configuration; default: false
-s | --sleep [ sleep-time ] : sleep/wait time in seconds; default: 30
-h | --help : help message
commands:
bootstrap : install dependencies
build : build project
start[:cassandra,mysql,wasabi] : start all, cassandra, mysql, wasabi
test : test wasabi
stop[:wasabi,cassandra,mysql] : stop all, wasabi, cassandra, mysql
resource[:ui,api,doc,cassandra,mysql] : open resource api, javadoc, cassandra, mysql
status : display resource status
remove[:wasabi,cassandra,mysql] : remove all, wasabi, cassandra, mysql
package : build deployable packages
release[:start,finish] : promote release
```
## Develop
#### Build and Run Wasabi Server
```bash
% mvn package
% ./bin/wasabi.sh start:cassandra,mysql
% (cd modules/main/target; \
WASABI_CONFIGURATION="-DnodeHosts=localhost -Ddatabase.url.host=localhost" ./wasabi-main-*-SNAPSHOT-development/bin/run) &
% curl -i http://localhost:8080/api/v1/ping
...
```
The runtime logs can be accessed executing the following command in a another shell:
> Viewing runtime logs:
```bash
% tail -f modules/main/target/wasabi-main-*-SNAPSHOT-development/logs/wasabi-main-*-SNAPSHOT-development.log
```
#### Build and Run Wasabi UI
```bash
% cd modules/ui
% grunt build
```
```bash
% grunt serve
```
#### Stop Wasabi
```bash
% ./bin/wasabi.sh stop
```
Now while that was fun, in all likelihood you will be using an IDE to work on Wasabi. In doing so, you need only
add the configuration information above to the JVM commandline prior to startup:
> Wasabi runtime configuration:
```bash
-DnodeHosts=localhost -Ddatabase.url.host=localhost
```
#### Run Integration Tests
Code changes can readily be verified by running the growing collection of included integration tests:
```bash
% ./bin/wasabi.sh start test stop
```
##### Troubleshooting
Integration tests might fail intermittently due to a time drift issue in docker containers on Mac OSX.
When the Mac sleeps and wakes back up, there is a lag created between the clock in the Mac vs the
running docker containers. This is a known issue in Docker for Mac.
This can be fixed by running the following command:
```bash
% docker run --rm --privileged alpine hwclock -s
```
The above command will need to be run every time when there is a time drift.
To automatically run this command and update the time each time the Mac wakes up, you could install
the following agent:
```bash
% curl https://raw.githubusercontent.com/arunvelsriram/docker-time-sync-agent/master/install.sh | bash
```
You can read more about this at: [quick-tip-fixing-time-drift-issue-on-docker-for-mac](https://blog.shameerc.com/2017/03/quick-tip-fixing-time-drift-issue-on-docker-for-mac)
## Package and Deploy at Scale
Wasabi can readily be packaged as installable *rpm* or *deb* distributions and deployed at scale as follows:
> Package by running integration tests 1st:
```bash
% ./bin/wasabi.sh start package
```
> Package without integration tests, if needed:
```bash
% ./bin/wasabi.sh -t false package
```
> Find generated package files:
```bash
% find . -type f \( -name "*.rpm" -or -name "*.deb" \)
```
Note: [Java 8](http://www.oracle.com/technetwork/java/javase/overview/index.html) is a runtime dependency
## Integrate
Wasabi is readily embeddable via the following *maven* dependency GAV family:
```xml
com.intuit.wasabi
wasabi
1.0.20160627213750
```
## Contribute
We greatly encourage contributions! You can add new features, report and fix existing bugs, write docs and
tutorials, or any of the above. Feel free to open issues and/or send pull requests.
The `master` branch of this repository contains the latest stable release of Wasabi, while snapshots are published to the `develop` branch. In general, pull requests should be submitted against `develop` by forking this repo into your account, developing and testing your changes, and creating pull requests to request merges. See the [Contributing to a Project](https://guides.github.com/activities/contributing-to-open-source/)
article for more details about how to contribute in general and find more specific information on how to write code for Wasabi in our [user guide](https://intuit.github.io/wasabi/v1/guide/index.html#developing-wasabi).
Extension projects such as browser plugins, client integration libraries, and apps can be contributed under the `contrib` directory.
Steps to contribute:
1. Fork this repository into your account on Github
2. Clone *your forked repository* (not our original one) to your hard drive with `git clone https://github.com/YOURUSERNAME/wasabi.git`
3. Design and develop your changes
4. Add/update unit tests
5. Add/update integration tests
6. Add/update documentation on `gh-pages` branch
7. Create a pull request for review to request merge
8. Obtain 2 approval _squirrels_ before your changes can be merged
Thank you for your contribution!