# hrsass中台管理系统
**Repository Path**: sdwl_git/hrscss
## Basic Information
- **Project Name**: hrsass中台管理系统
- **Description**: 中台管理项目,这仅仅是一次演练
- **Primary Language**: Unknown
- **License**: MIT
- **Default Branch**: master
- **Homepage**: None
- **GVP Project**: No
## Statistics
- **Stars**: 0
- **Forks**: 0
- **Created**: 2023-04-19
- **Last Updated**: 2023-08-07
## Categories & Tags
**Categories**: Uncategorized
**Tags**: None
## README
## try catch finally 校验
**try**成功后的回调
**catch**失败后的回调
**finally**不论成功还是失败都执行的回调
```js
try {
this.loading=true
await this['user/login'](this.loginForm)
// 登录成功之后
this.$router.push('/')
} catch (error) {
console.log(error, '登录失败')
} finally {
this.loading=false
}
```
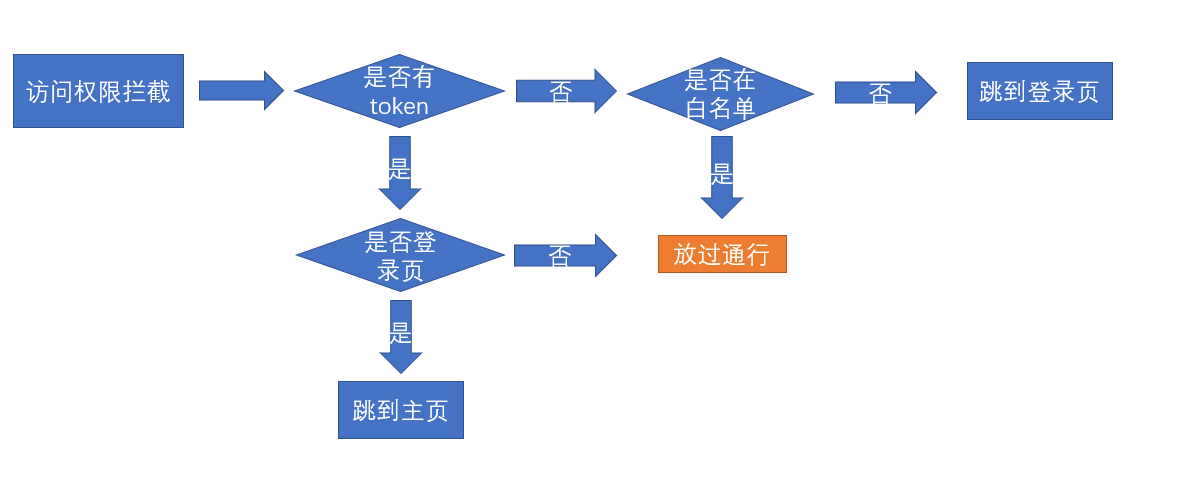
## 导航守卫
```js
// 权限拦截在路由跳转 导航守卫
import router from "./router";
import store from "./store";
import nProgress from "nprogress"; //引入进度条插件
import 'nprogress/nprogress.css'
// 前置守卫
// next() 放行
// next(false) 跳转终止
// next(地址) 跳转到某个地址
const whiteList = ['/login', '/404'] //请求白名单
router.beforeEach((to, from, next) => {
nProgress.start() //开启进度条
if (store.getters.token) {
// 如果有token
if (to.path === '/login') {
// 如果要访问的是 登录页
next('/') //跳到主页
} else {
next()
}
} else {
if (whiteList.indexOf(to.path) > -1) {
// 表示要去的地址在白名单
next()
} else {
next('/login')
}
}
nProgress.done() //解决手动切换地址时 进度条不关闭的情况
})
// 后置守卫
router.afterEach(() => {
nProgress.done()
})
```
## scss 同级选择和子集选择 (&.)
**使用&连接符**
```scss
//sass
.side-container {
float: left;
height: 100vh;
transition: width 0.5s;
background-color: #263238;
&.unfolded {
width: 195px;
.logo {
width: 195px;
height: 64px;
}
}
&.folded {
width: 64px;
.logo {
width: 64px;
height: 64px;
padding: 10px;
box-sizing: border-box;
}
}
}
```
**不适用连接符**
```scss
// sass
.side-container {
float: left;
height: 100vh;
transition: width 0.5s;
background-color: #263238;
.unfolded {
width: 195px;
.logo {
width: 195px;
height: 64px;
}
}
.folded {
width: 64px;
.logo {
width: 64px;
height: 64px;
padding: 10px;
box-sizing: border-box;
}
}
}
```
**多类选择器:\**.side-container.unfolded\**与\**.side-container .unfolded\**是不一样的,前者是\**同级关系\**,后者是\**父子级关系\**。**
## 默认全部导入方法
**全部导入**
```js
import * as directives from './directives'
```
## 对象转数组 Object.keys
**示例代码**
```js
// simple array
var arr = ['a', 'b', 'c'];
console.log(Object.keys(arr)); // console: ['0', '1', '2']
// array like object
var obj = { 0: 'a', 1: 'b', 2: 'c' };
console.log(Object.keys(obj)); // console: ['0', '1', '2']
// array like object with random key ordering
var anObj = { 100: 'a', 2: 'b', 7: 'c' };
console.log(Object.keys(anObj)); // console: ['2', '7', '100']
// getFoo is a property which isn't enumerable
var myObj = Object.create({}, {
getFoo: {
value: function () { return this.foo; }
}
});
myObj.foo = 1;
console.log(Object.keys(myObj)); // console: ['foo']
```
## 自定义指令用法实例
> ### **本节主要解决异常图片情况**
**`目标`**: 通过自定义指令的形式解决异常图片的处理
> ### **自定义指令**
首先定义第一个自定义指令 **`v-imagerror`**
```js
export const imagerror = {
// 指令对象 会在当前的dom元素插入到节点之后执行
inserted(dom, options) {
// options是 指令中的变量的解释 其中有一个属性叫做 value
// dom 表示当前指令作用的dom对象
// dom认为此时就是图片
// 当图片有地址 但是地址没有加载成功的时候 会报错 会触发图片的一个事件 => onerror
dom.onerror = function() {
// 当图片出现异常的时候 会将指令配置的默认图片设置为该图片的内容
// dom可以注册error事件
dom.src = options.value // 这里不能写死
}
}
}
```
> ### **在main.js完成自定义指令全局注册**
然后,在**`main.js`**中完成对于该文件中所有指令的全局注册
```js
import * as directives from '@/directives'
// 注册自定义指令
// 遍历所有的导出的指令对象 完成自定义全局注册
Object.keys(directives).forEach(key => {
// 注册自定义指令
Vue.directive(key, directives[key])
})
```
针对上面的引入语法 **`import * as 变量`** 得到的是一个对象**`{ 变量1:对象1,变量2: 对象2 ... }`**, 所以可以采用对象遍历的方法进行处理
指令注册成功,可以在**`navbar.vue`**中直接使用了
```vue
![]() ```
```js
data() {
return {
defaultImg: require('@/assets/common/head.jpg')
}
},
```
## 函数式组件
`functional`为`true`,表示该组件为一个函数式组件
函数式组件: 没有`data`状态,没有`响应式数据`,只会接收`props`属性, 没有`this`, 他就是一个函数
```js
export default {
name: 'MenuItem',
functional: true,
props: {
title: {
type: String,
default: ''
}
},
}
```
## debugger 调试
> ### debugger 可以在js中写入这个代码来进行调试
```js
function tranListToTreeDate(list, rootValue) {
debugger
}
```
## native 修饰符
> #### 作用:唤醒该组件原生的事件
## 利用sync修饰符关闭新增弹层
> 这里我们学习一个新的技巧,**`sync修饰符`**
按照常规,想要让父组件更新**`showDialog`**的话,需要这样做
```js
// 子组件
this.$emit('changedialog', false) //触发事件
// 父组件
method(value) {
this.showDialog = value
}
```
> 但是,vuejs为我们提供了**`sync修饰符`**,它提供了一种简写模式 也就是
```js
// 子组件 update:固定写法 (update:props名称, 值)
this.$emit('update:showDialog', false) //触发事件
// 父组件 sync修饰符
```
只要用sync修饰,就可以省略父组件的监听和方法,直接将值赋值给showDialog
**取消按钮和关闭**
```js
// 点击确定时触发
btnOK() {
this.$refs.deptForm.validate(async isOK => {
if (isOK) {
// 表示可以提交了
await addDepartments({ ...this.formData, pid: this.treeNode.id }) // 调用新增接口 添加父部门的id
this.$emit('addDepts') // 告诉父组件 新增数据成功 重新拉取数据
// update:props名称
this.$emit('update:showDialog', false)
}
})
}
```
## 插槽的两种写法
**定义一个插槽**
```html
```
```js
data() {
return {
defaultImg: require('@/assets/common/head.jpg')
}
},
```
## 函数式组件
`functional`为`true`,表示该组件为一个函数式组件
函数式组件: 没有`data`状态,没有`响应式数据`,只会接收`props`属性, 没有`this`, 他就是一个函数
```js
export default {
name: 'MenuItem',
functional: true,
props: {
title: {
type: String,
default: ''
}
},
}
```
## debugger 调试
> ### debugger 可以在js中写入这个代码来进行调试
```js
function tranListToTreeDate(list, rootValue) {
debugger
}
```
## native 修饰符
> #### 作用:唤醒该组件原生的事件
## 利用sync修饰符关闭新增弹层
> 这里我们学习一个新的技巧,**`sync修饰符`**
按照常规,想要让父组件更新**`showDialog`**的话,需要这样做
```js
// 子组件
this.$emit('changedialog', false) //触发事件
// 父组件
method(value) {
this.showDialog = value
}
```
> 但是,vuejs为我们提供了**`sync修饰符`**,它提供了一种简写模式 也就是
```js
// 子组件 update:固定写法 (update:props名称, 值)
this.$emit('update:showDialog', false) //触发事件
// 父组件 sync修饰符
```
只要用sync修饰,就可以省略父组件的监听和方法,直接将值赋值给showDialog
**取消按钮和关闭**
```js
// 点击确定时触发
btnOK() {
this.$refs.deptForm.validate(async isOK => {
if (isOK) {
// 表示可以提交了
await addDepartments({ ...this.formData, pid: this.treeNode.id }) // 调用新增接口 添加父部门的id
this.$emit('addDepts') // 告诉父组件 新增数据成功 重新拉取数据
// update:props名称
this.$emit('update:showDialog', false)
}
})
}
```
## 插槽的两种写法
**定义一个插槽**
```html
```
**两种写法:**
```html
// 第一种写法 template 标签嵌套使用
前面的插槽
// 第二种写法 slot 直接引用
导入excel
```
## 全局注册组件
> 为了方便所有的页面都可以不用引用该组件,可以进行全局注册
提供注册入口 **`src/componets/index.js`**
```js
// 该文件负责所有的公共的组件的全局注册 Vue.use
import PageTools from './PageTools'
export default {
install(Vue) {
// 注册全局的通用栏组件对象
Vue.component('PageTools', PageTools)
}
}
```
> 在入口处进行注册 **`src/main.js`**
```js
import Component from '@/components'
Vue.use(Component) // 注册自己的插件
```
## 分页 实现 逻辑
**接口**
**Path:** /sys/user
**Method:** GET
**Query**
| 参数名称 | 是否必须 | 示例 | 备注 |
| -------- | -------- | ---- | -------- |
| page | 是 | 1 | 页码 |
| size | 是 | 10 | 每页条数 |
**返回数据**
| 名称 | 类型 | 是否必须 | 默认值 | 备注 | 其他信息 |
| ------------- | --------- | -------- | ------ | ---- | ----------------- |
| success | boolean | 非必须 | | | |
| code | number | 非必须 | | | |
| message | string | 非必须 | | | |
| data | object | 非必须 | | | |
| ├─ total | number | 非必须 | | | |
| ├─ rows | object [] | 非必须 | | | item 类型: object |
| ├─├─ id | string | 必须 | | | |
| ├─├─ username | string | 必须 | | | |
| ├─├─ password | string | 必须 | | | |
> ### 1.调用接口
```js
/**
* 获取员工列表
*/
export function getEmployeeList(params){
return request({
url: '/sys/user',
params
})
}
```
> ### 2.组件中定义
> `list`负责接收所需要的数据
>
> `page`负责控制分页
>
> loading控制加载样式
```js
```
> ### 页面中去绑定
>
> 表格控件绑定 数据
>
> 绑定到上方定义的list 数据
> 表示 显示为`序号`
> 将`list数据`中的`username`绑定到这个位置
```html
查看
转正
调岗
离职
角色
删除
```
## Excel 插件 XLSX
> ### **`扩展` 复杂表头的导出**
> 当需要导出复杂表头的时候,vue-element-admin同样支持该类操作
**vue-element-admin** 提供的导出方法中有 **multiHeader**和**merges** 的参数
| 参数 | 说明 | 类型 | 可选值 | 默认值 |
| ----------- | -------------- | ----- | ------ | ------ |
| multiHeader | 复杂表头的部分 | Array | / | [[]] |
| merges | 需要合并的部分 | Array | / | [] |
multiHeader里面是一个二维数组,里面的一个元素是一行表头,假设你想得到一个如图的结构

mutiHeader应该这样定义
```js
const multiHeader = [['姓名', '主要信息', '', '', '', '', '部门']]
```
multiHeader中的一行表头中的字段的个数需要和真正的列数相等,假设想要跨列,多余的空间需要定义成空串
它主要对应的是标准的表头
```js
const header = ['姓名', '手机号', '入职日期', '聘用形式', '转正日期', '工号', '部门']
```
如果,我们要实现其合并的效果, 需要设定merges选项
```js
const merges = ['A1:A2', 'B1:F1', 'G1:G2']
```
merges的顺序是没关系的,只要配置这两个属性,就可以导出复杂表头的excel了
```js
exportData() {
const headers = {
'姓名': 'username',
'手机号': 'mobile',
'入职日期': 'timeOfEntry',
'聘用形式': 'formOfEmployment',
'转正日期': 'correctionTime',
'工号': 'workNumber',
'部门': 'departmentName'
}
// 导出excel
import('@/vendor/Export2Excel').then(async excel => {
// excel是引入文件的导出对象
// 导出 header从哪里来
// data从哪里来
// 现在没有一个接口获取所有的数据
// 获取员工的接口 页码 每页条数 100 1 10000
const { rows } = await getEmployeeList({ page: 1, size: this.page.total })
const data = this.formatJson(headers, rows) // 返回的data就是 要导出的结构
const multiHeader = [['姓名', '主要信息', '', '', '', '', '部门']]
const merges = ['A1:A2', 'B1:F1', 'G1:G2']
excel.export_json_to_excel({
header: Object.keys(headers),
data,
filename: '员工资料表',
multiHeader, // 复杂表头
merges // 合并选项
})
// excel.export_json_to_excel({
// header: ['姓名', '工资'],
// data: [['张三', 3000], ['李四', 5000]],
// filename: '员工工资表'
// })
// [{ username: '张三',mobile: 13112345678 }] => [[]]
// 要转化 数据结构 还要和表头的顺序对应上
// 要求转出的标题是中文
})
},
// 将表头数据和数据进行对应
// [{}] => [[]]
formatJson(headers, rows) {
return rows.map(item => {
// item是一个对象 { mobile: 132111,username: '张三' }
// ["手机号", "姓名", "入职日期" 。。]
return Object.keys(headers).map(key => {
// 需要判断 字段
if (headers[key] === 'timeOfEntry' || headers[key] === 'correctionTime') {
// 格式化日期
return formatDate(item[headers[key]])
} else if (headers[key] === 'formOfEmployment') {
const obj = EmployeeEnum.hireType.find(obj => obj.id === item[headers[key]])
return obj ? obj.value : '未知'
}
return item[headers[key]]
})
// ["132", '张三’, ‘’,‘’,‘’d]
})
// return rows.map(item => Object.keys(headers).map(key => item[headers[key]]))
// 需要处理时间格式问题
}
```
## 动态路由传参
> ? 的含义就是 id参数,可传可不传
```js
path: "detail/:id?", //动态路由传参
```
## 图片校验文件大小和类型
```js
beforeUpload(file) {
// 要开始做文件上传的检查了
// 文件类型 文件大小
const types = ['image/jpeg', 'image/gif', 'image/bmp', 'image/png']
if (!types.includes(file.type)) {
this.$message.error('上传图片只能是 JPG、GIF、BMP、PNG 格式!')
return false
}
// 检查大小
const maxSize = 5 * 1024 * 1024
if (maxSize < file.size) {
this.$message.error('图片大小最大不能超过5M')
return false
}
return true
}
```