# Turi-Create
**Repository Path**: weblinuxgame/Turi-Create
## Basic Information
- **Project Name**: Turi-Create
- **Description**: 这一框架应该会让开发者更容易构建机器学习模型
- **Primary Language**: Unknown
- **License**: BSD-3-Clause
- **Default Branch**: master
- **Homepage**: None
- **GVP Project**: No
## Statistics
- **Stars**: 0
- **Forks**: 6
- **Created**: 2017-12-28
- **Last Updated**: 2022-06-21
## Categories & Tags
**Categories**: Uncategorized
**Tags**: None
## README
 # Turi Create
Turi Create simplifies the development of custom machine learning models. You
don't have to be a machine learning expert to add recommendations, object
detection, image classification, image similarity or activity classification to
your app.
* **Easy-to-use:** Focus on tasks instead of algorithms
* **Visual:** Built-in, streaming visualizations to explore your data
* **Flexible:** Supports text, images, audio, video and sensor data
* **Fast and Scalable:** Work with large datasets on a single machine
* **Ready To Deploy:** Export models to Core ML for use in iOS, macOS, watchOS, and tvOS apps
Example: Image classifier with a few lines of code
--------------------------------------------------
If you want your app to recognize specific objects in images, you can build your own model with just a few lines of code:
```python
import turicreate as tc
# Load data
data = tc.SFrame('photoLabel.sframe')
# Create a model
model = tc.image_classifier.create(data, target='photoLabel')
# Make predictions
predictions = model.predict(data)
# Export to Core ML
model.export_coreml('MyClassifier.mlmodel')
```
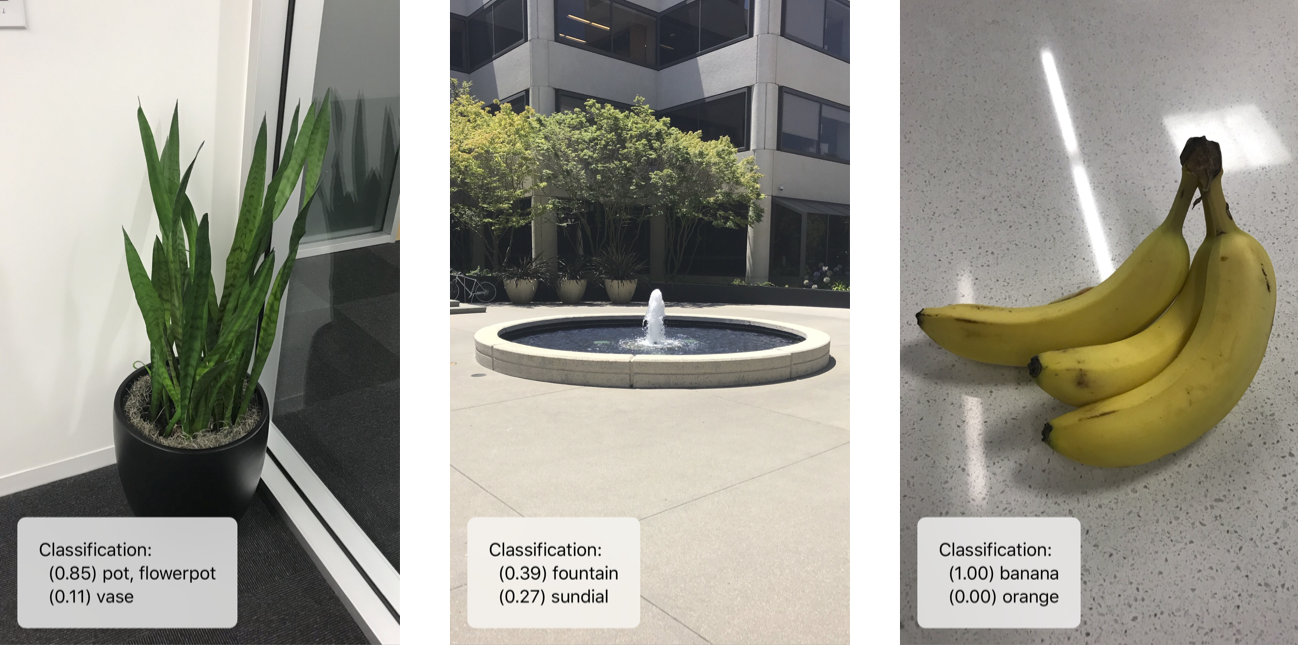
It's easy to use the resulting model in an [iOS application](https://developer.apple.com/documentation/vision/classifying_images_with_vision_and_core_ml):
# Turi Create
Turi Create simplifies the development of custom machine learning models. You
don't have to be a machine learning expert to add recommendations, object
detection, image classification, image similarity or activity classification to
your app.
* **Easy-to-use:** Focus on tasks instead of algorithms
* **Visual:** Built-in, streaming visualizations to explore your data
* **Flexible:** Supports text, images, audio, video and sensor data
* **Fast and Scalable:** Work with large datasets on a single machine
* **Ready To Deploy:** Export models to Core ML for use in iOS, macOS, watchOS, and tvOS apps
Example: Image classifier with a few lines of code
--------------------------------------------------
If you want your app to recognize specific objects in images, you can build your own model with just a few lines of code:
```python
import turicreate as tc
# Load data
data = tc.SFrame('photoLabel.sframe')
# Create a model
model = tc.image_classifier.create(data, target='photoLabel')
# Make predictions
predictions = model.predict(data)
# Export to Core ML
model.export_coreml('MyClassifier.mlmodel')
```
It's easy to use the resulting model in an [iOS application](https://developer.apple.com/documentation/vision/classifying_images_with_vision_and_core_ml):
With Turi Create, you can tackle a number of common scenarios:
* [Recommender systems](userguide/recommender/introduction.md)
* [Image classification](userguide/image_classifier/introduction.md)
* [Image similarity](userguide/image_similarity/introduction.md)
* [Object detection](userguide/object_detection/introduction.md)
* [Activity classifier](userguide/activity_classifier/introduction.md)
* [Text classifier](userguide/text_classifier/introduction.md)
You can also work with essential machine learning models, organized into algorithm-based toolkits:
* [Classifiers](userguide/supervised-learning/classifier.md)
* [Regression](userguide/supervised-learning/regression.md)
* [Graph analytics](userguide/graph_analytics/intro.md)
* [Clustering](userguide/clustering/intro.md)
* [Nearest Neighbors](userguide/nearest_neighbors/nearest_neighbors.md)
* [Topic models](userguide/text/intro.md)
Supported Platforms
-------------------
Turi Create supports:
* macOS 10.12+
* Linux (with glibc 2.12+)
* Windows 10 (via WSL)
System Requirements
-------------------
* Python 2.7 (Python 3.5+ support coming soon)
* x86\_64 architecture
Installation
------------
For detailed instructions for different varieties of Linux see [LINUX\_INSTALL.md](LINUX_INSTALL.md).
For common installation issues see [INSTALL\_ISSUES.md](INSTALL_ISSUES.md).
We recommend using virtualenv to use, install, or build Turi Create.
```shell
pip install virtualenv
```
The method for installing *Turi Create* follows the
[standard python package installation steps](https://packaging.python.org/installing/).
To create and activate a Python virtual environment called `venv` follow these steps:
```shell
# Create a Python virtual environment
cd ~
virtualenv venv
# Activate your virtual environment
source ~/venv/bin/activate
```
Alternatively, if you are using [Anaconda](https://www.anaconda.com/what-is-anaconda/), you may use its virtual environment:
```shell
conda create -n venv python=2.7 anaconda
source activate venv
```
To install `Turi Create` within your virtual environment:
```shell
(venv) pip install -U turicreate
```
Documentation
-------------
The package [User Guide](https://apple.github.io/turicreate/docs/userguide) and [API Docs](https://apple.github.io/turicreate/docs/api) contain
more details on how to use Turi Create.
GPU Support
-----------
Turi Create **does not require a GPU**, but certain models can be accelerated by the use of a GPU.
To enable GPU support after installation of the `turicreate` package, please perform the following steps:
* Install CUDA 8.0 ([instructions](http://docs.nvidia.com/cuda/cuda-installation-guide-linux/))
* Install cuDNN 5 for CUDA 8.0 ([instructions](https://developer.nvidia.com/cudnn))
Make sure to add the CUDA library path to your `LD_LIBRARY_PATH` environment
variable. In the typical case, this means adding the following line to your
`~/.bashrc` file:
```shell
export LD_LIBRARY_PATH=/usr/local/cuda/lib64:$LD_LIBRARY_PATH
```
If you installed the cuDNN files into a separate directory, make sure to
separately add it as well. Next step is to uninstall `mxnet` and install the
CUDA-enabled `mxnet-cu80` package:
```
(venv) pip uninstall -y mxnet
(venv) pip install mxnet-cu80==0.11.0
```
Make sure you install the same version of MXNet as the one `turicreate` depends
on (currently `0.11.0`). If you have trouble setting up the GPU, the [MXNet
installation instructions](https://mxnet.incubator.apache.org/get_started/install.html) may
offer additional help.
Building From Source
---------------------
If you want to build Turi Create from source, see [BUILD.md](BUILD.md).
Contributing
------------
See [CONTRIBUTING.md](CONTRIBUTING.md).