# multilevel-cache-spring-boot-starter
**Repository Path**: wq-opensource-download/multilevel-cache-spring-boot-starter
## Basic Information
- **Project Name**: multilevel-cache-spring-boot-starter
- **Description**: spring cache 多级缓存扩展
- **Primary Language**: Java
- **License**: Apache-2.0
- **Default Branch**: master
- **Homepage**: None
- **GVP Project**: No
## Statistics
- **Stars**: 0
- **Forks**: 31
- **Created**: 2021-09-25
- **Last Updated**: 2021-09-25
## Categories & Tags
**Categories**: Uncategorized
**Tags**: None
## README
## 为什么多级缓存
缓存的引入是现在大部分系统所必须考虑的
- redis 作为常用中间件,虽然我们一般业务系统(毕竟业务量有限)不会遇到如下图 在随着 data-size 的增大和数据结构的复杂的造成性能下降,但网络 IO 消耗会成为整个调用链路中不可忽视的部分。尤其在 微服务架构中,一次调用往往会涉及多次调用 例如[pig oauth2.0 的 client 认证](https://gitee.com/log4j/pig "pig oauth2.0 的 client 认证")

- Caffeine 来自未来的本地内存缓存,性能比如常见的内存缓存实现性能高出不少[详细对比](https://github.com/ben-manes/caffeine/wiki/Benchmarks "详细对比")。

**综合所述:我们需要构建 L1 Caffeine JVM 级别内存 , L2 Redis 内存。**
## 设计难点
目前大部分应用缓存都是基于 Spring Cache 实现,基于注释(annotation)的缓存(cache)技术,存在的问题如下:
- Spring Cache 仅支持 单一的缓存来源,即:只能选择 Redis 实现或者 Caffeine 实现,并不能同时使用。
- 数据一致性:各层缓存之间的数据一致性问题,如应用层缓存和分布式缓存之前的数据一致性问题。
- 缓存过期:Spring Cache 不支持主动的过期策略
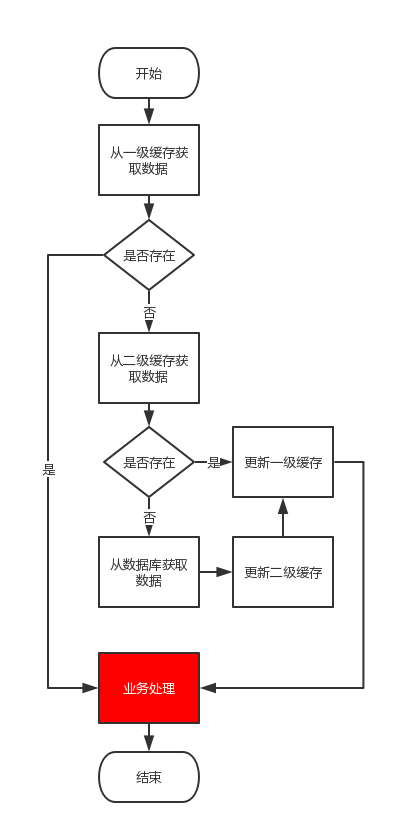
## 业务流程
## 如何使用
- 1. 引入依赖
```xml
com.pig4cloud.plugin
multilevel-cache-spring-boot-starter
0.0.4
```
- 2. 开启缓存支持
```java
@EnableCaching
public class App {
public static void main(String[] args) {
SpringApplication.run(App.class, args);
}
}
```
- 3. 目标接口声明 Spring Cache 注解
```
@Cacheable(value = "get",key = "#key")
@GetMapping("/get")
public String get(String key){
return "success";
}
```
## 性能比较
为保证性能 redis 在 127.0.0.1 环路安装
- OS: macOS Mojave
- CPU: 2.3 GHz Intel Core i5
- RAM: 8 GB 2133 MHz LPDDR3
- JVM: corretto_11.jdk
| Benchmark | Mode | Cnt | Score | Units |
| ---------- | ----- | --- | -------- | ----- |
| 多级实现 | thrpt | 2 | 2716.074 | ops/s |
| 默认 redis | thrpt | 2 | 1373.476 | ops/s |
## 代码原理
- 1. 自定义 CacheManager 多级缓存实现
```java
public class RedisCaffeineCacheManager implements CacheManager {
@Override
public Cache getCache(String name) {
Cache cache = cacheMap.get(name);
if (cache != null) {
return cache;
}
cache = new RedisCaffeineCache(name, stringKeyRedisTemplate, caffeineCache(), cacheConfigProperties);
Cache oldCache = cacheMap.putIfAbsent(name, cache);
log.debug("create cache instance, the cache name is : {}", name);
return oldCache == null ? cache : oldCache;
}
}
```
- 2. 多级读取、过期策略实现
```java
public class RedisCaffeineCache extends AbstractValueAdaptingCache {
protected Object lookup(Object key) {
Object cacheKey = getKey(key);
// 1. 先调用 caffeine 查询是否存在指定的值
Object value = caffeineCache.getIfPresent(key);
if (value != null) {
log.debug("get cache from caffeine, the key is : {}", cacheKey);
return value;
}
// 2. 调用 redis 查询在指定的值
value = stringKeyRedisTemplate.opsForValue().get(cacheKey);
if (value != null) {
log.debug("get cache from redis and put in caffeine, the key is : {}", cacheKey);
caffeineCache.put(key, value);
}
return value;
}
}
```
- 3. 过期策略,所有更新操作都基于 redis pub/sub 消息机制更新
```java
public class RedisCaffeineCache extends AbstractValueAdaptingCache {
@Override
public void put(Object key, Object value) {
push(new CacheMessage(this.name, key));
}
@Override
public ValueWrapper putIfAbsent(Object key, Object value) {
push(new CacheMessage(this.name, key));
}
@Override
public void evict(Object key) {
push(new CacheMessage(this.name, key));
}
@Override
public void clear() {
push(new CacheMessage(this.name, null));
}
private void push(CacheMessage message) {
stringKeyRedisTemplate.convertAndSend(topic, message);
}
}
```
- 4. MessageListener 删除指定 Caffeine 的指定值
```java
public class CacheMessageListener implements MessageListener {
private final RedisTemplate redisTemplate;
private final RedisCaffeineCacheManager redisCaffeineCacheManager;
@Override
public void onMessage(Message message, byte[] pattern) {
CacheMessage cacheMessage = (CacheMessage) redisTemplate.getValueSerializer().deserialize(message.getBody());
cacheMessage.getCacheName(), cacheMessage.getKey());
redisCaffeineCacheManager.clearLocal(cacheMessage.getCacheName(), cacheMessage.getKey());
}
}
```
## 源码地址
[https://github.com/pig-mesh/multilevel-cache-spring-boot-starter
](https://github.com/pig-mesh/multilevel-cache-spring-boot-starter)