 //
.needle{
width:2.5rem;
height: auto;
position: absolute;
left: 3.5rem;
transform-origin: 0.3rem 0;
transform: rotate(-10deg); //初始角度
transition: all 1s;
z-index: 10; //为了在上层,让播放词条不被覆盖
}
.needle.active{
width:2.5rem;
height: auto;
position: absolute;
left: 3.5rem;
transform-origin: 0.3rem 0;
transform: rotate(15deg); //旋转后角度
transition: all 1s;
z-index: 10;
}
```
#### 4.8 calc()动态计算公式
说明:
1、任何长度值都可以使用calc()函数进行计算;
2、calc()函数支持 "+", "-", "*", "/" 运算;
3、calc()函数使用标准的数学运算优先级规则;
4、需要注意的是,运算符前后都需要保留一个空格,例如:width: calc(100% - 10px);
//
.needle{
width:2.5rem;
height: auto;
position: absolute;
left: 3.5rem;
transform-origin: 0.3rem 0;
transform: rotate(-10deg); //初始角度
transition: all 1s;
z-index: 10; //为了在上层,让播放词条不被覆盖
}
.needle.active{
width:2.5rem;
height: auto;
position: absolute;
left: 3.5rem;
transform-origin: 0.3rem 0;
transform: rotate(15deg); //旋转后角度
transition: all 1s;
z-index: 10;
}
```
#### 4.8 calc()动态计算公式
说明:
1、任何长度值都可以使用calc()函数进行计算;
2、calc()函数支持 "+", "-", "*", "/" 运算;
3、calc()函数使用标准的数学运算优先级规则;
4、需要注意的是,运算符前后都需要保留一个空格,例如:width: calc(100% - 10px);
 ```JavaScript
.disc{
width: 5.5rem;
height: auto;
position: absolute;
left: calc(50% - 2.75rem) ;
top: 2.5rem;
}
.playImg{
width: 3.4rem;
height: 3.4rem;
border-radius: 1.7rem;
position: absolute;
left: calc(50% - 1.7rem);
top: 3.55rem;
}
```
#### 4.9 offsetWidth与offset Height、offsetLeft与offsetTop、scrollTop
1. 总览
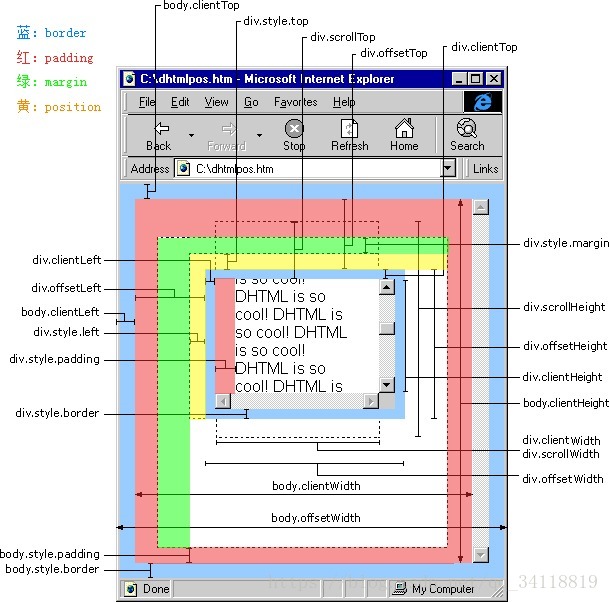
如图所示中间是个div,那么div.offsetTop = 此div border外到父元素border内且都不包括border
那么div.scrollTop = 此div border(包括border)到窗体上边界(如果div比较大,使得外部产生滚动条,那么这个距离将会随着滚动条变化)
2. offsetWidth与offset Height

3. offsetTop和scrollTop区别
- 如图所示中间是个div,那么div.offsetTop = 此div border外到父元素border内且都不包括border
那么div.scrollTop = 此div border(包括border)到窗体上边界(如果div比较大,使得外部产生滚动条,那么这个距离将会随着滚动条变化)
- scrollTop:当前元素顶端距离窗口顶端距离,鼠标滚轮会影响其数值.
==是这些元素中唯一一个可写可读的==。
下面的图是用微信截图随便画的:D(不小心混入了一个光标。。
 
所以当滚动条在最顶端的时候, scrollTop=0 ,当滚动条在最低端的时候, scrollTop=115
这个115怎么来的(滚动条高度是15,我量的),见下图。(实为我主观臆测,不保证准确性。。。_(:з」∠)_

scrollTop是一个整数。
如果一个元素不能被滚动,它的`scrollTop`将被设置为`0`。
设置scrollTop的值小于0,`scrollTop` 被设为`0。`
如果设置了超出这个容器可滚动的值, `scrollTop` 会被设为最大值。
4. 汇总
```JavaScript
```
#### 4.10 flex-wrap & ==flex:1==
[CSS](https://developer.mozilla.org/zh-CN/docs/Web/CSS) 的 **`flex-wrap`** 属性指定 flex 元素单行显示还是多行显示。如果允许换行,这个属性允许你控制行的堆叠方向。
```css
flex-wrap: nowrap; /* Default value */
flex-wrap: wrap;
flex-wrap: wrap-reverse;
/* Global values */
flex-wrap: inherit;
flex-wrap: initial;
flex-wrap: revert;
flex-wrap: unset;
```
- nowrap
flex 的元素被摆放到到一行,这可能导致 flex 容器溢出。**cross-start** 会根据 [`flex-direction`](https://developer.mozilla.org/zh-CN/docs/Web/CSS/flex-direction) 的值等价于 **start** 或 **before**。为该属性的默认值。
- wrap
flex 元素 被打断到多个行中。**cross-start** 会根据 [`flex-direction`](https://developer.mozilla.org/zh-CN/docs/Web/CSS/flex-direction) 的值等价于 **start** 或**before**。**cross-end** 为确定的 **cross-start** 的另一端。
- wrap-reverse
和 wrap 的行为一样,但是 **cross-start** 和 **cross-end** 互换。
#### 4.11 set去重
- 对于重复的历史搜索进行去重,并控制显示的最大长度
```JavaScript
methods: {
saveKeyWord: async function () {
this.keywordList.push(this.searchKeyword)
this.keywordList = Array.from(new Set(this.keywordList))
if (this.keywordList.length > 10) {
this.keywordList = this.keywordList.slice(this.keywordList.length - 10, this.keywordList.length)
}
localStorage.keywordList = JSON.stringify(this.keywordList)
let result = await searchMusic(this.searchKeyword)
this.searchSongs = result.data.result.songs
console.log(this.searchSongs)
},
```
### 5、JavaScript技巧或函数
#### 5.1 修改数字
`Number.prototype.toFixed()`确定小数点后位数。
```JavaScript
function changeValue (num){
let res = 0
if(num>=100000000){
res = num/100000000
res = res.toFixed(2) + '亿'
}else if(num>10000){
res = num/10000
res = res.toFixed(2) + '万'
}
return res
}
```
#### 5.2 正则分割歌词
- 以换行\n来切割歌词
```javascript
let arr = state.lyric.split(/\n/igs).map((item,i,arr)=>{}
```
#### 5.3 处理歌词样式
- 原始歌词样式

- JavaScript字符串处理
```JavaScript
// vuex/store/index.js
getters:{
lyricList:function(state){
let arr = state.lyric.split(/\n/igs).map((item,i,arr)=>{
let min = parseInt(item.slice(1,3)) ;
let sec = parseInt(item.slice(4,6)) ;
let mill = parseInt(item.slice(7,10));
return {
min,sec,mill,
lyric:item.slice(12,item.length),
content:item,
time:mill+sec*1000+min*60*1000
}
})
//components/playMusic.vue
```JavaScript
.disc{
width: 5.5rem;
height: auto;
position: absolute;
left: calc(50% - 2.75rem) ;
top: 2.5rem;
}
.playImg{
width: 3.4rem;
height: 3.4rem;
border-radius: 1.7rem;
position: absolute;
left: calc(50% - 1.7rem);
top: 3.55rem;
}
```
#### 4.9 offsetWidth与offset Height、offsetLeft与offsetTop、scrollTop
1. 总览

如图所示中间是个div,那么div.offsetTop = 此div border外到父元素border内且都不包括border
那么div.scrollTop = 此div border(包括border)到窗体上边界(如果div比较大,使得外部产生滚动条,那么这个距离将会随着滚动条变化)
2. offsetWidth与offset Height

3. offsetTop和scrollTop区别
- 如图所示中间是个div,那么div.offsetTop = 此div border外到父元素border内且都不包括border
那么div.scrollTop = 此div border(包括border)到窗体上边界(如果div比较大,使得外部产生滚动条,那么这个距离将会随着滚动条变化)
- scrollTop:当前元素顶端距离窗口顶端距离,鼠标滚轮会影响其数值.
==是这些元素中唯一一个可写可读的==。
下面的图是用微信截图随便画的:D(不小心混入了一个光标。。
 
所以当滚动条在最顶端的时候, scrollTop=0 ,当滚动条在最低端的时候, scrollTop=115
这个115怎么来的(滚动条高度是15,我量的),见下图。(实为我主观臆测,不保证准确性。。。_(:з」∠)_

scrollTop是一个整数。
如果一个元素不能被滚动,它的`scrollTop`将被设置为`0`。
设置scrollTop的值小于0,`scrollTop` 被设为`0。`
如果设置了超出这个容器可滚动的值, `scrollTop` 会被设为最大值。
4. 汇总
```JavaScript
```
#### 4.10 flex-wrap & ==flex:1==
[CSS](https://developer.mozilla.org/zh-CN/docs/Web/CSS) 的 **`flex-wrap`** 属性指定 flex 元素单行显示还是多行显示。如果允许换行,这个属性允许你控制行的堆叠方向。
```css
flex-wrap: nowrap; /* Default value */
flex-wrap: wrap;
flex-wrap: wrap-reverse;
/* Global values */
flex-wrap: inherit;
flex-wrap: initial;
flex-wrap: revert;
flex-wrap: unset;
```
- nowrap
flex 的元素被摆放到到一行,这可能导致 flex 容器溢出。**cross-start** 会根据 [`flex-direction`](https://developer.mozilla.org/zh-CN/docs/Web/CSS/flex-direction) 的值等价于 **start** 或 **before**。为该属性的默认值。
- wrap
flex 元素 被打断到多个行中。**cross-start** 会根据 [`flex-direction`](https://developer.mozilla.org/zh-CN/docs/Web/CSS/flex-direction) 的值等价于 **start** 或**before**。**cross-end** 为确定的 **cross-start** 的另一端。
- wrap-reverse
和 wrap 的行为一样,但是 **cross-start** 和 **cross-end** 互换。
#### 4.11 set去重
- 对于重复的历史搜索进行去重,并控制显示的最大长度
```JavaScript
methods: {
saveKeyWord: async function () {
this.keywordList.push(this.searchKeyword)
this.keywordList = Array.from(new Set(this.keywordList))
if (this.keywordList.length > 10) {
this.keywordList = this.keywordList.slice(this.keywordList.length - 10, this.keywordList.length)
}
localStorage.keywordList = JSON.stringify(this.keywordList)
let result = await searchMusic(this.searchKeyword)
this.searchSongs = result.data.result.songs
console.log(this.searchSongs)
},
```
### 5、JavaScript技巧或函数
#### 5.1 修改数字
`Number.prototype.toFixed()`确定小数点后位数。
```JavaScript
function changeValue (num){
let res = 0
if(num>=100000000){
res = num/100000000
res = res.toFixed(2) + '亿'
}else if(num>10000){
res = num/10000
res = res.toFixed(2) + '万'
}
return res
}
```
#### 5.2 正则分割歌词
- 以换行\n来切割歌词
```javascript
let arr = state.lyric.split(/\n/igs).map((item,i,arr)=>{}
```
#### 5.3 处理歌词样式
- 原始歌词样式

- JavaScript字符串处理
```JavaScript
// vuex/store/index.js
getters:{
lyricList:function(state){
let arr = state.lyric.split(/\n/igs).map((item,i,arr)=>{
let min = parseInt(item.slice(1,3)) ;
let sec = parseInt(item.slice(4,6)) ;
let mill = parseInt(item.slice(7,10));
return {
min,sec,mill,
lyric:item.slice(12,item.length),
content:item,
time:mill+sec*1000+min*60*1000
}
})
//components/playMusic.vue
{{item.lyric}}
import {mapState} from 'vuex' computed:{ ...mapState(['lyric','currentTime','playlist','playCurrentIndex']), }, ``` - 更改后效果  #### 5.4 切换上一首歌词 ```JavaScript // store/index.js setPlayIndex(state,value){ state.playCurrentIndex = value }, // components/playMusic.vue